Difference between revisions of "Sacred 2:The Big Bad Werewolf"
Gogoblender (talk | contribs) |
|||
| Line 1: | Line 1: | ||
| − | |||
| + | <div class="plainlinks"> | ||
| + | {|WIDTH="100%" | ||
| + | |WIDTH="15%" VALIGN="TOP"|__TOC__ | ||
| + | |WIDTH="35%" VALIGN="TOP"| | ||
| + | * '''Quest Objective:''' TYPE IN OBJECTIVE OF QUEST | ||
| + | * '''Quest Difficulty:''' TYPE IN NUMBER OF STARS THIS QUEST INDICATES AS DIFFICULTY | ||
| + | * '''Quest Giver:''' TYPE IN FULL NAME OF NPC QUEST GIVER [[Sacred 2:QUEST GIVER |QUEST GIVER ]] | ||
| + | * '''Location(s):''' TYPE IN REGION AND/OR TOWN THE QUEST IS GIVEN IN [[Sacred 2:REGION|REGION]] [[Sacred 2:PLACE|PLACE]] | ||
| + | * '''Prerequisite Quest:''' TYPE IN PREREQUISITE QUEST IF ONE IS NEEDED TO BE GIVEN THIS [[Sacred 2:QUEST|QUEST]] | ||
| + | * '''Next Quest:''' TYPE IN NAME OF NEXT [[Sacred 2:QUEST|QUEST]] | ||
| + | * '''Reward:''' TYPE IN REWARD RECEIVED UPON COMPLETION OF THIS QUEST [[Sacred 2:Gold|Gold]] [[Sacred 2:Experience|Experience]] | ||
| + | |WIDTH="50%" VALIGN="TOP"|UPLOAD A "TAB" MAP AND "M" MAP PICTURE SHOWING THE LOCATION WHERE THIS QUEST BEGINS AND REPLACE THIS TEXT WITH IT HERE. EXAMPLE: | ||
| + | |||
| + | {{S2frame|[[Image:sample_worldmap.jpg|250px]][[Image:Quest_Name_map.jpg|250px]]|right|'''[[Sacred 2:Map of Ancaria|View the Ancaria Interactive Map]]'''}} | ||
| + | |} | ||
| + | {|WIDTH="100%" | ||
| + | |WIDTH="60%" VALIGN="TOP"| | ||
| + | == Quick Walkthrough == | ||
| + | TYPE IN A FEW SENTENCES WHAT THE QUESTS GOALS ARE AND HOW TO ACHIEVE THEM USING BULLET FORM. FOR EXAMPLE: | ||
| + | * TALK TO "QUEST GIVER" | ||
| + | * KILL 20 "ENEMY TYPE" AND COLLECT "WHATEVER QUEST ITEMS THEY DROP" | ||
| + | * RETURN TO "QUEST GIVER" FOR REWARD | ||
| + | |WIDTH="40%" VALIGN="TOP"|{{S2frame|[[Image:Quest_Location.jpg|500px]]}} | ||
| + | |} | ||
| + | |||
| + | == Detailed Walkthrough == | ||
| + | TYPE IN ADDITIONAL INFO. LINKS TO PICTURES, MAPS, VIDEOS ARE PERMITTED IN THIS FIELD. PICTURES OF DIALOGUES MUST BE 430PX WIDE AND SHOULD NOT BE FRAMED. WHEN YOU WANT TO SHOW A TAB MAP AND "m" MAP IMAGE BESIDE EACHTOTHER IN A FRAME THEY MUST EACH BE SET TO 250PX. | ||
| + | |||
| + | KEEP IN MIND THIS SECTION IS MEANT TO HAVE WRITTEN CONTENT AND NOT JUST FOR PICTURES. TELL THE STORY OF THIS QUEST FOR READERS TO ENJOY. BE CREATIVE AND HAVE FUN WITH IT! | ||
| + | |||
| + | |||
| + | PICTURES SUCH AS TO SHOW LOCATIONS SHOULD BE FRAMED AND MUST BE 400PX WIDE. FRAMED IMAGES NEED A SPECIAL LINE OF CODE AFTER EACH WHICH YOU CAN SEE IN THE CODE BELOW; '''<NOWIKI><br clear="both" /></NOWIKI>''' | ||
| + | |||
| + | {{S2frame|[[Image:Quest_Name_camera1.jpg|400px]]|left}} | ||
| + | <br clear="both" /> | ||
| + | |||
| + | |||
| + | {{S2frame|[[Image:Quest_Name_camera2.jpg|400px]]|left}} | ||
| + | <br clear="both" /> | ||
| + | |||
| + | WHEN YOU WANT TO SHOW A TAB MAP AND "m" MAP IMAGE BESIDE EACHTOTHER IN A FRAME THEY MUST EACH BE SET TO 250PX. | ||
| + | {{S2frame|[[Image:sample_worldmap.jpg|250px]][[Image:Quest_Name_map.jpg|250px]]|left]]}} | ||
| + | <br clear="both" /> | ||
| + | |||
| + | |||
| + | DIALOGUES CAN BE CUT OUT NICELY LIKE THIS ONE: | ||
| + | |||
| + | [[Image:NPC_name_dialog.jpg|430px]] | ||
| + | |||
| + | OR CROPPED WITH A FRAME: | ||
| + | |||
| + | {{S2frame|[[Image:NPC_name_dialog2.jpg|430px]]|left}} | ||
| + | <br clear="both" /> | ||
| + | |||
| + | == Quest Enemies == | ||
| + | QUEST ENEMIES SHOULD BE IMPORTED FROM THEIR OWN PAGE USING THE EXAMPLE CODE BELOW. DESCRIBE ANY SPECIAL ATTACKS THEY HAVE OR OTHER IMPORTANT INFO IF YOU LIKE. | ||
| − | + | === [[Sacred 2:Sample Enemy|Sample Enemy]] === | |
| + | {{:Sacred 2:Sample Enemy}} | ||
| + | |||
| + | == Hirelings and Escorts == | ||
| + | REPLACE THE BELOW WITH THE NAMES OF ANY HIRELINGS OR ESCORTS THAT ARE INVOLVED IN THIS QUEST. BRIEFLY DESCRIBE THEIR INVOLVEMENT. HOW DO THE BEHAVE WHEN THEY ARE WITH YOU? wILL YOU FAIL THE QUEST IF THEY DIE? | ||
| + | |||
| + | * [[Sacred 2:Warrior|Warrior]] - Hireling. Not Immortal. Tries to fight. If killed quest will fail. | ||
| + | * [[Sacred 2:Child|Child]] - Escort. Immortal. Tries to escape the fight. | ||
| + | |||
| + | |||
| + | == Logbook Entry == | ||
| + | UPLOAD A PICTURE SHOWING THE LOGBOOK FOR THIS QUEST AND REPLACE THIS TEXT WITH A THUMBNAIL OF IT HERE. EXAMPLE: | ||
{| | {| | ||
| − | | | + | |{{S2frame|[[Image:Quest Name log1.jpg|300px]]|left}} |
| − | + | |{{S2frame|[[Image:Quest Name log1.jpg|300px]]|left}} | |
| − | |||
| − | |||
| − | |||
| − | |||
| − | |||
| − | |||
| − | |||
| − | |||
| − | |||
| − | |||
|} | |} | ||
| − | == | + | |
| − | + | == Notes == | |
| − | + | TYPE IN ANY POSSIBLE BUGS, EXPLOITS, TRICKS, HINTS, SHORTCUTS ETC | |
| − | + | ||
| + | |||
| + | |||
| + | </div> | ||
| + | DECIDE WHICH OF THE FOLLOWING CATEGORY('S) APPLY TO THIS QUEST (LEAVE IN THE SACRED 2 QUEST CATEGORY) AND DELETE THOSE THAT DO NOT APPLY(AS WELL AS THIS COMMENT): | ||
| + | [[Category:Sacred 2 Quest|{{PAGENAME}}]] | ||
| + | [[Category:Sacred 2 Side Quest|{{PAGENAME}}]] | ||
| + | [[Category:Sacred 2 Chain Quest]|{{PAGENAME}}]] | ||
| + | [[Category:Sacred 2 Class Quest|{{PAGENAME}}]] | ||
| + | [[Category:Sacred 2 Light Path Quest|{{PAGENAME}}]] | ||
| + | [[Category:Sacred 2 Shadow Path Quest|{{PAGENAME}}]] | ||
| + | [[Category:Sacred 2 Light Campaign Quest|{{PAGENAME}}]] | ||
| + | [[Category:Sacred 2 Shadow Campaign Quest|{{PAGENAME}}]] | ||
| + | [[Category:Sacred 2 CM Patch Quest|{{SUBPAGENAME}}]] | ||
| + | |||
| + | |||
| + | |||
| + | |||
| + | |||
| + | |||
| + | |||
Revision as of 18:41, 18 December 2011
|
UPLOAD A "TAB" MAP AND "M" MAP PICTURE SHOWING THE LOCATION WHERE THIS QUEST BEGINS AND REPLACE THIS TEXT WITH IT HERE. EXAMPLE:
| ||||||||||
Quick WalkthroughTYPE IN A FEW SENTENCES WHAT THE QUESTS GOALS ARE AND HOW TO ACHIEVE THEM USING BULLET FORM. FOR EXAMPLE:
|
| |||||||||

Detailed Walkthrough
TYPE IN ADDITIONAL INFO. LINKS TO PICTURES, MAPS, VIDEOS ARE PERMITTED IN THIS FIELD. PICTURES OF DIALOGUES MUST BE 430PX WIDE AND SHOULD NOT BE FRAMED. WHEN YOU WANT TO SHOW A TAB MAP AND "m" MAP IMAGE BESIDE EACHTOTHER IN A FRAME THEY MUST EACH BE SET TO 250PX.
KEEP IN MIND THIS SECTION IS MEANT TO HAVE WRITTEN CONTENT AND NOT JUST FOR PICTURES. TELL THE STORY OF THIS QUEST FOR READERS TO ENJOY. BE CREATIVE AND HAVE FUN WITH IT!
PICTURES SUCH AS TO SHOW LOCATIONS SHOULD BE FRAMED AND MUST BE 400PX WIDE. FRAMED IMAGES NEED A SPECIAL LINE OF CODE AFTER EACH WHICH YOU CAN SEE IN THE CODE BELOW; <br clear="both" />
|
| ||
 |
||
|
| ||
 |
||
WHEN YOU WANT TO SHOW A TAB MAP AND "m" MAP IMAGE BESIDE EACHTOTHER IN A FRAME THEY MUST EACH BE SET TO 250PX.
|
| ||
  |
||
DIALOGUES CAN BE CUT OUT NICELY LIKE THIS ONE:

OR CROPPED WITH A FRAME:
|
| ||
 |
||
Quest Enemies
QUEST ENEMIES SHOULD BE IMPORTED FROM THEIR OWN PAGE USING THE EXAMPLE CODE BELOW. DESCRIBE ANY SPECIAL ATTACKS THEY HAVE OR OTHER IMPORTANT INFO IF YOU LIKE.
Sample Enemy
|
|
Damage Types: Weakest Against: Quest:Sample Quest Quest Location: Place Name in Region Name | ||||||||||||||||||


Hirelings and Escorts
REPLACE THE BELOW WITH THE NAMES OF ANY HIRELINGS OR ESCORTS THAT ARE INVOLVED IN THIS QUEST. BRIEFLY DESCRIBE THEIR INVOLVEMENT. HOW DO THE BEHAVE WHEN THEY ARE WITH YOU? wILL YOU FAIL THE QUEST IF THEY DIE?
- Warrior - Hireling. Not Immortal. Tries to fight. If killed quest will fail.
- Child - Escort. Immortal. Tries to escape the fight.
Logbook Entry
UPLOAD A PICTURE SHOWING THE LOGBOOK FOR THIS QUEST AND REPLACE THIS TEXT WITH A THUMBNAIL OF IT HERE. EXAMPLE:
|
| ||||||||||||||||||

Notes
TYPE IN ANY POSSIBLE BUGS, EXPLOITS, TRICKS, HINTS, SHORTCUTS ETC
DECIDE WHICH OF THE FOLLOWING CATEGORY('S) APPLY TO THIS QUEST (LEAVE IN THE SACRED 2 QUEST CATEGORY) AND DELETE THOSE THAT DO NOT APPLY(AS WELL AS THIS COMMENT): [[Category:Sacred 2 Chain Quest]|The Big Bad Werewolf]]
Detailed Walkthrough
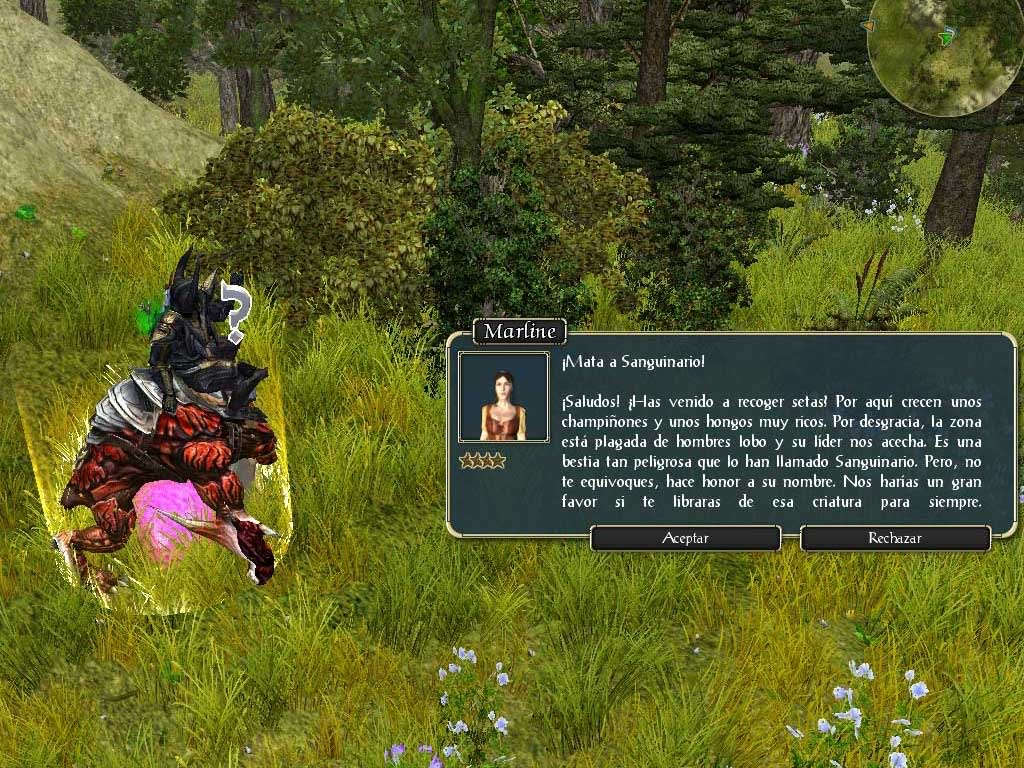
While you were wandering in the forests east form Griffinborough you find a woman called Marline, who tells you she is picking up some mushrooms. After spending some minutes speaking with the woman, she tells you about a terrible werewolf that has been seen in the nearby forests.
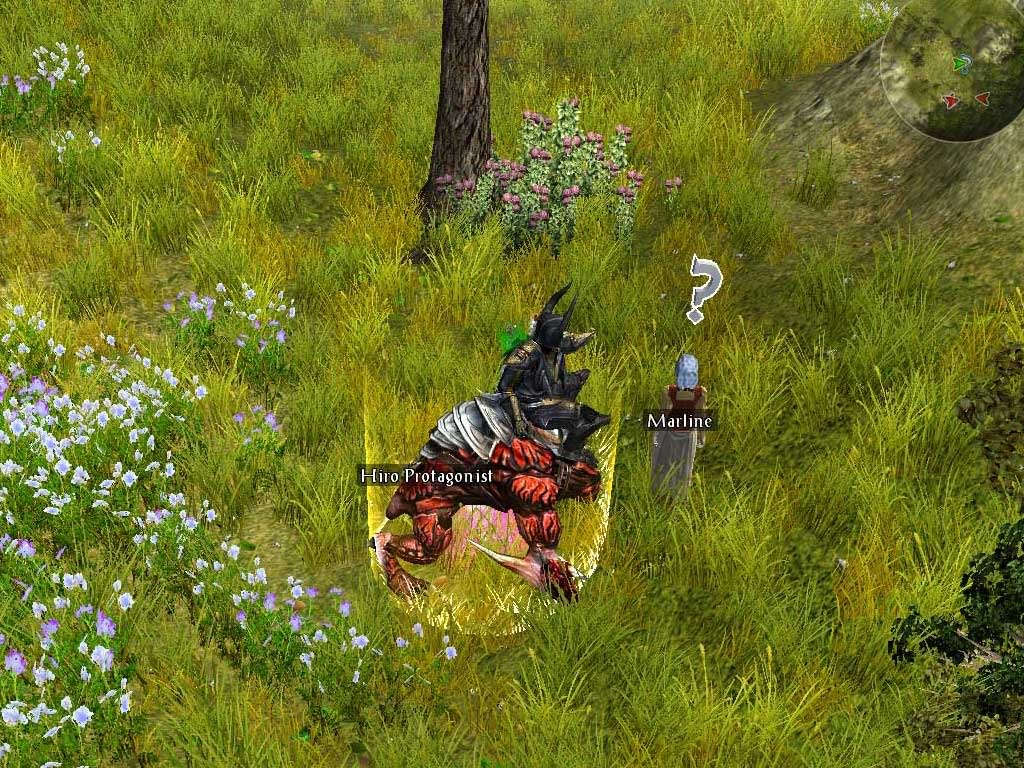
Wondering why the woman keeps picking up mushrooms despite the known danger you start walking deeper in the forest. After looking around for a while, finally you find a small path crossing through the middle of the forest.
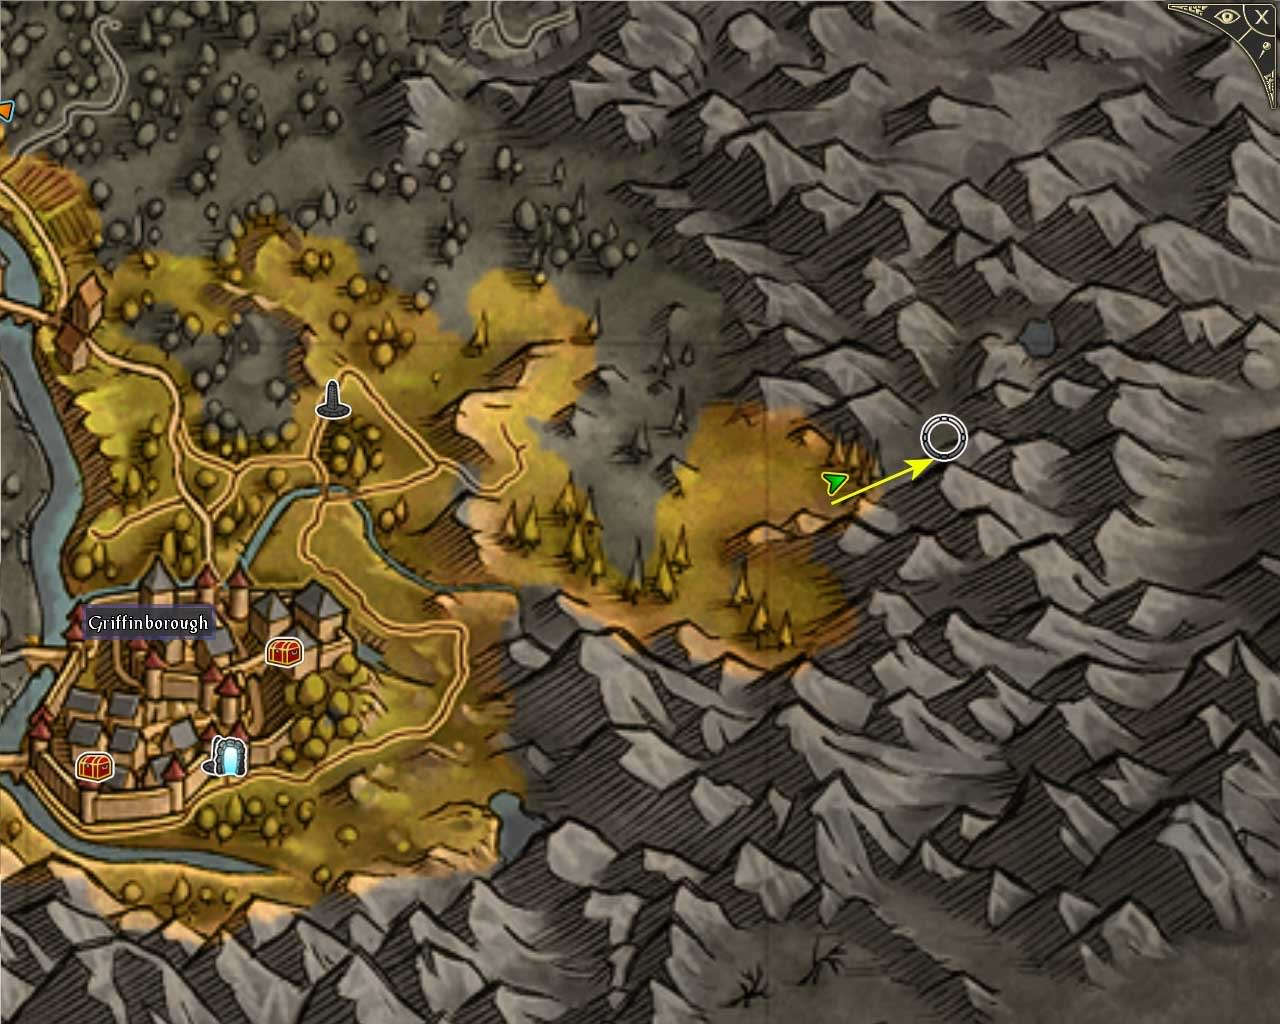

You follow the path up between two hills and just when you arrive into a clear in the path ...the Werewolf Bloodclaw comes out from his hideout and attacks you!

You fight bravely the Werewolf Bloodclaw. After beating the beast you feel quite proud of yourself... that's been a great fight!
Logbook Entry
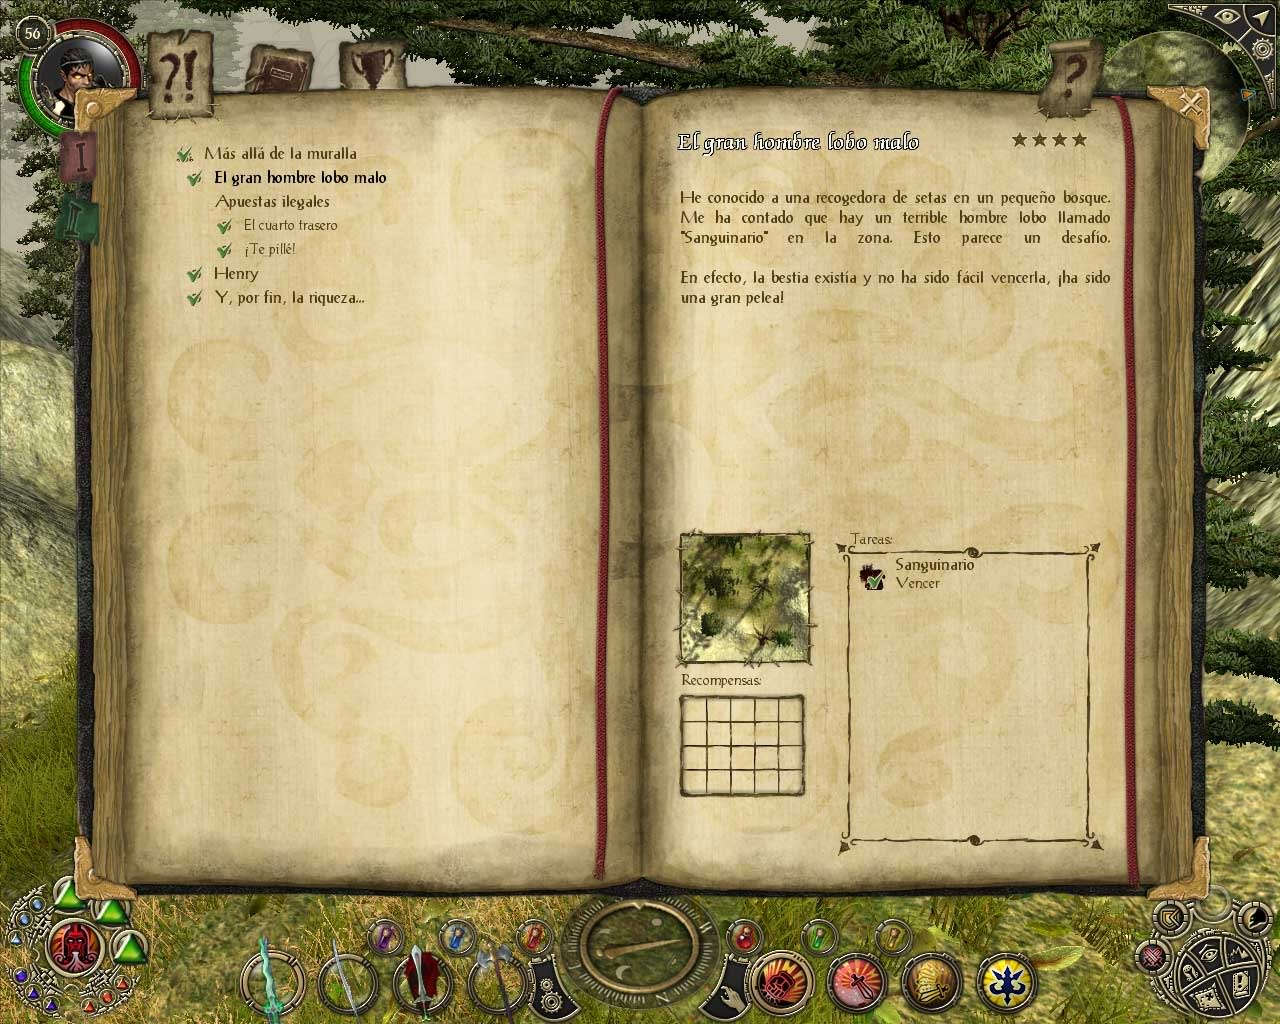
Notes
The path entrance up to the Werewolf Bloodclaw hideout isn't very clear, so probably you won't see it at first sight. The mini-map view is a good help to quickly find out the path.