Difference between revisions of "Sacred 2:The Lover"
(removed old dialogue pics) |
|||
| Line 1: | Line 1: | ||
{{Languages}} | {{Languages}} | ||
| − | |||
| − | |||
| Line 25: | Line 23: | ||
* Lead [[Sacred 2:Mary Ann|Mary Ann]] through the [[Sacred 2:The Lair of Orpheus|The Lair of Orpheus]] to her lover. | * Lead [[Sacred 2:Mary Ann|Mary Ann]] through the [[Sacred 2:The Lair of Orpheus|The Lair of Orpheus]] to her lover. | ||
* Talk to her lover, [[Sacred 2:Logamir|Logamir]]. | * Talk to her lover, [[Sacred 2:Logamir|Logamir]]. | ||
| − | * Find [[Sacred 2:Orpheus - | + | * Find [[Sacred 2:Orpheus - NPC|Orpheus]]. |
| − | * Talk to [[Sacred 2:Orpheus - | + | * Talk to [[Sacred 2:Orpheus - NPC|Orpheus]]. |
| Line 35: | Line 33: | ||
{{S2 Dialogue|NPC NAME=Mary Ann|PORTRAIT FILE NAME=dialog025.png|DIALOGUE=Accompany me on my journey to the underworld! | {{S2 Dialogue|NPC NAME=Mary Ann|PORTRAIT FILE NAME=dialog025.png|DIALOGUE=Accompany me on my journey to the underworld! | ||
| − | My lover is dead and yet I hear him crying out for help at night. A learned gentleman told me that it is possible to bring him back from the dead. | + | My lover is dead and yet I hear him crying out for help at night. A learned gentleman told me that it is possible to bring him back from the dead. I beg you, accompany me to the underworld!}} |
| Line 42: | Line 40: | ||
[http://www.sacredwiki.org/images/Sacred_2/quests/Chapter01/Orpheus/The%20Lover/sacred2Orpheus1wt1.jpg http://www.sacredwiki.org/images/Sacred_2/quests/Chapter01/Orpheus/The%20Lover/th_sacred2Orpheus1wt1.jpg] [http://www.sacredwiki.org/images/Sacred_2/quests/Chapter01/Orpheus/The%20Lover/sacred2Orpheus1wt2.jpg http://www.sacredwiki.org/images/Sacred_2/quests/Chapter01/Orpheus/The%20Lover/th_sacred2Orpheus1wt2.jpg] | [http://www.sacredwiki.org/images/Sacred_2/quests/Chapter01/Orpheus/The%20Lover/sacred2Orpheus1wt1.jpg http://www.sacredwiki.org/images/Sacred_2/quests/Chapter01/Orpheus/The%20Lover/th_sacred2Orpheus1wt1.jpg] [http://www.sacredwiki.org/images/Sacred_2/quests/Chapter01/Orpheus/The%20Lover/sacred2Orpheus1wt2.jpg http://www.sacredwiki.org/images/Sacred_2/quests/Chapter01/Orpheus/The%20Lover/th_sacred2Orpheus1wt2.jpg] | ||
<br> | <br> | ||
| − | Talk to [[Sacred 2:Logamir|Logamir]] and he will ask you to help them escape. Your first task is to kill [[Sacred 2:Orpheus - | + | Talk to [[Sacred 2:Logamir|Logamir]] and he will ask you to help them escape. Your first task is to kill [[Sacred 2:Orpheus - NPC|Orpheus]]... |
{{S2 Dialogue|NPC NAME=Logamir|PORTRAIT FILE NAME=000543a.png|DIALOGUE=You have succeeded in bringing my beloved Mary Ann this far. Please help us find a way out of the underworld! But first: Kill Orpheus!}} | {{S2 Dialogue|NPC NAME=Logamir|PORTRAIT FILE NAME=000543a.png|DIALOGUE=You have succeeded in bringing my beloved Mary Ann this far. Please help us find a way out of the underworld! But first: Kill Orpheus!}} | ||
| − | Head out of the chamber and go south into a large room of enemies. Fortunately you don't have to worry too much about the two lovers at this point. Head to the northwest corner of the room and follow the corridor north into another small chamber where [[Sacred 2:Orpheus - | + | Head out of the chamber and go south into a large room of enemies. Fortunately you don't have to worry too much about the two lovers at this point. Head to the northwest corner of the room and follow the corridor north into another small chamber where [[Sacred 2:Orpheus - NPC|Orpheus]] is waiting. The quest will update as completed as you approach him, however, if you don't want Mary Ann and her lover following you around everywhere, you now need to talk to Orpheus and pick which of the two possible endings you want this tale to have. |
<br> | <br> | ||
[http://www.sacredwiki.org/images/Sacred_2/quests/Chapter01/Orpheus/The%20Lover/sacred2Orpheus1wt3.jpg http://www.sacredwiki.org/images/Sacred_2/quests/Chapter01/Orpheus/The%20Lover/th_sacred2Orpheus1wt3.jpg] | [http://www.sacredwiki.org/images/Sacred_2/quests/Chapter01/Orpheus/The%20Lover/sacred2Orpheus1wt3.jpg http://www.sacredwiki.org/images/Sacred_2/quests/Chapter01/Orpheus/The%20Lover/th_sacred2Orpheus1wt3.jpg] | ||
| Line 73: | Line 71: | ||
* Bug: Some of the Tasks and Log entries for the quest [[Sacred 2:Changing Sides|Changing Sides]] appear to update under the log for this quest. | * Bug: Some of the Tasks and Log entries for the quest [[Sacred 2:Changing Sides|Changing Sides]] appear to update under the log for this quest. | ||
* Tip: The quest [[Sacred 2:Changing Sides|Changing Sides]] results in more EXP overall - this may be a consideration if you are not playing in character. | * Tip: The quest [[Sacred 2:Changing Sides|Changing Sides]] results in more EXP overall - this may be a consideration if you are not playing in character. | ||
| − | |||
| − | |||
| − | |||
</div> | </div> | ||
| − | |||
[[Category:Sacred 2 Quest|{{SUBPAGENAME}}]] | [[Category:Sacred 2 Quest|{{SUBPAGENAME}}]] | ||
[[Category:Sacred 2 Chain Quest Part|{{SUBPAGENAME}}]] | [[Category:Sacred 2 Chain Quest Part|{{SUBPAGENAME}}]] | ||
[[Category:Sacred 2 Tyr Lysia Quest|{{PAGENAME}}]] | [[Category:Sacred 2 Tyr Lysia Quest|{{PAGENAME}}]] | ||
Latest revision as of 03:47, 23 August 2019
|

|
Quick Walkthrough
- Talk to Mary Ann.
- Lead Mary Ann to the The Lair of Orpheus.
- Lead Mary Ann through the The Lair of Orpheus to her lover.
- Talk to her lover, Logamir.
- Find Orpheus.
- Talk to Orpheus.
Detailed Walkthrough
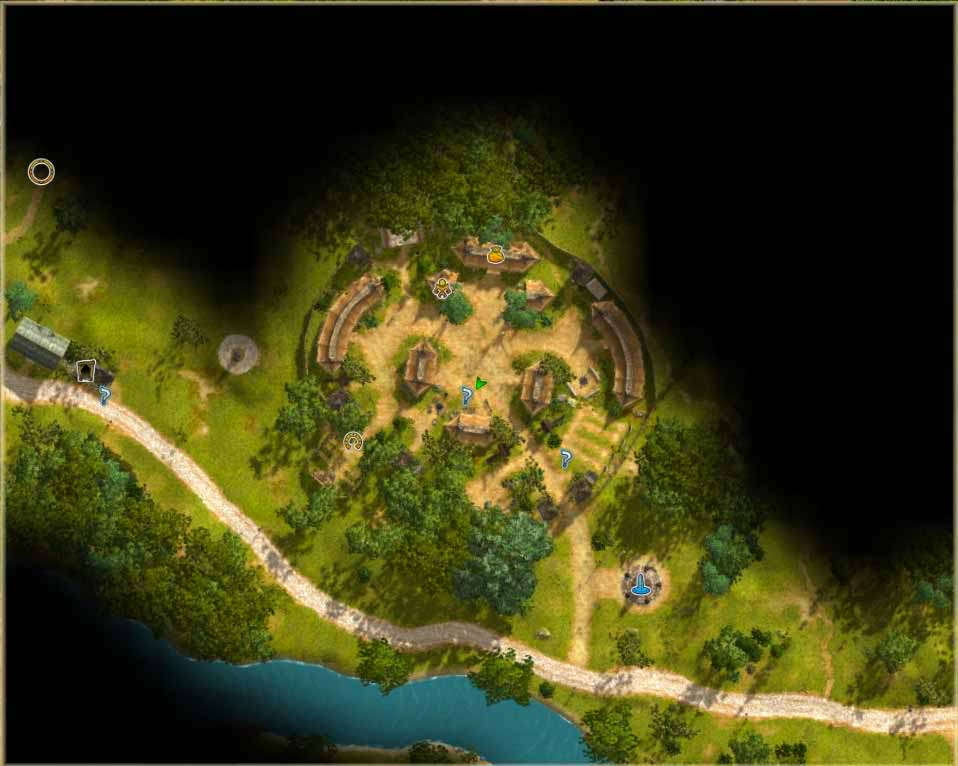
Talk to Mary Ann to learn that her lover is dead, but she plans to free him from the underworld and lead him back to life. She will then join your party.


Accompany me on my journey to the underworld!
My lover is dead and yet I hear him crying out for help at night. A learned gentleman told me that it is possible to bring him back from the dead. I beg you, accompany me to the underworld!
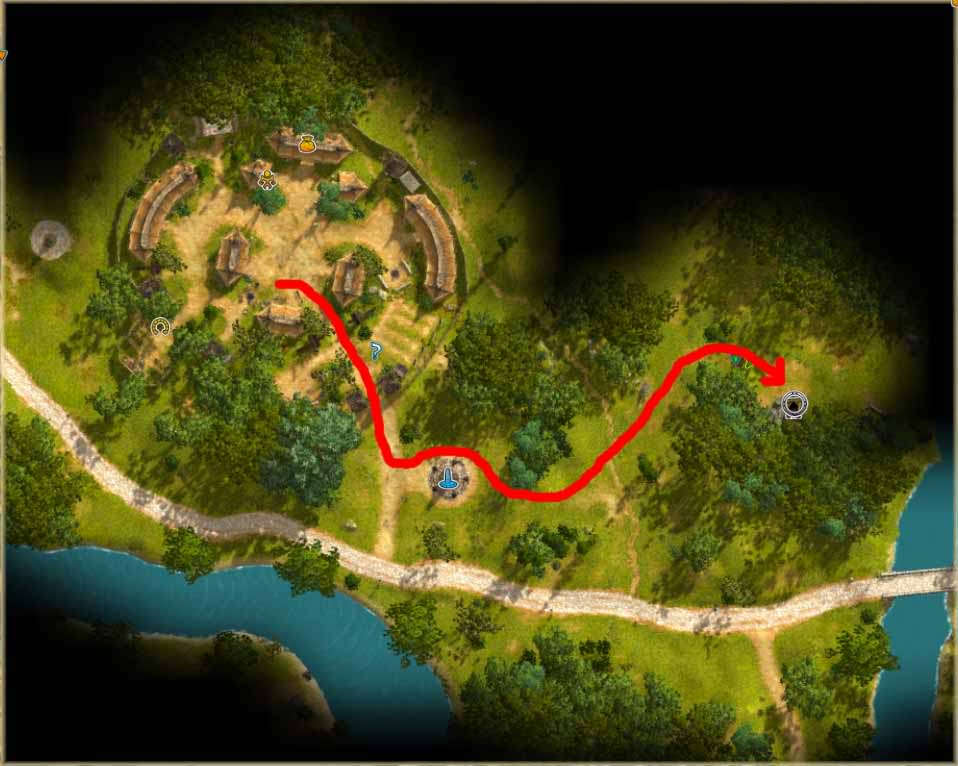
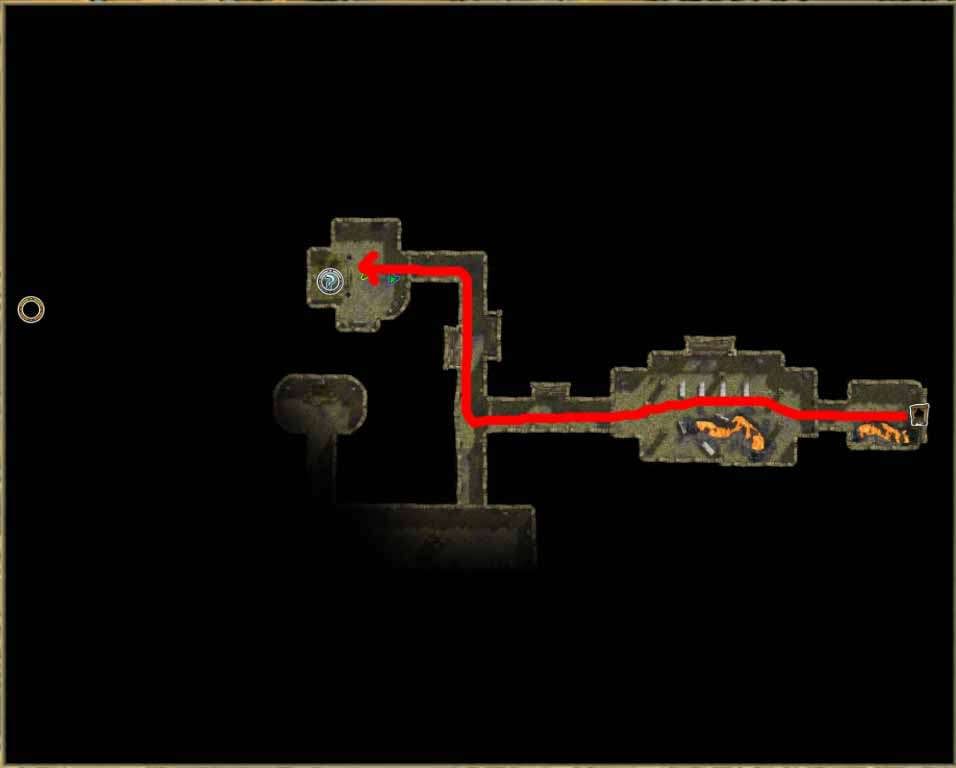
Lead her out of the High Elf Outpost 2 and then northeast from the nearby Resurrection Monument to the 'underworld' entrance. Head west in the The Lair of Orpheus and then north at the T-Junction. Logamir, her lover, is in the small chamber at the end of the corridor.
Talk to Logamir and he will ask you to help them escape. Your first task is to kill Orpheus...


You have succeeded in bringing my beloved Mary Ann this far. Please help us find a way out of the underworld! But first: Kill Orpheus!
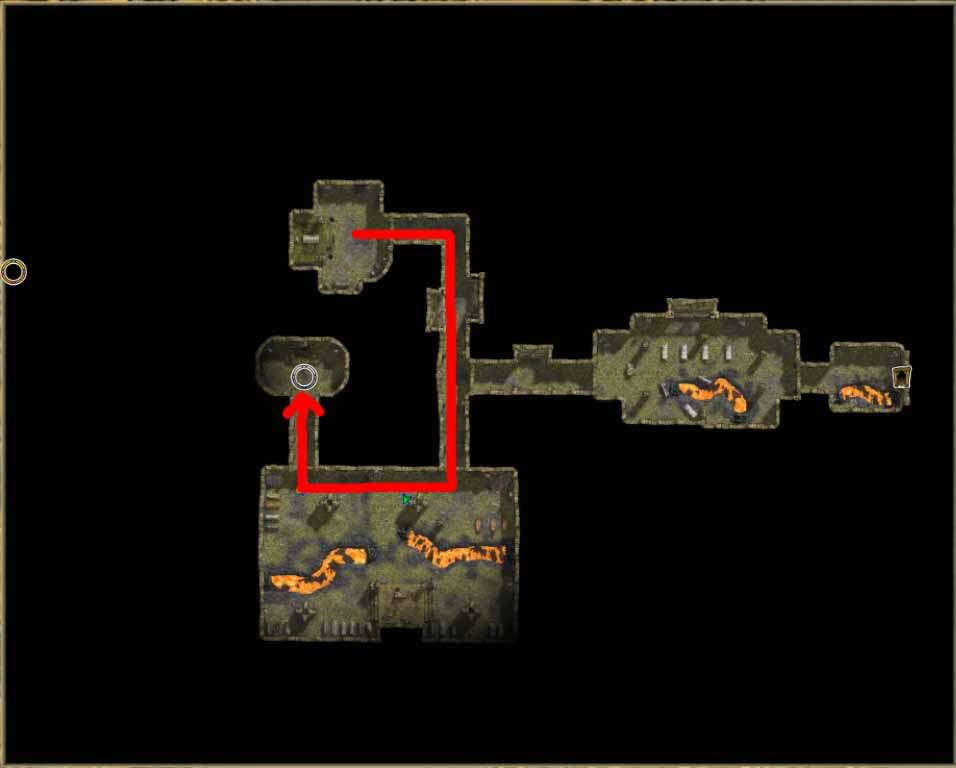
Head out of the chamber and go south into a large room of enemies. Fortunately you don't have to worry too much about the two lovers at this point. Head to the northwest corner of the room and follow the corridor north into another small chamber where Orpheus is waiting. The quest will update as completed as you approach him, however, if you don't want Mary Ann and her lover following you around everywhere, you now need to talk to Orpheus and pick which of the two possible endings you want this tale to have.


Kill the mortal and destroy the spirit.
You have brought new life to a love most foul, how touching. Honestly, it fills my heart with joy! I'm afriad I can't let you leave though. I mean, what would all the other Demons say? I could do you one small favor, I could reunite you forever... in death.
If you pick In Orpheus' Service, then you will receive the quest Orpheus Himself.
If you pick Destroying Orpheus, then you will receive the quest Changing Sides.
Logbook Entry
After Changing Sides is completed
After Orpheus Himself is completed

Notes
- Bug: Some of the Tasks and Log entries for the quest Changing Sides appear to update under the log for this quest.
- Tip: The quest Changing Sides results in more EXP overall - this may be a consideration if you are not playing in character.