Difference between revisions of "Sacred 2:Bad Sheep"
Jump to navigation
Jump to search
(Applied quest template) |
(Quest page completed - See small experiment, should compact detailed content) |
||
| Line 1: | Line 1: | ||
| − | |||
| − | |||
| − | |||
<div class="plainlinks"> | <div class="plainlinks"> | ||
{|WIDTH="100%" | {|WIDTH="100%" | ||
|WIDTH="15%" VALIGN="TOP"|__TOC__ | |WIDTH="15%" VALIGN="TOP"|__TOC__ | ||
|WIDTH="35%" VALIGN="TOP"| | |WIDTH="35%" VALIGN="TOP"| | ||
| − | * '''Quest Objective:''' | + | * '''Quest Objective:''' Kill all of Jacob's mutated sheep |
| − | * '''Quest Difficulty:''' | + | * '''Quest Difficulty:''' 2 stars |
| − | * '''Quest Giver:''' | + | * '''Quest Giver:''' [[Sacred 2:Shepherd Jacob|Shepherd Jacob]] |
| − | * '''Location(s):''' | + | * '''Location(s):''' [[Sacred 2:Artamark|Artamark]], in [[Sacred 2:Ulli's_Potato_Field|Ulli's Potato Field]], near [[Sacred 2:Skook's_Corner|Skook's Corner]] |
| − | * '''Prerequisite Quest:''' | + | * '''Prerequisite Quest:''' None |
| − | * '''Next Quest:''' | + | * '''Next Quest:''' None |
| − | * '''Reward:''' | + | * '''Reward:''' [[Sacred 2:Experience|Experience]] |
| − | |WIDTH="50%" VALIGN="TOP"| | + | |WIDTH="50%" VALIGN="TOP"| |
| − | + | {{S2frame|[[Image:BadSheep_TabMap1.jpg|250px]][[Image:BadSheep_Map1.jpg|250px]]|right|'''[[Sacred 2:Map of Ancaria|View the Ancaria Interactive Map]]'''}} | |
| − | {{S2frame|[[Image: | ||
|} | |} | ||
{|WIDTH="100%" | {|WIDTH="100%" | ||
|WIDTH="60%" VALIGN="TOP"| | |WIDTH="60%" VALIGN="TOP"| | ||
== Quick Walkthrough == | == Quick Walkthrough == | ||
| − | + | * Talk to Shepherd Jacob | |
| − | * | + | * Find and kill all Jacob's mutated sheep |
| − | * | + | * Talk back to Shepherd Jacob to get your reward |
| − | * | + | |WIDTH="40%" VALIGN="TOP"|{{S2frame|[[Image:BadSheep_SepherdJacob.jpg|500px]]}} |
| − | |WIDTH="40%" VALIGN="TOP"|{{S2frame|[[Image: | ||
|} | |} | ||
== Detailed Walkthrough == | == Detailed Walkthrough == | ||
| − | + | {| | |
| + | |WIDTH="300px" VALIGN="TOP"|<br>On your trip north to [[Sacred 2:Artamark's Gate|Artamark's Gate]] you meet Shepherd Jacob in [[Sacred 2:Ulli's Potato Field|Ulli's Potato Field]]. He tells you he's been attacked by his own sheep! That sounds strange, specially when you see the man is in absolute panic... you wonder what happened to those sheep, so you ask Jacob where the sheep are right now and you decide to look for them. | ||
| + | |WIDTH="50px"| | ||
| + | |{{S2frame|[[Image:BadSheep_SepherdJacobDialog1.jpg|430px]]|left}} | ||
| + | <br clear="both" /> | ||
| + | |} | ||
| − | + | {| | |
| − | + | |WIDTH="300px" VALIGN="TOP"|<br>You are told to find the sheep in the nearby mountain slope, so you begin walking north-east with your eyes wide open... you can smell something in the air! | |
| − | + | |WIDTH="50px"| | |
| − | + | |{{S2frame|[[Image:BadSheep_SheepMap.jpg|250px]][[Image:BadSheep_SheepTabMap.jpg|250px]]|left]]}} | |
| − | |||
| − | {{S2frame|[[Image: | ||
<br clear="both" /> | <br clear="both" /> | ||
| + | |} | ||
| − | + | {| | |
| − | {{S2frame|[[Image: | + | |WIDTH="300px" VALIGN="TOP"|<br>After a short walk you find all the sheep toghether. They seem to be eating grass pacefully, but as soon as you get close to them... the sheep are mutated! And they attack you!! |
| + | |WIDTH="50px"| | ||
| + | |{{S2frame|[[Image:BadSheep_MutatedSheep.jpg|400px]]|left}} | ||
<br clear="both" /> | <br clear="both" /> | ||
| + | |} | ||
| − | + | {| | |
| − | {{S2frame|[[Image: | + | |WIDTH="300px" VALIGN="TOP"|<br>Finally you run back to talk again with Shepherd Jacob and explain him what happened. Obviously the man is upset! He's lost his sheep, everything he had... but he's a honest man and gives you the reward he promised! |
| + | |WIDTH="50px"| | ||
| + | |{{S2frame|[[Image:BadSheep_ShepherdJacobEnd.jpg|400px]]|left}}{{S2frame|[[Image:BadSheep_ShepherdJacobEndDialog.jpg|430px]]|left}} | ||
<br clear="both" /> | <br clear="both" /> | ||
| + | |} | ||
| − | |||
| − | |||
| − | |||
| − | |||
| − | |||
| − | |||
| − | |||
| − | |||
== Quest Enemies == | == Quest Enemies == | ||
| − | |||
| − | === [[Sacred 2: | + | === [[Sacred 2:Badly Mutated Sheep|Badly Mutated Sheep]] === |
| − | {{:Sacred 2: | + | {{:Sacred 2:Badly Mutated Sheep}} |
== Hirelings and Escorts == | == Hirelings and Escorts == | ||
| − | |||
| − | |||
| − | |||
| − | |||
== Logbook Entry == | == Logbook Entry == | ||
| − | |||
{| | {| | ||
| − | |{{S2frame|[[Image: | + | |{{S2frame|[[Image:BadSheep_Logbook.jpg|300px]]|left}} |
| − | |||
|} | |} | ||
== Notes == | == Notes == | ||
| − | |||
</div> | </div> | ||
| − | |||
[[Category:Sacred 2 Quest|{{PAGENAME}}]] | [[Category:Sacred 2 Quest|{{PAGENAME}}]] | ||
[[Category:Sacred 2 Side Quest|{{PAGENAME}}]] | [[Category:Sacred 2 Side Quest|{{PAGENAME}}]] | ||
| − | |||
| − | |||
| − | |||
| − | |||
| − | |||
| − | |||
| − | |||
Revision as of 21:30, 31 May 2011
|
| ||||||||||


Quick Walkthrough
|
| |||||||||

Detailed Walkthrough
On your trip north to Artamark's Gate you meet Shepherd Jacob in Ulli's Potato Field. He tells you he's been attacked by his own sheep! That sounds strange, specially when you see the man is in absolute panic... you wonder what happened to those sheep, so you ask Jacob where the sheep are right now and you decide to look for them. |
| ||||||||||
You are told to find the sheep in the nearby mountain slope, so you begin walking north-east with your eyes wide open... you can smell something in the air! |
| ||||||||||


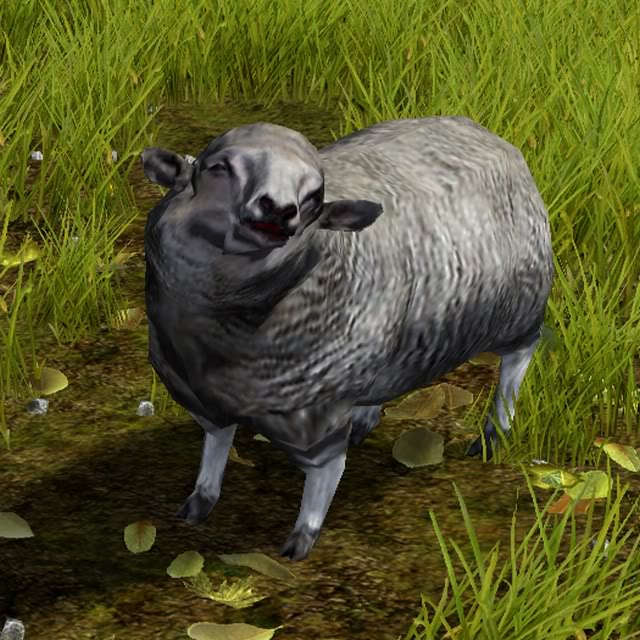
After a short walk you find all the sheep toghether. They seem to be eating grass pacefully, but as soon as you get close to them... the sheep are mutated! And they attack you!! |
| ||||||||||

Finally you run back to talk again with Shepherd Jacob and explain him what happened. Obviously the man is upset! He's lost his sheep, everything he had... but he's a honest man and gives you the reward he promised! |
| |||||||||||||||||||

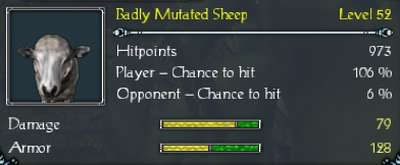
Quest Enemies
Badly Mutated Sheep
|
|
Damage Types: Weakest Against: Quest:Bad Sheep Quest Location: Ulli's Potato Field in Artamark | ||||||||||||||||||


Hirelings and Escorts
Logbook Entry
| |||||||||
