Sacred:Interface
Contents
Game Environment
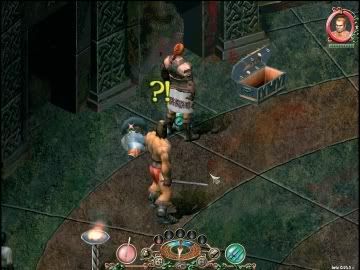
Press the ALT key to view the objects on the ground, and also the names of both neutral characters and opponents. Additionally, various icons above neutral characters inform you about their current intentions.
1. Left-click on an unoccupied space to move the Gladiator.
2. An NPC that is open for a short chat or has a task they would like you to tackle.
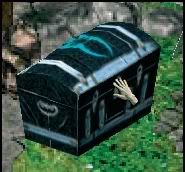
3. Left-click on boxes, chests, cabinets and other containers to open them. Press and hold the ALT key to view the names of the objects.
4. A colorful sparkle marks objects that can be collected. Press and hold the ALT key in order to display the names of all visible objects. 5. Move the mouse cursor onto the health display or the green bar to display a window with exact numeric values. Note: During the game, other characters may join you in your quest. Their portraits are displayed underneath yours and include information on their health.
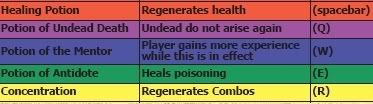
6. The large needle of the quest compass always points directly towards the next main goal. If a sub quest has been completed, then a small blue compass needle points towards the person who has given you the quest. This is where you can claim your reward. If the task involves eliminating an enemy group, a small red compass needle shows the position of the nearest enemy. If you have placed a goal marker on the Ancaria world map (M key), another compass needle (also red) points precisely towards that point. Arranged around the compass are icons for five different potions:
The World and the Map
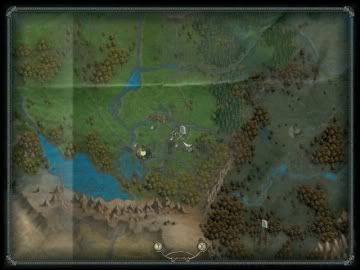
There are two different maps that will help you find your way around Ancaria.
1. The overview map. On this map you can see all of Ancaria, including the names of places and attractions. Dotted red lines show how much of the country you have explored already. You can access the world map with the M key during the game.
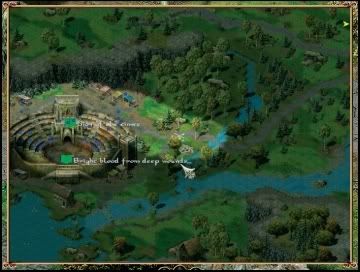
2. You can access a more
detailed overview of your
immediate surroundings by using
the TAB key. The area you
have not yet explored is shown
in black and therefore not visible
on this map. In the regions you
have already explored, colored
dots show where enemies (red),
neutral characters (blue),
important NPCs - they might give
you a task to complete, for
instance - (white), and dropped
objects (gray) are located.
Equipment, Traders and Private Stash
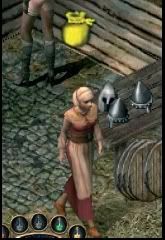
Every larger settlement provides a special (blue) chest for your private possessions. This allows you to store the equipment you don't currently need but do not want to sell at this point.
Traders are designated by a bag of gold on the map. Click on the trader to access the trade menu. When purchasing an object, leftclick on it and confirm your purchase. It is even easier when you right-click on it: This way you purchase the object right away - the price is automatically deducted from the gold you own.
Menu
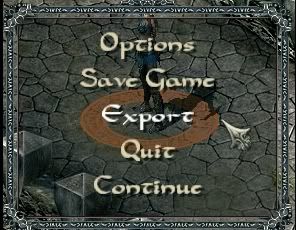
You can access the menu using the ESC key during the game.
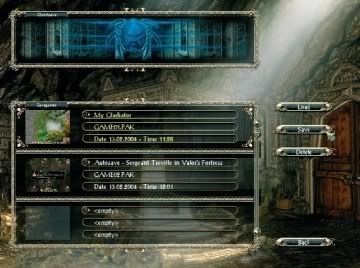
Click on Saved games to access the menu in which you can save the game. At the center, you will see the slots for saved games as well as the name for that game. Click on one of the slots. This activates the Save, Load and Delete buttons that allow you to save, load or delete a game.
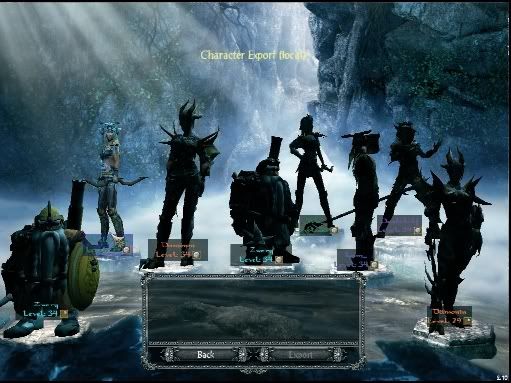
Importing/Exporting Characters
You can export your hero at any time. Just
use the ESC key to open the menu and select
the Export option. Then choose an unoccupied
pedestal for your character and click on
Export.
Your character and all its associated properties, objects and Combat Arts are now saved to the hard disk. When starting a new game, you can import a previously exported character. Just choose New Campaign in the Main Menu, then click on Import.
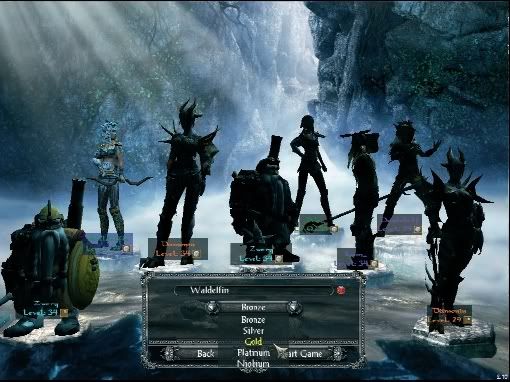
The saved characters are now displayed for selection. Select the character and the desired difficulty level and launch yourself into the adventure again.
Character Properties
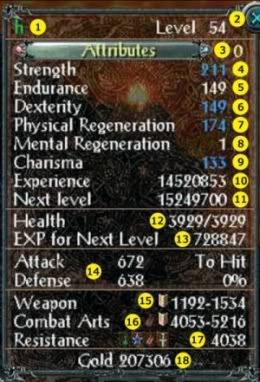
This window (displayed when you open the inventory [I]) provides information
about your character.
1. Your character.
2. Current level of experience.
3. Attribute points available for distribution.
4. Strength: increases the attack value and the melee damage.
5. Endurance: influences the bodys inherent protection and reduces the effects of poison.
6. Dexterity: influences defense values and ranged combat damage.
7. Physical Regeneration: speeds up the regeneration of health and combat arts.
8. Mental Regeneration: increases the damage of your spells and reduces the time you need to regenerate from poison attacks.
9. Charismatic characters benefit from lower prices when dealing with traders; such characters are often favored by certain gods, granting increased poison damage.
10. Experience points accumulated to date.
11. When you reach this experience value, your character gains a level.
12. The value in front shows your current state of health, the second value shows the maximum health.
13. This is the amount of points required to reach the next level of experience.
14. Attack, Defense and Hit Chance: This displays the values for your current weapon and armor in relation to the last opponent you have defeated.
15. The damage value and the type of weapon currently equipped.
16. The damage value and the type of Combat Art currently activate.
17. The cumulative resistance value.
18. Gold carried.
Weapon Properties
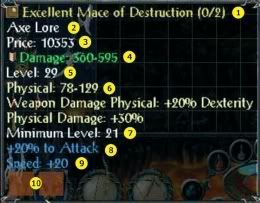
1. Weapon name - the color shows
how rare this weapon is. Regular
weapons are white, golden
weapons are extremely rare. The
figure in brackets shows the
number of available smithing slots
and the number of slots already
occupied.
2. Skill base of weapon.
3. Price you will receive if you sell the weapon.
4. Expected total damage.
5. Weapon level - the higher the level, the more difficult the weapon is to handle.
6. Damage inflicted by a weapon: Subdivided into Physical, Fire, Magic, and Poison as well as possible bonus damage points within these damage types.
7. Minimum character level required to use the weapon.
8. Possible additional bonuses to attributes and skills granted by the weapon. Some of these bonuses are provided by the weapon itself.
9. In addition, further improvements are possible by forging (smithing) runes or objects into the weapon.
10. If available, this is where smithing slots are displayed. There are three different colors: Bronze, Silver, and Gold. Depending on the color, additional points are added to the bonuses
Armor Properties
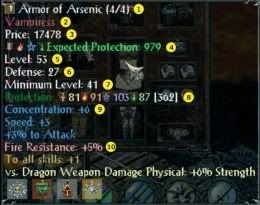
1. Armor name - the color shows how
rare the armor is. If the name is
displayed in green, the armor is part of
a set of armor. The figure in brackets
shows the number of available
smithing slots and the number of slots
already occupied.
2. Specifies which character can use the armor.
3. If the item is part of a set, then the sets name is shown.
4. Price you will receive if you sell the armor.
5. Expected total protection
6. Level of the armor
7. Minimum level required to wear the armor.
8. Resistance provided by the armor: Subdivided into Physical, Fire, Magic, and Poison resistances.
9. Possible additional bonuses to attributes and skills granted by the armor.
10. In addition, further improvements are possible by forging (smithing) runes or objects into the weapon.
11. If available, this is where smithing slots are displayed. There are three different colors: Bronze, Silver and Gold. Depending on the color, additional points are added to the bonuses.
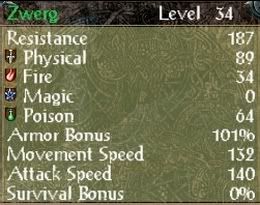
Enemy Display

When an enemy is nearby or is becomes a target, a color-coded circle will appear, indicating the level of difficulty of your opponents. Additionally, hovering the mouse cursor over your enemy will activate an information bar, providing more detail on the enemys current health points. In addition, the bar contains notes on the opponents level, name and type - such as Monster. The opponents resistance values are also displayed.
Intuitive Symbols, Resistance and Damage

Symbols are used for resistance values (for opponents, armor and your
character) as well as for damage caused by weapons or skills. If the resistance
or damage values are not listed in absolute figures, the symbols transparency
provides a good idea of this value. The more transparent a symbol is, the
weaker the resistance and/or damage.
View All Bonuses

This feature can be accessed via the Sum button - this is the + (plus)
symbol to the right of the character image health bar.
This is the at-a-glance, visible display of the bonus, resistance and damage
values your character currently has either naturally or improved through
objects or equipment. If, for instance, you have two pieces of equipment that
improve the Physical Regeneration value by twelve points each, the total bonus
value (24) is displayed in this information window.