Difference between revisions of "Sacred 2:Dragon Mage Class Chain Quest"
Jump to navigation
Jump to search
| (17 intermediate revisions by the same user not shown) | |||
| Line 11: | Line 11: | ||
|WIDTH="50%" VALIGN="TOP"| | |WIDTH="50%" VALIGN="TOP"| | ||
| − | {{S2frame|[[Image:.jpg|250px]][[Image:.jpg|250px]]|right|'''[[Sacred 2:Map of Ancaria|View the Ancaria Interactive Map]]'''}} | + | {{S2frame|[[Image:gemblikmap.jpg|250px]][[Image:gembliktab.jpg|250px]]|right|'''[[Sacred 2:Map of Ancaria|View the Ancaria Interactive Map]]'''}} |
|} | |} | ||
| − | {{S2frame|[[Image:.jpg|500px]]}} | + | {{S2frame|[[Image:gemblikloc.jpg|500px]]}} |
== Quest Parts == | == Quest Parts == | ||
This is the name for the 9-part 'chain-quest' starting on the [[Sacred 2:Dragon Mage Island|Dragon Mage Island]]. | This is the name for the 9-part 'chain-quest' starting on the [[Sacred 2:Dragon Mage Island|Dragon Mage Island]]. | ||
| Line 30: | Line 30: | ||
... | ... | ||
| − | In order to start your journey towards completing this multi-part quest, you will have to speak to [[Sacred | + | In order to start your journey towards completing this multi-part quest, you will have to speak to [[Sacred 2:Gemblik, Fellow Student|Gemblik, Fellow Student]] and [[Sacred 2:Orphas|Orphas]]. The detailed information on this string of quests starts [[Sacred 2:A Second Task|HERE]] |
| Line 48: | Line 48: | ||
* Talk to [[Sacred 2:Geraldil|Geraldil]] | * Talk to [[Sacred 2:Geraldil|Geraldil]] | ||
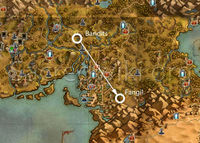
* Travel to the [[Sacred 2:Goblin Camp|Goblin Camp]] | * Travel to the [[Sacred 2:Goblin Camp|Goblin Camp]] | ||
| − | |||
* Wait til the 5 Bandits appear | * Wait til the 5 Bandits appear | ||
* Defeat the Bandits and pick up the '''Half-burned note''' | * Defeat the Bandits and pick up the '''Half-burned note''' | ||
| − | |WIDTH="40%" VALIGN="TOP"|{{S2frame|[[Image:.jpg|200px]]}} | + | |WIDTH="40%" VALIGN="TOP"|{{S2frame|[[Image:secondtask.jpg|200px]]}} |
|} | |} | ||
| Line 59: | Line 58: | ||
| + | ---- | ||
=== 2. [[Sacred 2:Sudden and Unexpected|Sudden and Unexpected]] === | === 2. [[Sacred 2:Sudden and Unexpected|Sudden and Unexpected]] === | ||
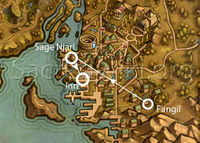
| − | * Travel to the Human Quarter in southwestern [[Sacred 2: | + | * Travel to the Human Quarter in southwestern [[Sacred 2:Thylysium|Thylysium]] |
* Enter Fangil's house. You'll see his corpse | * Enter Fangil's house. You'll see his corpse | ||
* Search the chest in the house and retrieve the '''Data Crystal''' | * Search the chest in the house and retrieve the '''Data Crystal''' | ||
| − | |WIDTH="40%" VALIGN="TOP"|{{S2frame|[[Image:.jpg|200px]]}} | + | |WIDTH="40%" VALIGN="TOP"|{{S2frame|[[Image:sudden.jpg|200px]]}} |
|} | |} | ||
| Line 71: | Line 71: | ||
|WIDTH="60%" VALIGN="TOP"| | |WIDTH="60%" VALIGN="TOP"| | ||
| + | ---- | ||
=== 3. [[Sacred 2:Deciphering|Deciphering]] === | === 3. [[Sacred 2:Deciphering|Deciphering]] === | ||
| Line 79: | Line 80: | ||
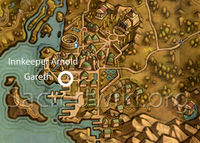
* Enter inn | * Enter inn | ||
| − | |WIDTH="40%" VALIGN="TOP"|{{S2frame|[[Image:.jpg|200px]]}} | + | |WIDTH="40%" VALIGN="TOP"|{{S2frame|[[Image:deciphering.jpg|200px]]}} |
|} | |} | ||
| Line 85: | Line 86: | ||
|WIDTH="60%" VALIGN="TOP"| | |WIDTH="60%" VALIGN="TOP"| | ||
| + | ---- | ||
=== 4. [[Sacred 2:Investigations|Investigations]] === | === 4. [[Sacred 2:Investigations|Investigations]] === | ||
| Line 91: | Line 93: | ||
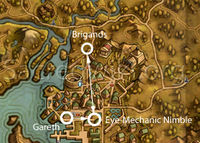
* Talk to [[Sacred 2:Gareth|Gareth]] | * Talk to [[Sacred 2:Gareth|Gareth]] | ||
| − | |WIDTH="40%" VALIGN="TOP"|{{S2frame|[[Image:.jpg|200px]]}} | + | |WIDTH="40%" VALIGN="TOP"|{{S2frame|[[Image:investigations.jpg|200px]]}} |
|} | |} | ||
| Line 97: | Line 99: | ||
|WIDTH="60%" VALIGN="TOP"| | |WIDTH="60%" VALIGN="TOP"| | ||
| + | ---- | ||
=== 5. [[Sacred 2:Oculus Mechanicus|Oculus Mechanicus]] === | === 5. [[Sacred 2:Oculus Mechanicus|Oculus Mechanicus]] === | ||
| Line 105: | Line 108: | ||
* Return and talk to Nimble twice | * Return and talk to Nimble twice | ||
| − | |WIDTH="40%" VALIGN="TOP"|{{S2frame|[[Image:.jpg|200px]]}} | + | |WIDTH="40%" VALIGN="TOP"|{{S2frame|[[Image:oculus.jpg|200px]]}} |
|} | |} | ||
| Line 111: | Line 114: | ||
|WIDTH="60%" VALIGN="TOP"| | |WIDTH="60%" VALIGN="TOP"| | ||
| + | ---- | ||
=== 6. [[Sacred 2:And the Second...|And the Second...]] === | === 6. [[Sacred 2:And the Second...|And the Second...]] === | ||
| Line 119: | Line 123: | ||
* Collect the '''Ashes of the Dragon Mage''' after he dies | * Collect the '''Ashes of the Dragon Mage''' after he dies | ||
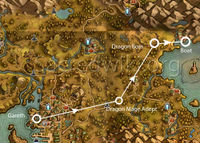
* Head to a cliff just east of [[Sacred 2:Garghadok's Destiny|Garghadok's Destiny]] and scatter the ashes | * Head to a cliff just east of [[Sacred 2:Garghadok's Destiny|Garghadok's Destiny]] and scatter the ashes | ||
| − | * Right after you scatter the ashes a [[Sacred: Dragon|Dragon]] Boss appears | + | * Right after you scatter the ashes a [[Sacred 2:Dragon (DM quest)|Dragon]] Boss appears |
* Defeat the Dragon Boss | * Defeat the Dragon Boss | ||
* Travel to the dock at [[Sacred 2:Bluestonbury|Bluestonbury]] and take the boat (small portal) | * Travel to the dock at [[Sacred 2:Bluestonbury|Bluestonbury]] and take the boat (small portal) | ||
| − | |WIDTH="40%" VALIGN="TOP"|{{S2frame|[[Image:.jpg|200px]]}} | + | |WIDTH="40%" VALIGN="TOP"|{{S2frame|[[Image:andsecond.jpg|200px]]}} |
|} | |} | ||
| Line 129: | Line 133: | ||
|WIDTH="60%" VALIGN="TOP"| | |WIDTH="60%" VALIGN="TOP"| | ||
| − | + | ---- | |
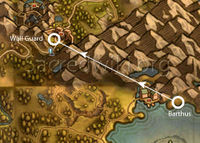
=== 7. [[Sacred 2:Barthus|Barthus]] === | === 7. [[Sacred 2:Barthus|Barthus]] === | ||
| − | * Talk to [[Sacred 2:Barthus|Barthus]] | + | * Talk to [[Sacred 2:Barthus - NPC|Barthus]] |
* Defeat 5 [[Sacred 2:Hired Brigand|Hired Brigands]] | * Defeat 5 [[Sacred 2:Hired Brigand|Hired Brigands]] | ||
* Subdue Barthus and talk to him | * Subdue Barthus and talk to him | ||
| Line 139: | Line 143: | ||
| − | |WIDTH="40%" VALIGN="TOP"|{{S2frame|[[Image:.jpg|200px]]}} | + | |WIDTH="40%" VALIGN="TOP"|{{S2frame|[[Image:barthus.jpg|200px]]}} |
|} | |} | ||
| Line 145: | Line 149: | ||
|WIDTH="60%" VALIGN="TOP"| | |WIDTH="60%" VALIGN="TOP"| | ||
| − | + | ---- | |
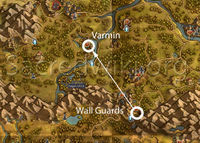
=== 8. [[Sacred 2:Varmin|Varmin]] === | === 8. [[Sacred 2:Varmin|Varmin]] === | ||
| Line 152: | Line 156: | ||
| − | |WIDTH="40%" VALIGN="TOP"|{{S2frame|[[Image:.jpg|200px]]}} | + | |WIDTH="40%" VALIGN="TOP"|{{S2frame|[[Image:varmin.jpg|200px]]}} |
|} | |} | ||
| Line 158: | Line 162: | ||
|WIDTH="60%" VALIGN="TOP"| | |WIDTH="60%" VALIGN="TOP"| | ||
| + | ---- | ||
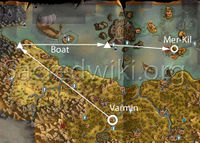
=== 9. [[Sacred 2:A message delivered|A message delivered]] === | === 9. [[Sacred 2:A message delivered|A message delivered]] === | ||
| Line 169: | Line 174: | ||
| − | |WIDTH="40%" VALIGN="TOP"|{{S2frame|[[Image:.jpg|200px]]}} | + | |WIDTH="40%" VALIGN="TOP"|{{S2frame|[[Image:message.jpg|200px]]}} |
|} | |} | ||
{|WIDTH="100%" | {|WIDTH="100%" | ||
|WIDTH="60%" VALIGN="TOP"| | |WIDTH="60%" VALIGN="TOP"| | ||
| − | |||
| − | |||
| − | |||
== Notes == | == Notes == | ||
Latest revision as of 23:15, 10 April 2012
|
| ||||||||||
|
| ||
Quest Parts
This is the name for the 9-part 'chain-quest' starting on the Dragon Mage Island.
The nine quests in this chain are:
- A Second Task
- Sudden and Unexpected
- Deciphering
- Investigations
- Oculus Mechanicus
- And the Second...
- Barthus
- Varmin
- A message delivered
...
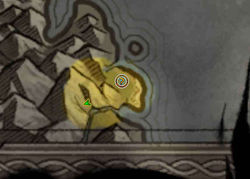
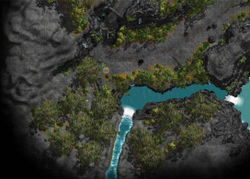
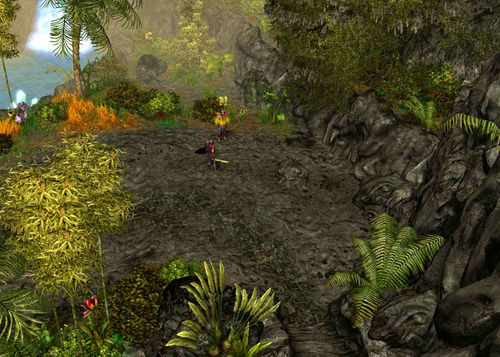
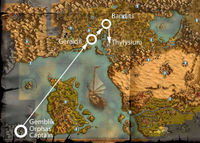
In order to start your journey towards completing this multi-part quest, you will have to speak to Gemblik, Fellow Student and Orphas. The detailed information on this string of quests starts HERE
Quick Walkthrough
1. A Second Task
|
| |||||||||
|
2. Sudden and Unexpected
|
| |||||||||
3. Deciphering
|
| |||||||||
4. Investigations
|
| |||||||||
5. Oculus Mechanicus
|
| |||||||||
6. And the Second...
|
| |||||||||
7. Barthus
|
| |||||||||
8. Varmin
|
| |||||||||
9. A message delivered
Note: You must have progressed through the Main Campaign to where you defeat the Carnach or either Mer-Kil will not appear, or you will not be able to complete the Dragon Mage Class Quest
|
| |||||||||
Notes |
