Difference between revisions of "Sacred 2:Pack of Slaves"
(Added info for quest Pack of Slaves) |
(replaced pics with dialogue template) |
||
| (4 intermediate revisions by 3 users not shown) | |||
| Line 1: | Line 1: | ||
{{Languages}} | {{Languages}} | ||
| + | {| | ||
| + | |valign="top"| | ||
| Line 32: | Line 34: | ||
== Detailed Walkthrough == | == Detailed Walkthrough == | ||
Talk to Paul Tatoe to learn of the slaves that ran away.<br> | Talk to Paul Tatoe to learn of the slaves that ran away.<br> | ||
| − | + | {{S2 Dialogue|NPC NAME=Paul Tatoe|PORTRAIT FILE NAME=dialog011.png|DIALOGUE=Bring me the heads of the escaped slaves!<br><br>This is how the good-for-nothing Humans show their gratitude! The first sign of danger and they run like chickens! We must show the other slaves that running away is a very bad idea; otherwise, they will not obey me any longer. Find the ten escaped slaves and crush them! Crush them all! And bring me their heads! Hurry, before the broker can smuggle them back to their homeland!}} | |
| + | <br> | ||
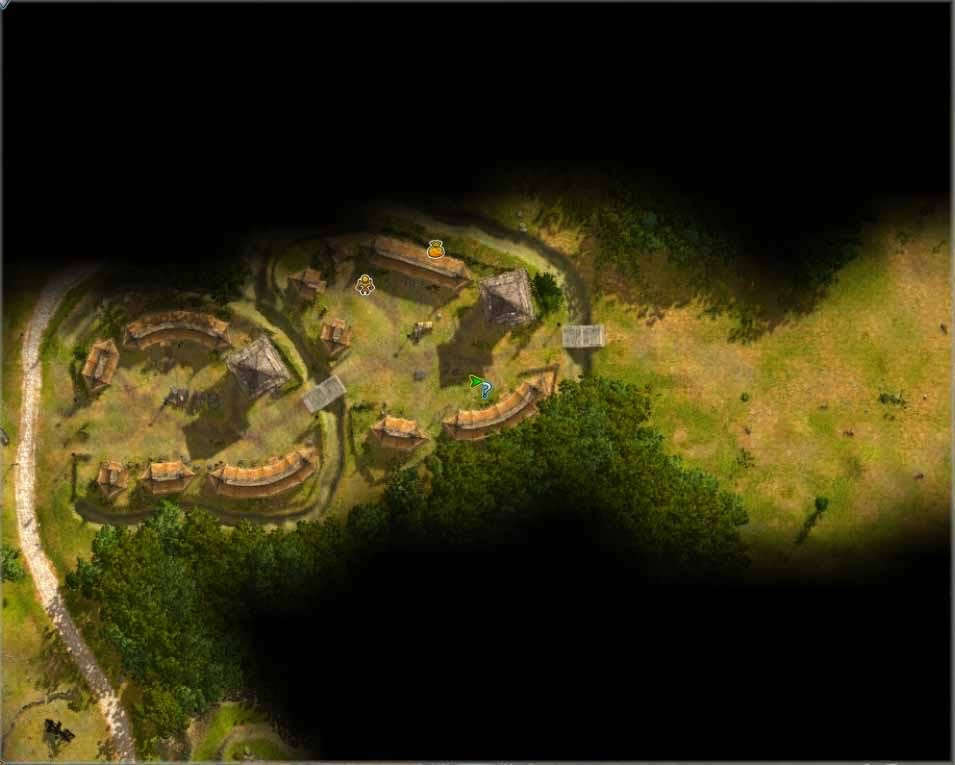
Head East out of the Army Camp, turning North as your radar quest marker indicates. Keep heading North/Northwest, killing the slaves you come across and picking up their heads. Around the 7/9 heads collected mark you will need to head to a small trading outpost North of the Army Camp. Here you will kill and collect the last two heads, and a ‘Whimpering Slave’ will spawn.<br> | Head East out of the Army Camp, turning North as your radar quest marker indicates. Keep heading North/Northwest, killing the slaves you come across and picking up their heads. Around the 7/9 heads collected mark you will need to head to a small trading outpost North of the Army Camp. Here you will kill and collect the last two heads, and a ‘Whimpering Slave’ will spawn.<br> | ||
[http://www.sacredwiki.org/images/Sacred_2/quests/Chapter01/Pack%20of%20Slaves/sacred2PackOfSlaveswt1.jpg http://www.sacredwiki.org/images/Sacred_2/quests/Chapter01/Pack%20of%20Slaves/th_sacred2PackOfSlaveswt1.jpg]<br> | [http://www.sacredwiki.org/images/Sacred_2/quests/Chapter01/Pack%20of%20Slaves/sacred2PackOfSlaveswt1.jpg http://www.sacredwiki.org/images/Sacred_2/quests/Chapter01/Pack%20of%20Slaves/th_sacred2PackOfSlaveswt1.jpg]<br> | ||
| + | |||
Talk to the Whimpering Slave, then talk to her again.<br> | Talk to the Whimpering Slave, then talk to her again.<br> | ||
| − | + | {{S2 Dialogue|NPC NAME=Whimpering Slave|PORTRAIT FILE NAME=Dialog123.png|DIALOGUE=Please! Spare me! I know the broker! If you let me live I will lead you to him.}} | |
| + | |||
| + | {{S2 Dialogue|NPC NAME=Whimpering Slave|PORTRAIT FILE NAME=Dialog123.png|DIALOGUE=Follow me to the broker!<br><br>So you give me your word? You let me live, if I take you to the broker? I don't want to end like my friends whose heads are in your backpack.}} | ||
| + | |||
| + | <br> | ||
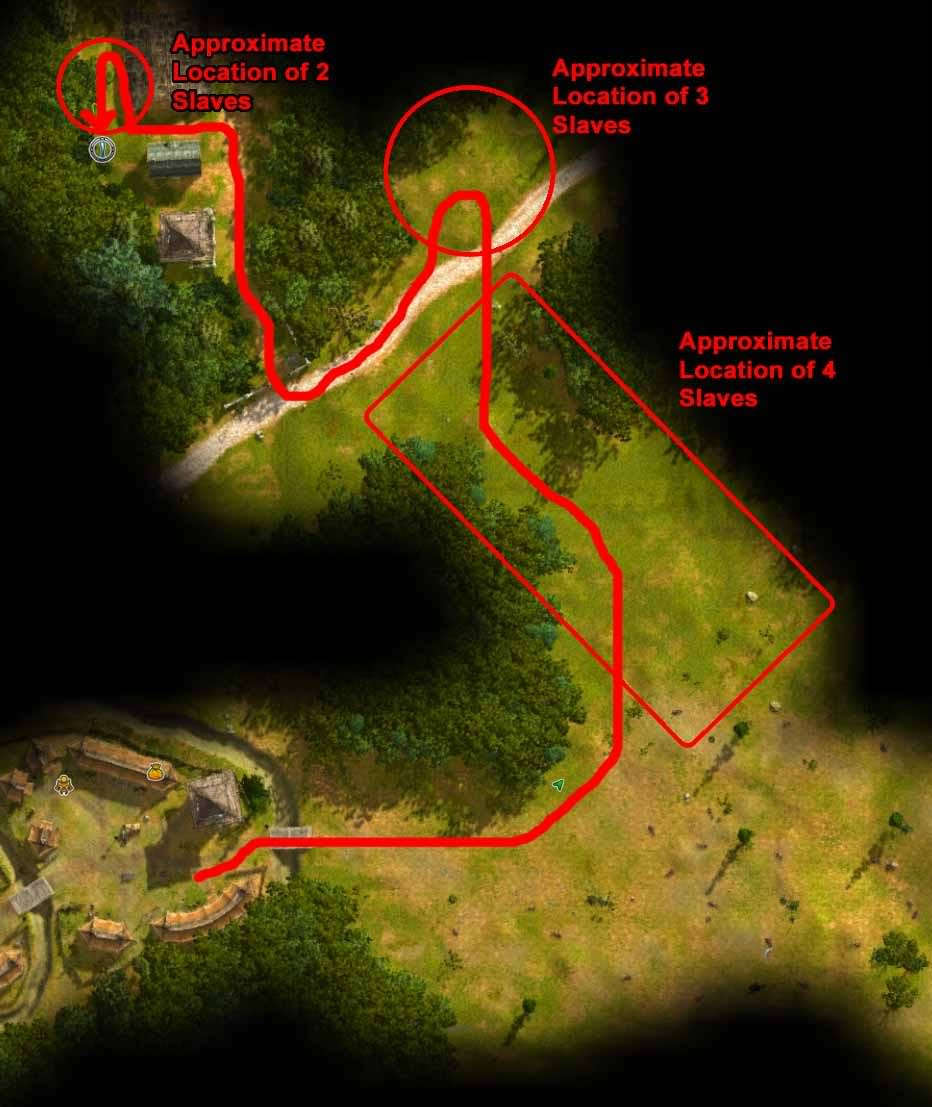
Now head further North through the trading outpost. To the West of a dungeon entrance the Broker and three of his Henchmen will be standing. You only need to kill the Broker, but you’ll probably end up having to kill his Henchmen as well. When all four of them are dead, pick up the Map the Broker dropped.<br> | Now head further North through the trading outpost. To the West of a dungeon entrance the Broker and three of his Henchmen will be standing. You only need to kill the Broker, but you’ll probably end up having to kill his Henchmen as well. When all four of them are dead, pick up the Map the Broker dropped.<br> | ||
[http://www.sacredwiki.org/images/Sacred_2/quests/Chapter01/Pack%20of%20Slaves/sacred2PackOfSlaveswt2.jpg http://www.sacredwiki.org/images/Sacred_2/quests/Chapter01/Pack%20of%20Slaves/th_sacred2PackOfSlaveswt2.jpg]<br> | [http://www.sacredwiki.org/images/Sacred_2/quests/Chapter01/Pack%20of%20Slaves/sacred2PackOfSlaveswt2.jpg http://www.sacredwiki.org/images/Sacred_2/quests/Chapter01/Pack%20of%20Slaves/th_sacred2PackOfSlaveswt2.jpg]<br> | ||
Return to the Whimpering Slave (she’s back where she first spawned) and talk to her, then kill her.<br> | Return to the Whimpering Slave (she’s back where she first spawned) and talk to her, then kill her.<br> | ||
| − | [http://www.sacredwiki.org/images/Sacred_2/quests/Chapter01/Pack%20of%20Slaves/sacred2PackOfSlaveswt3.jpg http://www.sacredwiki.org/images/Sacred_2/quests/Chapter01/Pack%20of%20Slaves/th_sacred2PackOfSlaveswt3.jpg] | + | [http://www.sacredwiki.org/images/Sacred_2/quests/Chapter01/Pack%20of%20Slaves/sacred2PackOfSlaveswt3.jpg http://www.sacredwiki.org/images/Sacred_2/quests/Chapter01/Pack%20of%20Slaves/th_sacred2PackOfSlaveswt3.jpg] |
| + | {{S2 Dialogue|NPC NAME=Whimpering Slave|PORTRAIT FILE NAME=Dialog123.png|DIALOGUE=Please let me go! I'm begging you!}} | ||
| + | |||
Finally, return to Paul Tatoe for your reward.<br> | Finally, return to Paul Tatoe for your reward.<br> | ||
| − | + | {{S2 Dialogue|NPC NAME=Paul Tatoe|PORTRAIT FILE NAME=dialog011.png|DIALOGUE=So you've found the broker and this is his map, right? Well, look at that...<br><br>And there are the heads of the escapees, very good. Only nine, okay, the hag's missing. She wouldn't have survived the winter anyway.}} | |
| − | |||
| Line 58: | Line 67: | ||
</div> | </div> | ||
| − | [[Category:Sacred 2 Side Quest]] | + | [[Category:Sacred 2 Side Quest|{{SUBPAGENAME}}]] |
| − | [[Category:Sacred 2 Quest]] | + | [[Category:Sacred 2 Quest|{{SUBPAGENAME}}]] |
| + | [[Category:Sacred 2 Tyr Lysia Quest|{{PAGENAME}}]] | ||
Latest revision as of 05:57, 30 August 2014
|
Quick Walkthrough
Detailed WalkthroughTalk to Paul Tatoe to learn of the slaves that ran away.   Bring me the heads of the escaped slaves!
Talk to the Whimpering Slave, then talk to her again.
  Follow me to the broker!
Finally, return to Paul Tatoe for your reward. So you've found the broker and this is his map, right? Well, look at that...
Logbook Entry
Notes |