Difference between revisions of "Sacred 2:Pawn Sacrifice"
m |
|||
| (7 intermediate revisions by 2 users not shown) | |||
| Line 5: | Line 5: | ||
<div class="plainlinks"> | <div class="plainlinks"> | ||
| − | {| | + | {|WIDTH="100%" |
| − | |WIDTH=" | + | |WIDTH="15%" VALIGN="TOP"|__TOC__ |
| − | |WIDTH=" | + | |WIDTH="35%" VALIGN="TOP"| |
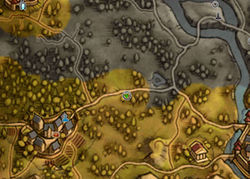
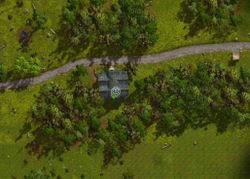
* '''Quest Objective:''' Escort the $!^$^# suicidal Weapons Dealer to the military camp west of Black Oaks | * '''Quest Objective:''' Escort the $!^$^# suicidal Weapons Dealer to the military camp west of Black Oaks | ||
* '''Quest Difficulty:''' *** (should be a full *****) | * '''Quest Difficulty:''' *** (should be a full *****) | ||
| − | * '''Quest Giver:''' | + | * '''Quest Giver:''' [[Sacred 2:Weapon Dealer|Weapon Dealer]] |
* '''Location(s):''' Basement in Black Oaks | * '''Location(s):''' Basement in Black Oaks | ||
* '''Prerequisite Quest:''' [[Sacred 2:Tailing|Tailing]] | * '''Prerequisite Quest:''' [[Sacred 2:Tailing|Tailing]] | ||
* '''Next Quest:''' [[Sacred 2:Crown Witness|Crown Witness]] | * '''Next Quest:''' [[Sacred 2:Crown Witness|Crown Witness]] | ||
| − | * '''Reward:''' A large pile of hair on the floor, Experience and the chance to wrap this quest up. | + | * '''Reward:''' A large pile of your hair on the floor, Experience and the chance to wrap this quest up. |
| − | |WIDTH=" | + | * '''Main Quest Page:''' [[Sacred 2:By Order of the Crown|By Order of the Crown]] |
| − | + | |WIDTH="50%" VALIGN="TOP"| | |
| + | |||
| + | {{S2frame|[[Image:haroldmap.jpg|250px]][[Image:haroldtab.jpg|250px]]|right|'''[[Sacred 2:Map of Ancaria|View the Ancaria Interactive Map]]'''}} | ||
|} | |} | ||
| − | + | {|WIDTH="100%" | |
| + | |WIDTH="60%" VALIGN="TOP"| | ||
== Quick Walkthrough == | == Quick Walkthrough == | ||
| − | |||
| − | |||
| − | |||
| − | |||
| − | |||
| − | |||
| − | |||
* Talk to the weapons dealer again | * Talk to the weapons dealer again | ||
* He will agree to rat out the Lord of the Castle if you spare his life. | * He will agree to rat out the Lord of the Castle if you spare his life. | ||
| − | * Escort the Weapons Dealer to | + | * Escort the Weapons Dealer to [[Sacred 2:Informant Harol|Informant Harol]] in the military camp west of Black Oaks. |
| + | |WIDTH="40%" VALIGN="TOP"|{{S2frame|[[Image:Quest_Location.jpg|500px]]}} | ||
| + | |} | ||
| + | == Detailed Walkthrough == | ||
| + | The Quick Walkthrough pretty much covers all of the bases. When you talk to him, he will mention that there are agents of the Lord of the Castle everywhere - and they will try to kill him. Getting him to the surface isn't too hard. There are a few thugs in the caverns and they're fairly easy to take out. Escort him to the surface and toward the west gate of Black Oaks. That's when the real nightmare begins. | ||
| − | + | You see, the Weapons Dealer, instead of being a docile NPC who is willing to be peacefully escorted to testify against the Lord of the Castle... He's really out to get himself killed. ANY way he can. Be sure to have '''''LOTS''''' of health potions and healing spells at the ready before you exit the west gate of Black Oaks. | |
| − | |||
| − | + | From the moment you leave the safety of the town walls, our suicidal weapons dealer will attack anything he can find that will get him killed. Wild boars, slave outcasts, bandits, thugs, wolves, etc... He will go well out of his way - meaning going the wrong way to do himself in. And of course, he's unarmed! | |
| − | + | Your task is to run after him and blast anything that might kill him with extreme prejudice and supply him with health potions to keep him breathing. Given he's bent on killing everything in the area in an effort to kill himself, he's bound to make it to the camp at some point. | |
Simply running for the military camp isn't an option. He will run, he will find something that will kill him before you can get anywhere close. | Simply running for the military camp isn't an option. He will run, he will find something that will kill him before you can get anywhere close. | ||
| Line 44: | Line 43: | ||
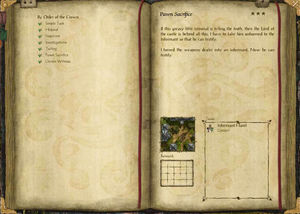
== Logbook Entry == | == Logbook Entry == | ||
| − | + | {{S2frame|[[File:Pawnsacrificelog.jpg|300px]]|none}} | |
== Notes == | == Notes == | ||
| − | Have a lot of patience and health potions before you leave Black Oaks. | + | Have a lot of patience and health potions before you leave Black Oaks. And a good ranged weapon that can kill with 1-2 shots doesn't hurt either. Be prepared to run after the nitwit as he will run off in another direction once you've saved his useless hide and get himself into more trouble. |
</div> | </div> | ||
| − | [[Category:Sacred 2 Chain Quest]|{{PAGENAME}}] | + | [[Category:Sacred 2 Quest|{{PAGENAME}}]] |
| + | [[Category:Sacred 2 Chain Quest Part|{{PAGENAME}}]] | ||
| + | [[Category:Sacred 2 Artamark Quest|{{PAGENAME}}]] | ||
Latest revision as of 05:12, 8 November 2013
|
| ||||||||||
Quick Walkthrough
|
| |||||||||
Detailed Walkthrough
The Quick Walkthrough pretty much covers all of the bases. When you talk to him, he will mention that there are agents of the Lord of the Castle everywhere - and they will try to kill him. Getting him to the surface isn't too hard. There are a few thugs in the caverns and they're fairly easy to take out. Escort him to the surface and toward the west gate of Black Oaks. That's when the real nightmare begins.
You see, the Weapons Dealer, instead of being a docile NPC who is willing to be peacefully escorted to testify against the Lord of the Castle... He's really out to get himself killed. ANY way he can. Be sure to have LOTS of health potions and healing spells at the ready before you exit the west gate of Black Oaks.
From the moment you leave the safety of the town walls, our suicidal weapons dealer will attack anything he can find that will get him killed. Wild boars, slave outcasts, bandits, thugs, wolves, etc... He will go well out of his way - meaning going the wrong way to do himself in. And of course, he's unarmed!
Your task is to run after him and blast anything that might kill him with extreme prejudice and supply him with health potions to keep him breathing. Given he's bent on killing everything in the area in an effort to kill himself, he's bound to make it to the camp at some point.
Simply running for the military camp isn't an option. He will run, he will find something that will kill him before you can get anywhere close.
Logbook Entry
|
| ||
Notes
Have a lot of patience and health potions before you leave Black Oaks. And a good ranged weapon that can kill with 1-2 shots doesn't hurt either. Be prepared to run after the nitwit as he will run off in another direction once you've saved his useless hide and get himself into more trouble.


