Difference between revisions of "Sacred 2:Pesky Pirates"
(converted to new look) |
Gogoblender (talk | contribs) (Added links) |
||
| (6 intermediate revisions by 4 users not shown) | |||
| Line 3: | Line 3: | ||
|WIDTH="20%" VALIGN="TOP"|__TOC__ | |WIDTH="20%" VALIGN="TOP"|__TOC__ | ||
|WIDTH="50%" VALIGN="TOP"| | |WIDTH="50%" VALIGN="TOP"| | ||
| − | * '''Quest Objective:''' | + | * '''Quest Objective:''' Put an end to the pirates |
* '''Quest Difficulty:''' 1 star | * '''Quest Difficulty:''' 1 star | ||
* '''Quest Giver:''' [[Sacred 2:Scout Jalenthil|Scout Jalenthil]] | * '''Quest Giver:''' [[Sacred 2:Scout Jalenthil|Scout Jalenthil]] | ||
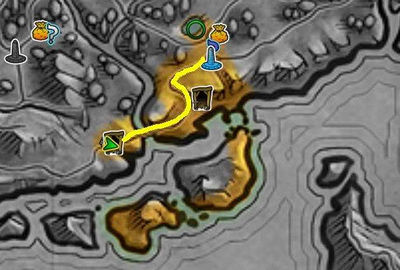
| − | * '''Location(s):''' [[Sacred 2:Golden Coast|Golden Coast]], near the beach | + | * '''Location(s):''' [[Sacred 2:Golden Coast|Golden Coast]], near the beach towards the western end of the coast |
| − | * '''Reward:''' Gold and Experience | + | * '''Reward:''' [[Sacred 2:Gold|Gold]] and [[Sacred 2:Experience|Experience]] |
| − | |WIDTH="30%" VALIGN="TOP"|[ | + | |WIDTH="30%" VALIGN="TOP"|{{S2frame|[[Image:tpnmap22.jpg|400px]]}} |
|} | |} | ||
| Line 20: | Line 20: | ||
#[[Sacred 2: Bounty|Bounty]] | #[[Sacred 2: Bounty|Bounty]] | ||
| − | In order to start your journey towards completing this | + | In order to start your journey towards completing this two part chain quest, you will have to retrieve a map. |
| − | The detailed explanation of this quest can be found in the [[Sacred 2: The Pirates' Navigator| | + | The detailed explanation of this quest can be found in the [[Sacred 2: The Pirates' Navigator|here]]. |
== Quick Walkthrough == | == Quick Walkthrough == | ||
| − | * Talk to | + | * Talk to [[Sacred 2:Scout Jalenthil|Scout Jalenthil]] near the cave. |
| − | * Enter the cave, walk north and retrieve the map | + | * Enter the cave, walk north and retrieve the map. |
| − | * Talk to Jalenthil again | + | * Talk to [[Sacred 2:Scout Jalenthil|Jalenthil]] again. |
| − | * Go to the spot marked on the map, and talk to the pirate | + | * Go to the spot marked on the map, and talk to the pirate, [[Sacred 2:Steelnose Forino|Steelnose Forino]]. |
| − | * After he bad-mounths you, slay him | + | * After he bad-mounths you, slay him. |
| − | * Pick up your loot | + | * Pick up your loot. |
| + | |||
| + | ==Quest Logs== | ||
| + | |||
| + | '''The Pirates' Navigator''' | ||
| + | |||
| + | A lot of pirates seem to be roaming this area. An intercepted message mentioned a map in a cave, and that it's marked with all the landing sites of these raiders. A High Elf scout asked me to go to the cave and get the map. He's afraid of the rate there. Tsk...! | ||
| + | |||
| + | I did it. I got the map! Now I have to get out of here and deliver it. | ||
| + | |||
| + | The map is in the scout's hands. This should ruin the pirate's plans for now! | ||
| + | |||
| + | '''Bounty''' | ||
| + | |||
| + | I have to find the pirates' leader and kill him. The man is called Steelnose Forino, and he makes anyone who jokes about his nose suffer for it. I should be able to find him at the cliffs. Well then, I'll just follow my nose... | ||
| + | |||
| + | The scout was not mistaken, Steelnose Forino was indeed at the cliffs. I fought against him and won! | ||
</div> | </div> | ||
| − | [[Category:Sacred 2 Chain Quest]] | + | |
| + | [[Category:Sacred 2 Quest|{{PAGENAME}}]] | ||
| + | [[Category:Sacred 2 Tyr Lysia Quest|{{PAGENAME}}]] | ||
| + | [[Category:Sacred 2 Chain Quest|{{PAGENAME}}]] | ||
Latest revision as of 03:38, 2 September 2013
Contents |
|
| |||||||||
Quest Parts
This quest is the start of a series of quests, known as a chain-quest. The name of this chain quest is called Pesky Pirates.
The two quests in this chain are:
In order to start your journey towards completing this two part chain quest, you will have to retrieve a map. The detailed explanation of this quest can be found in the here.
Quick Walkthrough
- Talk to Scout Jalenthil near the cave.
- Enter the cave, walk north and retrieve the map.
- Talk to Jalenthil again.
- Go to the spot marked on the map, and talk to the pirate, Steelnose Forino.
- After he bad-mounths you, slay him.
- Pick up your loot.
Quest Logs
The Pirates' Navigator
A lot of pirates seem to be roaming this area. An intercepted message mentioned a map in a cave, and that it's marked with all the landing sites of these raiders. A High Elf scout asked me to go to the cave and get the map. He's afraid of the rate there. Tsk...!
I did it. I got the map! Now I have to get out of here and deliver it.
The map is in the scout's hands. This should ruin the pirate's plans for now!
Bounty
I have to find the pirates' leader and kill him. The man is called Steelnose Forino, and he makes anyone who jokes about his nose suffer for it. I should be able to find him at the cliffs. Well then, I'll just follow my nose...
The scout was not mistaken, Steelnose Forino was indeed at the cliffs. I fought against him and won!
