Difference between revisions of "Sacred 2:The Griffin"
Gogoblender (talk | contribs) |
|||
| Line 17: | Line 17: | ||
|WIDTH="20%" VALIGN="TOP"|__TOC__ | |WIDTH="20%" VALIGN="TOP"|__TOC__ | ||
|WIDTH="50%" VALIGN="TOP"| | |WIDTH="50%" VALIGN="TOP"| | ||
| − | * '''Quest Objective:''' Defeat the boss The White Griffin | + | * '''Quest Objective:''' Defeat the boss [[Sacred 2:The White Griffin|The White Griffin]] |
* '''Quest Difficulty:''' 4 stars | * '''Quest Difficulty:''' 4 stars | ||
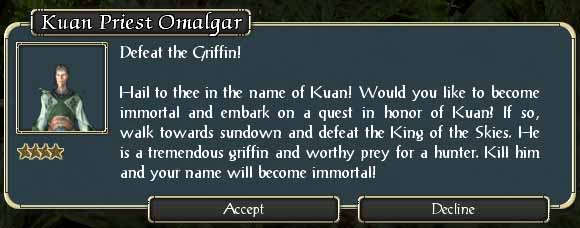
* '''Quest Giver:''' [[Sacred 2:Kuan Priest Omalgar|Kuan Priest Omalgar]] | * '''Quest Giver:''' [[Sacred 2:Kuan Priest Omalgar|Kuan Priest Omalgar]] | ||
| − | * '''Location(s):''' [[ | + | * '''Location(s):''' [[Sacred2:Noriath's Temple|Noriath's Temple]] |
* '''Prerequisite Quest:''' None | * '''Prerequisite Quest:''' None | ||
* '''Next Quest:''' None | * '''Next Quest:''' None | ||
| Line 28: | Line 28: | ||
== Quick Walkthrough == | == Quick Walkthrough == | ||
| − | * Talk to Kuan Priest Omalgar | + | * Talk to [[Sacred 2:Kuan Priest Omalgar|Kuan Priest Omalgar]]. |
| − | * Kill the White Griffin | + | * Kill the [[Sacred 2:The White Griffin|The White Griffin]]. |
== Detailed Walkthrough == | == Detailed Walkthrough == | ||
| − | Talk to Kuan Priest Omalgar to learn of the White Griffin. | + | Talk to [[Sacred 2:Kuan Priest Omalgar|Kuan Priest Omalgar]] to learn of the [[Sacred 2:The White Griffin|The White Griffin]]. |
| − | [http://www.sacredwiki.org/images/Sacred_2/quests/Chapter01/The%20Griffin/sacred2TheGriffina.jpg http://www.sacredwiki.org/images/Sacred_2/quests/Chapter01/The%20Griffin/th_sacred2TheGriffina.jpg] | + | |
| − | Head | + | |
| − | [http://www.sacredwiki.org/images/Sacred_2/quests/Chapter01/The%20Griffin/sacred2TheGriffinwt.jpg http://www.sacredwiki.org/images/Sacred_2/quests/Chapter01/The%20Griffin/th_sacred2TheGriffinwt.jpg] | + | [http://www.sacredwiki.org/images/Sacred_2/quests/Chapter01/The%20Griffin/sacred2TheGriffina.jpg http://www.sacredwiki.org/images/Sacred_2/quests/Chapter01/The%20Griffin/th_sacred2TheGriffina.jpg] |
| − | Things to note before going into battle: | + | |
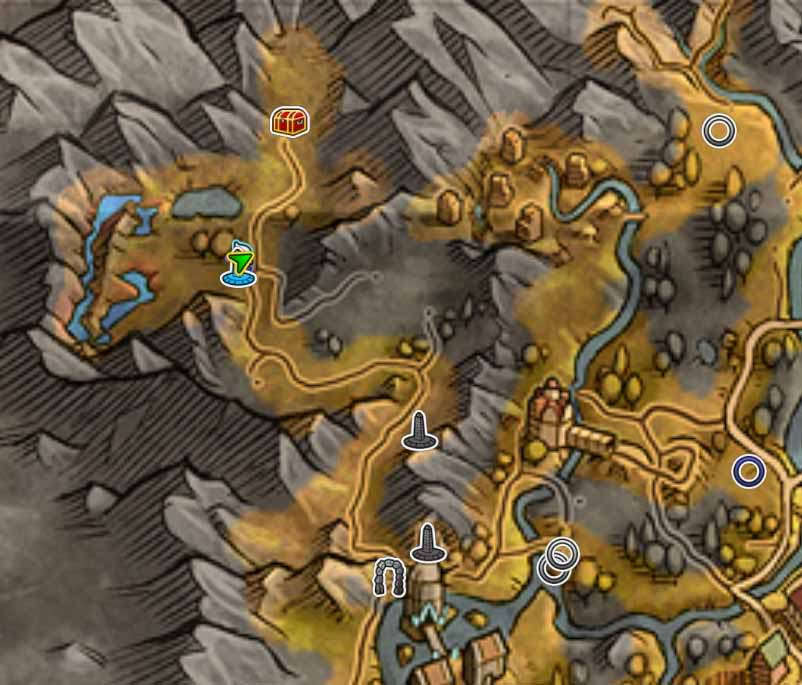
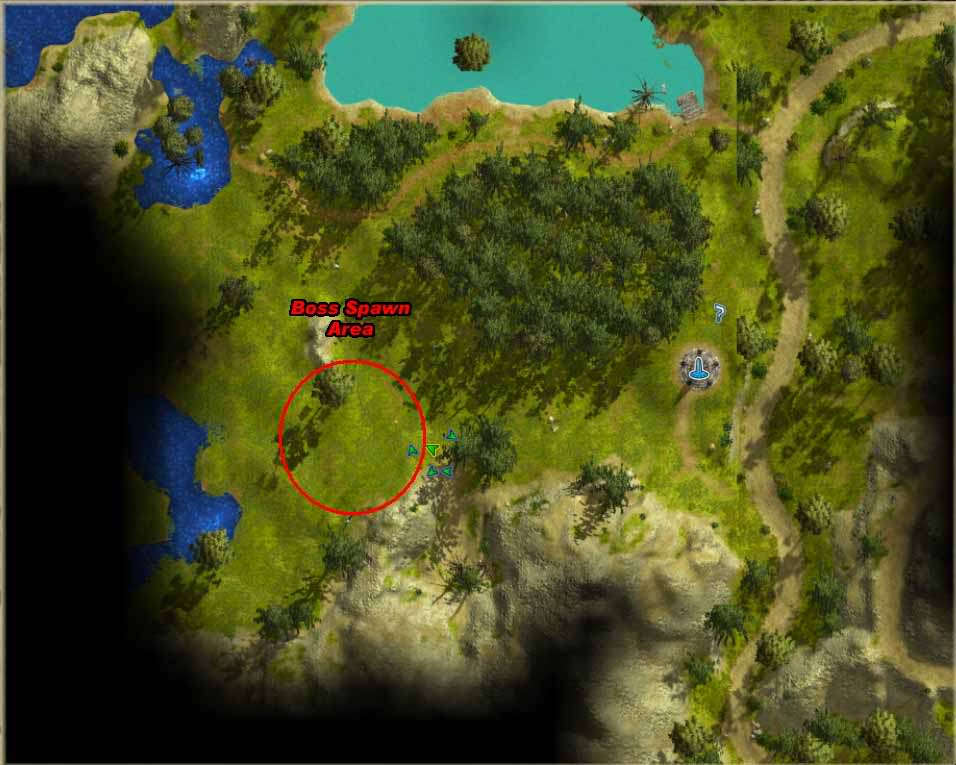
| + | Head west from the nearby Resurrection Monument (you may want to activate it, just in case of accidents). The boss isn’t far away, and you should be able to see it from a fair distance, even in the dark, as it is a bright white colour with large semi-translucent white wings. | ||
| + | |||
| + | [http://www.sacredwiki.org/images/Sacred_2/quests/Chapter01/The%20Griffin/sacred2TheGriffinwt.jpg http://www.sacredwiki.org/images/Sacred_2/quests/Chapter01/The%20Griffin/th_sacred2TheGriffinwt.jpg] | ||
| + | |||
| + | Things to note before going into battle: | ||
| + | |||
* try to have a fire-damage weapon or skills equipped, and try to avoid ice and magic damage weapons or skills | * try to have a fire-damage weapon or skills equipped, and try to avoid ice and magic damage weapons or skills | ||
* try to have some defence against ice attacks | * try to have some defence against ice attacks | ||
| Line 46: | Line 52: | ||
| − | Clear out as many of the | + | Clear out as many of the [[Sacred 2:Kobold|[[Sacred 2:Kuan Priest Omalgar|Kuan Priest Omalgar]]]] and [[Sacred 2:Boar|Boar]] as you can, but beware of the boss's long aggro range. If the mobs in the area are still dangerous to you then you might want to try using the aggro range against it and pulling it back towards the Resurrection Monument where it's easier to clear the extra mobs out beforehand. |
| + | |||
Beat on the boss (drinking health potions as necessary) until it gives in and dies already, and collect your loot and a nice fat EXP bonus. | Beat on the boss (drinking health potions as necessary) until it gives in and dies already, and collect your loot and a nice fat EXP bonus. | ||
| Line 59: | Line 66: | ||
== Notes == | == Notes == | ||
| − | * | + | * You can boost your EXP reward by drinking a [[Sacred 2:Potions|Potion of the Mentor]] just before the boss dies |
| − | * | + | * This boss doesn't spawn until you accept the quest, so you can clear out the area beforehand to avoid fighting extra enemies as well as the boss |
| − | * | + | * This quest (although not the boss) is new since v2.34 (PC) |
Revision as of 22:50, 2 January 2011
|
|
Quick Walkthrough
Detailed WalkthroughTalk to Kuan Priest Omalgar to learn of the The White Griffin.
Head west from the nearby Resurrection Monument (you may want to activate it, just in case of accidents). The boss isn’t far away, and you should be able to see it from a fair distance, even in the dark, as it is a bright white colour with large semi-translucent white wings.
Things to note before going into battle:
Beat on the boss (drinking health potions as necessary) until it gives in and dies already, and collect your loot and a nice fat EXP bonus.
Logbook Entry
Notes
|