Difference between revisions of "Sacred 2:The Mad Butcher"
m |
(removed old dialogue pics) |
||
| (7 intermediate revisions by 5 users not shown) | |||
| Line 6: | Line 6: | ||
* '''Quest Difficulty:''' 2 Stars | * '''Quest Difficulty:''' 2 Stars | ||
* '''Quest Giver:''' [[Sacred 2:Insane Scientist Kragik|Insane Scientist Kragik]] | * '''Quest Giver:''' [[Sacred 2:Insane Scientist Kragik|Insane Scientist Kragik]] | ||
| − | * '''Location(s):''' Small cabin south-east of the [[Sacred 2:Nor-Plat Border Wall|Nor-Plat Border Wall]] | + | * '''Location(s):''' Small cabin south-east of the [[Sacred 2:Nor-Plat Border Wall|Nor-Plat Border Wall]] within [[Sacred 2:Artamark|Artamark]] |
* '''Prerequisite Quest:''' None | * '''Prerequisite Quest:''' None | ||
* '''Next Quest:''' None | * '''Next Quest:''' None | ||
* '''Reward:''' [[Sacred 2:Experience|Experience]] | * '''Reward:''' [[Sacred 2:Experience|Experience]] | ||
| − | |WIDTH="50%" VALIGN="TOP"| | + | |WIDTH="50%" VALIGN="TOP"| |
| − | + | {{S2frame|[[Image:MadButcher_Map.jpg|250px]][[Image:MadButcher_TabMap.jpg|250px]]|right|'''[[Sacred 2:Map of Ancaria|View the Ancaria Interactive Map]]'''}} | |
| − | {{S2frame|[[Image: | ||
|} | |} | ||
{|WIDTH="100%" | {|WIDTH="100%" | ||
|WIDTH="60%" VALIGN="TOP"| | |WIDTH="60%" VALIGN="TOP"| | ||
== Quick Walkthrough == | == Quick Walkthrough == | ||
| − | * Talk to Insane Scientist Kragik | + | * Talk to [[Sacred 2:Insane Scientist Kragik|Insane Scientist Kragik]] |
| − | * Kill him to thwart his plans for world domination | + | * Kill him and his [[Sacred 2:Aid|aids]] to thwart his plans for world domination |
| − | |WIDTH="40%" VALIGN="TOP"|{{S2frame|[[Image: | + | * Talk to an [[Sacred 2:Orc - The Mad Butcher|Orc]] to finish this quest |
| + | |WIDTH="40%" VALIGN="TOP"|{{S2frame|[[Image:MadButcher_Camera.jpg|500px]]}} | ||
|} | |} | ||
== Detailed Walkthrough == | == Detailed Walkthrough == | ||
| − | + | Just south of the road from [[Sacred 2:Orcish Byway|Orcish Byway]] to the [[Sacred 2:Nor-Plat Border Wall|Nor Plat Border Wall]], you will find a small cabin that resembles a torture chamber. Inside you will meet the Insane Scientist Kragik. | |
| + | {{S2frame|[[Image:MadButcher_Camera.jpg|400px]]|left}} | ||
| + | <br clear="both" /> | ||
| − | Insane Scientist Kragik | + | {{S2 Dialogue|NPC NAME=Insane Scientist Kragik|PORTRAIT FILE NAME=dialog307.png|DIALOGUE=Catch a few Orcs for my unholy experiments. |
| − | |||
| − | + | Who are you? Ah an adventurer, very good. You can do something for me. I am transforming Orcs into undead minions and my need for fresh supplies is urgent. Soon my army will be large enough to control the whole world! | |
| + | Get me a few Orcs.}} | ||
| − | |||
| − | |||
| − | + | This guy is definitely out of his mind and must be stopped, so talk to him again. | |
| − | + | {{S2 Dialogue|NPC NAME=Insane Scientist Krajik|PORTRAIT FILE NAME=dialog307.png|DIALOGUE=Start looking!}} | |
| − | |||
| − | |||
| − | + | The scientist and his two thugs will attack you. Inside his cabin is a tight space, so you will not have much room to maneuver. You might want to make sure you are as close to the down as possible before talking to him. After defeating them, talk to the orc that is in the room. | |
| + | {{S2 Dialogue|NPC NAME=Orc|PORTRAIT FILE NAME=dialog051.png|DIALOGUE=Please spare me...}} | ||
| − | |||
| − | |||
| − | + | You let the orc go and the quest is complete. | |
| − | |||
| − | |||
| − | |||
| − | |||
| − | |||
| − | |||
| − | |||
| − | |||
| − | |||
| − | |||
| − | |||
| − | |||
| − | |||
| − | |||
| − | |||
| − | |||
== Quest Enemies == | == Quest Enemies == | ||
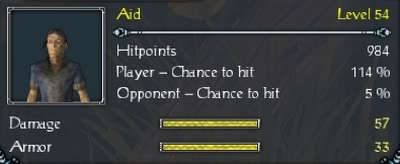
| − | + | === [[Sacred 2:Aid|Aid]] === | |
| − | === [[Sacred 2:Insane Scientist | + | {{:Sacred 2:Aid}} |
| − | {{:Sacred 2:Insane Scientist | + | === [[Sacred 2:Insane Scientist Kragik|Insane Scientist Kragik]] === |
| + | {{:Sacred 2:Insane Scientist Kragik}} | ||
== Logbook Entry == | == Logbook Entry == | ||
| − | |||
| − | |||
| − | |||
| − | |||
| − | |||
| − | |||
| − | |||
| − | |||
| − | |||
| − | |||
| − | |||
{| | {| | ||
| − | |{{S2frame|[[Image: | + | |{{S2frame|[[Image:MadButcher_Logbook.jpg|300px]]|left}} |
| − | |||
|} | |} | ||
| + | ==Notes== | ||
| + | On the table next to the dissection table is a an [[Sacred 2:Easter Eggs|Easter Egg]]: one of the [[Sacred 2:Vitruvian Monster - Homage to Davinci|"Vitruvian Orc" anatomy charts]] | ||
</div> | </div> | ||
[[Category:Sacred 2 Quest|{{PAGENAME}}]] | [[Category:Sacred 2 Quest|{{PAGENAME}}]] | ||
[[Category:Sacred 2 Side Quest|{{PAGENAME}}]] | [[Category:Sacred 2 Side Quest|{{PAGENAME}}]] | ||
| + | [[Category:Sacred 2 Artamark Quest|{{PAGENAME}}]] | ||
Latest revision as of 21:04, 31 August 2014
|
| ||||||||||


Quick Walkthrough
|
| |||||||||
Detailed Walkthrough
Just south of the road from Orcish Byway to the Nor Plat Border Wall, you will find a small cabin that resembles a torture chamber. Inside you will meet the Insane Scientist Kragik.
|
| ||
 |
||


Catch a few Orcs for my unholy experiments.
Who are you? Ah an adventurer, very good. You can do something for me. I am transforming Orcs into undead minions and my need for fresh supplies is urgent. Soon my army will be large enough to control the whole world! Get me a few Orcs.
This guy is definitely out of his mind and must be stopped, so talk to him again.
The scientist and his two thugs will attack you. Inside his cabin is a tight space, so you will not have much room to maneuver. You might want to make sure you are as close to the down as possible before talking to him. After defeating them, talk to the orc that is in the room.


You let the orc go and the quest is complete.
Quest Enemies
Aid
|
|
Damage Types: Weakest Against: Quest:The Mad Butcher Quest Location: Orcish Byway in Artamark | ||||||||||||||||||


Insane Scientist Kragik
|
|
Damage Types: Weakest Against: Quest:The Mad Butcher Quest Location: Orcish Byway in Artamark | ||||||||||||||||||


Logbook Entry
| |||||||||

Notes
On the table next to the dissection table is a an Easter Egg: one of the "Vitruvian Orc" anatomy charts