Difference between revisions of "Sacred 2:Missing Patrol"
m (category added) |
|||
| (14 intermediate revisions by 5 users not shown) | |||
| Line 6: | Line 6: | ||
* '''Quest Objective:''' Find the missing patrol | * '''Quest Objective:''' Find the missing patrol | ||
* '''Quest Difficulty:''' 2 stars | * '''Quest Difficulty:''' 2 stars | ||
| − | * '''Quest Giver:''' [[Sacred 2:High Elf Soldier|High Elf Soldier]] | + | * '''Quest Giver:''' [[Sacred 2:High Elf Soldier - Sloeford|High Elf Soldier]] |
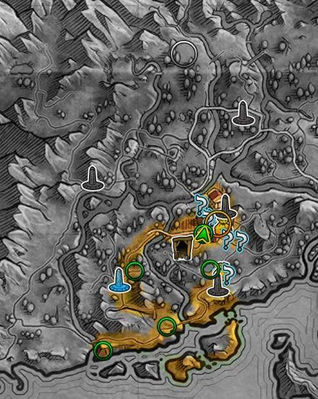
* '''Location(s):''' At the Bridge in Sloeford | * '''Location(s):''' At the Bridge in Sloeford | ||
| − | * '''Prerequisite Quest:''' [[Sacred 2: Highwaymen|Highwaymen]] | + | * '''Prerequisite Quest:''' [[Sacred 2: Highwaymen|Highwaymen]] |
* '''Next Quest:''' [[Sacred 2: Leader of the Pack|Leader of the pack]] | * '''Next Quest:''' [[Sacred 2: Leader of the Pack|Leader of the pack]] | ||
| − | * '''Reward:''' Experience and Gold | + | * '''Reward:''' [[Sacred 2:Experience|Experience]] and Gold |
| − | |WIDTH="20%" VALIGN="TOP"|[ | + | |WIDTH="20%" VALIGN="TOP"|{{S2frame|[[Image:LongwalkQ3.jpg|x400px]]}} |
| Line 17: | Line 17: | ||
== Quick Walkthrough == | == Quick Walkthrough == | ||
| − | * Talk to the High Elf Soldier | + | * Talk to the [[Sacred 2:High Elf Soldier - Sloeford|High Elf Soldier]]. |
| − | * Enter the cave | + | * Enter the cave southwest of [[Sacred 2:Sloeford|Sloeford]] and retrieve the 3 Medals and a map |
| − | * Return to the High Elf Soldier | + | * Return to the [[Sacred 2:High Elf Soldier - Sloeford|High Elf Soldier]] and talk to him to complete this quest. |
== Detailed Walkthrough == | == Detailed Walkthrough == | ||
| − | + | After speaking to the [[Sacred 2:High Elf Soldier - Sloeford|High Elf Soldier]] at Sloeford again, he will tell you that some of his men went missing a while back. | |
| − | After speaking to the High Elf Soldier at Sloeford again, he will tell you that some of his men went missing a while back | ||
| − | The way to the cave is rather simple, if you follow the yellow outline on the map below. | + | The way to the cave is rather simple, if you follow the yellow outline on the map below. Just follow the pathway past the |
| + | [[Sacred 2:High Elf Soldier - Sloeford|High Elf Soldier]] to a bridge. Cross that bridge, the cave is on the other side. | ||
| − | [ | + | There are some [[Sacred 2:Boar|Boars]] and [[Sacred 2:Wolf|Wolves]] between you and the cave. |
| − | + | {{S2frame|[[Image:map2.jpg|400px]]|left}} | |
| + | <br clear="both" /> | ||
| − | + | Once inside the cave, you will have to locate 3 Soldier's medals , and to make it a bit more eerie, they ask you to find a bloodstained map. Fortune has it, they are located right next to each other, the pictures below offer an overview of the cave along with it's route, and the actual items displayed on the cave floor. | |
| − | |||
| − | + | There are [[Sacred 2:Rat|Rats]], [[Sacred 2:Plague Rat|Plague Rats]] and [[Sacred 2:Brigand|Brigands]] inside the cave. | |
| − | [ | + | {{S2frame|[[Image:CavemapQ2.jpg|400px]]|left}} |
| + | {{S2frame|[[Image:objectiveQ2.jpg|x325px]]|left}} | ||
| + | <br clear="both" /> | ||
| + | After finding all 4 items, return to the [[Sacred 2:High Elf Soldier - Sloeford|High Elf Soldier]] to complete the quest. | ||
| + | You will need to talk to him again to start the third quest in the chain. | ||
| + | |||
| + | {{S2frame|[[Image:questend.jpg|400px]]|left}} | ||
| + | <br clear="both" /> | ||
== Logbook Entry == | == Logbook Entry == | ||
| − | [ | + | {{S2frame|[[Image:missingpatrollog.jpg|400px]]|left}} |
| + | <br clear="both" /> | ||
| + | A guard in the village told me that a patrol has been missing for several days. He has asked me to go and find out what has befallen them. | ||
| + | I found the patrol. There's no doubt about it, the bodies were still carrying their insignia. They are all dead! Evidently bandits killed them. Poor devils. I will relate the sad news to the villagers and take the map that I found on one of the bodies to them. | ||
| + | I have passed on the message. The villagers have another task waiting for me. | ||
| + | == Notes == | ||
| + | * In this cave it is recommended to use a spell/attack with an 'area of effect'. The opponents have very little health, but they are numerous. Hitting multiple opponents at a time in a cave like this is bound to save you a lot of time. | ||
| − | + | * If you do not like revisiting places, you will want to do this quest at the same time that you do [[Sacred 2:Michel, the Blacksmith's Apprentice|Michael, the Blacksmith's Apprentice]]. Both quests take you to the same cave. | |
| − | * | ||
</div> | </div> | ||
| − | [[Category:Sacred 2 Chain Quest]] | + | |
| − | [[Category:Sacred 2 Quest]] | + | [[Category:Sacred 2 Quest|{{PAGENAME}}]] |
| + | |||
| + | [[Category:Sacred 2 Chain Quest Part|{{SUBPAGENAME}}]] | ||
| + | [[Category:Sacred 2 Tyr Lysia Quest|{{PAGENAME}}]] | ||
Latest revision as of 00:19, 2 September 2013
|
| ||||||||||
Quick Walkthrough
- Talk to the High Elf Soldier.
- Enter the cave southwest of Sloeford and retrieve the 3 Medals and a map
- Return to the High Elf Soldier and talk to him to complete this quest.
Detailed Walkthrough
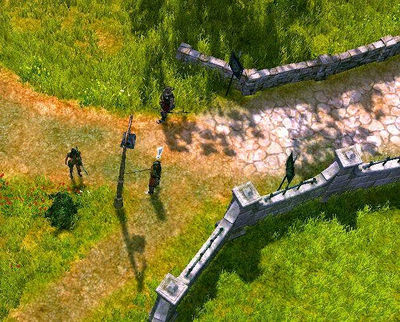
After speaking to the High Elf Soldier at Sloeford again, he will tell you that some of his men went missing a while back.
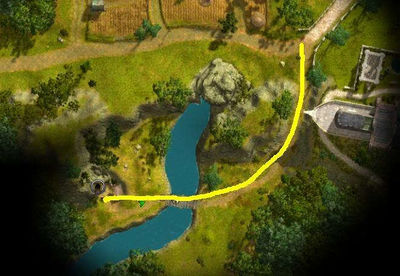
The way to the cave is rather simple, if you follow the yellow outline on the map below. Just follow the pathway past the High Elf Soldier to a bridge. Cross that bridge, the cave is on the other side.
There are some Boars and Wolves between you and the cave.
|
| ||
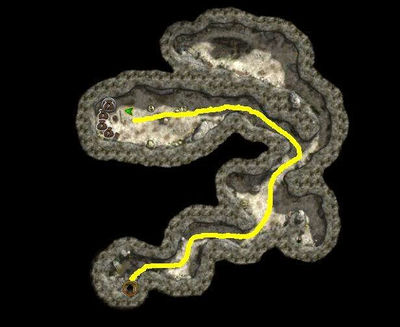
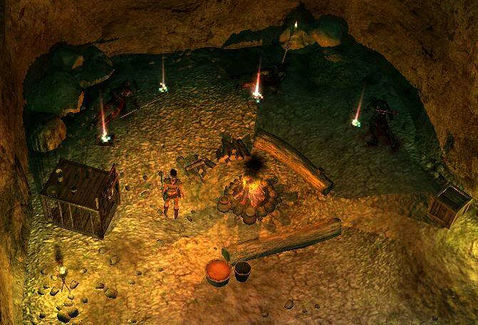
Once inside the cave, you will have to locate 3 Soldier's medals , and to make it a bit more eerie, they ask you to find a bloodstained map. Fortune has it, they are located right next to each other, the pictures below offer an overview of the cave along with it's route, and the actual items displayed on the cave floor.
There are Rats, Plague Rats and Brigands inside the cave.
|
| ||
|
| ||
After finding all 4 items, return to the High Elf Soldier to complete the quest. You will need to talk to him again to start the third quest in the chain.
|
| ||
Logbook Entry
|
| ||
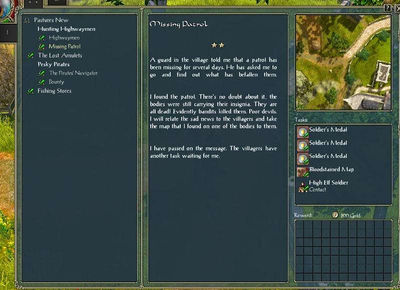
A guard in the village told me that a patrol has been missing for several days. He has asked me to go and find out what has befallen them.
I found the patrol. There's no doubt about it, the bodies were still carrying their insignia. They are all dead! Evidently bandits killed them. Poor devils. I will relate the sad news to the villagers and take the map that I found on one of the bodies to them.
I have passed on the message. The villagers have another task waiting for me.
Notes
- In this cave it is recommended to use a spell/attack with an 'area of effect'. The opponents have very little health, but they are numerous. Hitting multiple opponents at a time in a cave like this is bound to save you a lot of time.
- If you do not like revisiting places, you will want to do this quest at the same time that you do Michael, the Blacksmith's Apprentice. Both quests take you to the same cave.
