Difference between revisions of "Sacred 2:Inquisitor Ortlewyn"
(added m-map start location, edited quick walkthrough to meet 'standard' format, added pix to detailed walkthrough, swapped logbook text for img, removed chain category) |
|||
| (12 intermediate revisions by 4 users not shown) | |||
| Line 1: | Line 1: | ||
{{Languages}} | {{Languages}} | ||
| − | |||
| − | |||
| − | |||
| − | |||
<div class="plainlinks"> | <div class="plainlinks"> | ||
| − | {| | + | {|WIDTH="100%" |
| − | |WIDTH=" | + | |WIDTH="15%" VALIGN="TOP"|__TOC__ |
| − | |WIDTH=" | + | |WIDTH="35%" VALIGN="TOP"| |
| − | * '''Quest Objective:''' Eliminate the Inquisitor | + | * '''Quest Objective:''' Eliminate the [[Sacred 2:Ortlewyn|Inquisitor Ortlewyn]] |
* '''Quest Difficulty:''' 2 stars | * '''Quest Difficulty:''' 2 stars | ||
* '''Quest Giver:''' [[Sacred 2:Aristocratic Spy|Aristocratic Spy]] | * '''Quest Giver:''' [[Sacred 2:Aristocratic Spy|Aristocratic Spy]] | ||
| − | * '''Location(s):''' | + | * '''Location(s):''' On the hill southeast of [[Sacred 2:Noriath Temple|Noriath Temple]] |
* '''Prerequisite Quest:''' [[Sacred 2:The Guardsmen in the Ruins|The Guardsmen in the Ruins]] | * '''Prerequisite Quest:''' [[Sacred 2:The Guardsmen in the Ruins|The Guardsmen in the Ruins]] | ||
* '''Next Quest:''' None | * '''Next Quest:''' None | ||
| − | * '''Reward:''' [[Sacred 2:Gold|Gold]] | + | * '''Reward:''' [[Sacred 2:Gold|Gold]], [[Sacred 2:Experience|Experience]] |
| − | |WIDTH=" | + | |WIDTH="50%" VALIGN="TOP"| {{S2frame|[[Image:Aristocratic spy map.jpg|250px]][[Image:Aristocratic spy minimap.jpg|250px]]|right|'''[[Sacred 2:Map of Ancaria|View the Ancaria Interactive Map]]'''}} |
|} | |} | ||
| − | + | {|WIDTH="100%" | |
| + | |WIDTH="60%" VALIGN="TOP"| | ||
== Quick Walkthrough == | == Quick Walkthrough == | ||
| − | * Talk to the Aristocratic Spy | + | * Talk to the [[Sacred 2:Aristocratic Spy|Aristocratic Spy]] again to start the quest. |
| − | * Kill Inquisitor Ortlewyn | + | * Head southwest to the lake and find [[Sacred 2:Ortlewyn|Inquisitor Ortlewyn]] on its bank. |
| − | * | + | * Talk to Inquisitor Ortlewyn. |
| − | + | * Kill Inquisitor Ortlewyn. | |
| − | + | * Walk to the [[Sacred 2:Noriath Temple|Noriath Temple]] and report to [[Sacred 2:Lumen Priest Benewion|Lumen Priest Benewion]]. | |
| + | |WIDTH="40%" VALIGN="TOP"|{{S2frame|[[Image:Noriath camera3.jpg|500px]]}} | ||
| + | |} | ||
== Detailed Walkthrough == | == Detailed Walkthrough == | ||
| − | Talk to | + | While you were fighting the [[Sacred 2:Guardsman - Protecting Noriath's Corner Quest|Guardsmen]] of the Inquisition, the spy noticed something important. Talk to him to know what it is.<br> |
| − | [ | + | [[Image:Noriath dialog3.jpg]]<br> |
| − | + | After all, he managed to spot the mastermind behind the Inquisition invasion. Eliminating this menace would ruin all the plans the Inquisition has. So this becomes your new task.<br> | |
| − | [ | + | Now you should walk back down the hill where the [[Sacred 2:Aristocratic Spy|Spy]] is camped and run west until you reach a lake. Head south and then west along the lake’s edge until you find [[Sacred 2:Ortlewyn|Inquisitor Ortlewyn]] standing on the bank.<br> |
| − | + | {{S2frame|[[Image:Noriath2 walk worldmap.jpg|250px]][[Image:Noriath2 walk map.jpg|250px]]|left}} | |
| − | [ | + | <br clear="both" /> |
| − | + | The Inquisitor was spotted - he is hiding in the shadow of the trees near the lake. <br> | |
| − | [ | + | {{S2frame|[[Image:Noriath camera4.jpg|400px]]|left}} |
| − | + | <br clear="both" /> | |
| − | + | You should talk to him. Maybe he would tell you something about the Inquisition plans... most probably not, but it won't hurt to try.<br> | |
| − | + | [[Image:Noriath dialog4.jpg]]<br> | |
| + | As expected, he mumbled some nonscence and tried to kill you. That was very stupid of him. What a mastermind could make such a mistake? But anyway, he's dead now. So you can inform the Lumen Priests of the Noriath Temple, who were opposing the Inquisition, that the threat has been eliminated.<br> | ||
| + | To get to the Temple you should head east back to the road, and then follow it all the way north until you reach the gate. <br> | ||
| + | {{S2frame|[[Image:Benewion minimap.jpg|243px]][[Image:Whoops map.jpg|257px]]|left}} | ||
| + | <br clear="both" /> | ||
| + | [[Sacred 2:Lumen Priest Benewion|Lumen Priest Benewion]], who was mentioned by the spy, can be found a bit east of the Temple itself, next to the priests' house.<br> | ||
| + | {{S2frame|[[Image:Noriath camera5.jpg|400px]]|left}} | ||
| + | <br clear="both" /> | ||
| + | Of course he would be glad to hear that nothing threatens him and his fellow priests anymore.<br> | ||
| + | [[Image:Noriath dialog5.jpg]]<br> | ||
| + | Benewion was happy to hear the news and rewarded you for your help. Your crusade against the Inquisition in Noriath's Corner is over now. | ||
| + | ==Quest Enemies== | ||
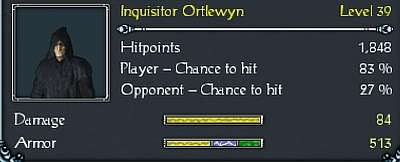
| + | ===[[Sacred 2:Ortlewyn|Inquisitor Ortlewyn]]=== | ||
| + | {{:Sacred 2:Ortlewyn}} | ||
== Logbook Entry == | == Logbook Entry == | ||
| − | [ | + | {{S2frame|[[Image:Noriath log2.jpg|300px]]|left}} |
| − | + | <br clear="both" /> | |
| − | |||
| − | |||
== Notes == | == Notes == | ||
| − | * | + | * This [[Sacred 2:Aristocratic Spy|Aristocratic Spy]] is the same one that gets killed in [[Sacred 2:The High Nobility's Spy|The High Nobility's Spy]] quest of the [[Sacred 2:Powers In Noriath's Corner|Powers In Noriath's Corner]] chain, the Shadow counterpart of {{PAGENAME}} quest. |
| − | * | + | * The green portal near [[Sacred 2:Noriath Temple|Noriath Temple]] will teleport you to the [[Sacred 2:Celestial Dome|Celestial Dome]] (Northwest of [[Sacred 2:Sloeford|Sloeford]]) if you click it. |
| − | + | * The [[Sacred 2:Seraphim|Seraphim's]] class quest [[Sacred 2:Whoops|Whoops]] starts at [[Sacred 2:Noriath Temple|Noriath Temple]]. | |
| − | |||
| − | |||
</div> | </div> | ||
| − | + | [[Category:Sacred 2 Quest|{{PAGENAME}}]] | |
| − | + | [[Category:Sacred 2 Chain Quest Part|{{PAGENAME}}]] | |
| − | [[Category:Sacred 2 Quest]] | + | [[Category:Sacred 2 Light Path Quest|{{PAGENAME}}]] |
| + | [[Category:Sacred 2 Tyr Lysia Quest|{{PAGENAME}}]] | ||
Latest revision as of 00:22, 23 December 2011
|
| ||||||||||


Quick Walkthrough
|
| |||||||||

Detailed Walkthrough
While you were fighting the Guardsmen of the Inquisition, the spy noticed something important. Talk to him to know what it is.

After all, he managed to spot the mastermind behind the Inquisition invasion. Eliminating this menace would ruin all the plans the Inquisition has. So this becomes your new task.
Now you should walk back down the hill where the Spy is camped and run west until you reach a lake. Head south and then west along the lake’s edge until you find Inquisitor Ortlewyn standing on the bank.
|
| ||
  |
||
The Inquisitor was spotted - he is hiding in the shadow of the trees near the lake.
|
| ||
 |
||
You should talk to him. Maybe he would tell you something about the Inquisition plans... most probably not, but it won't hurt to try.

As expected, he mumbled some nonscence and tried to kill you. That was very stupid of him. What a mastermind could make such a mistake? But anyway, he's dead now. So you can inform the Lumen Priests of the Noriath Temple, who were opposing the Inquisition, that the threat has been eliminated.
To get to the Temple you should head east back to the road, and then follow it all the way north until you reach the gate.
|
| ||
  |
||
Lumen Priest Benewion, who was mentioned by the spy, can be found a bit east of the Temple itself, next to the priests' house.
|
| ||
 |
||
Of course he would be glad to hear that nothing threatens him and his fellow priests anymore.

Benewion was happy to hear the news and rewarded you for your help. Your crusade against the Inquisition in Noriath's Corner is over now.
Quest Enemies
Inquisitor Ortlewyn
|
|
Damage Types: Weakest Against: Quest:Inquisitor Ortlewyn Quest Location: Noriath Temple in Tyr Lysia | ||||||||||||||||||


Logbook Entry
|
| ||
 |
||
Notes
- This Aristocratic Spy is the same one that gets killed in The High Nobility's Spy quest of the Powers In Noriath's Corner chain, the Shadow counterpart of Inquisitor Ortlewyn quest.
- The green portal near Noriath Temple will teleport you to the Celestial Dome (Northwest of Sloeford) if you click it.
- The Seraphim's class quest Whoops starts at Noriath Temple.