Difference between revisions of "Sacred 2:Present for the Bride"
(Applied template) |
|||
| (5 intermediate revisions by 2 users not shown) | |||
| Line 1: | Line 1: | ||
| − | |||
| − | |||
| − | |||
<div class="plainlinks"> | <div class="plainlinks"> | ||
{|WIDTH="100%" | {|WIDTH="100%" | ||
|WIDTH="15%" VALIGN="TOP"|__TOC__ | |WIDTH="15%" VALIGN="TOP"|__TOC__ | ||
|WIDTH="35%" VALIGN="TOP"| | |WIDTH="35%" VALIGN="TOP"| | ||
| − | * '''Quest Objective:''' | + | * '''Quest Objective:''' Rescue Jocelyn's fiancé and his friend |
| − | * '''Quest Difficulty:''' | + | * '''Quest Difficulty:''' 2 stars |
| − | * '''Quest Giver:''' | + | * '''Quest Giver:''' [[Sacred 2:Jocelyn|Jocelyn]] |
| − | * '''Location(s):''' | + | * '''Location(s):''' [[Sacred 2:Griffinborough|Griffinborough]], [[Sacred 2:Artamark|Artamark]]'s capital |
| − | * '''Prerequisite Quest:''' | + | * '''Prerequisite Quest:''' None |
| − | * '''Next Quest:''' | + | * '''Next Quest:''' None |
| − | * '''Reward:''' | + | * '''Reward:''' [[Sacred 2:Gold|Gold]], [[Sacred 2:Experience|Experience]] |
| − | |WIDTH="50%" VALIGN="TOP"| | + | |WIDTH="50%" VALIGN="TOP"| |
| − | + | {{S2frame|[[Image:PresentForTheBride_Jocelyn_map.jpg|250px]][[Image:PresentForTheBride_Jocelyn_tabmap.jpg|250px]]|right|'''[[Sacred 2:Map of Ancaria|View the Ancaria Interactive Map]]'''}} | |
| − | {{S2frame|[[Image: | ||
|} | |} | ||
{|WIDTH="100%" | {|WIDTH="100%" | ||
|WIDTH="60%" VALIGN="TOP"| | |WIDTH="60%" VALIGN="TOP"| | ||
== Quick Walkthrough == | == Quick Walkthrough == | ||
| − | + | * Talk to [[Sacred 2:Jocelyn|Jocelyn]] in Griffinborough | |
| − | * | + | * Talk to [[Sacred 2:Achmed|Achmed]], also in Griffinborough |
| − | * | + | * Find the cave where the grave of Caling is |
| − | * | + | * Kill the Goblins inside the cave |
| − | |WIDTH="40%" VALIGN="TOP"|{{S2frame|[[Image: | + | * Rescue [[Sacred 2:Davim|Davim]] and [[Sacred 2:Mettrick|Mettrick]] |
| + | * Grab the dragon claw in the grave of Caling | ||
| + | * Go back to Griffinborough and talk Jocelyn for your reward | ||
| + | |WIDTH="40%" VALIGN="TOP"|{{S2frame|[[Image:PresentForTheBride_Jocelyn_camera.jpg|500px]]}} | ||
|} | |} | ||
== Detailed Walkthrough == | == Detailed Walkthrough == | ||
| − | |||
| − | + | While taking a walk through Griffinborough streets, a young lady stops you and asks for your help. She looks very nervous, and explains that Davim, her fiancé, is missing for several days. They planned to marry next week, so she's very worried about him. | |
| + | {{S2frame|[[Image:PresentForTheBride_Jocelyn_dialog.jpg|430px]]|left}} | ||
| + | <br clear="both" /> | ||
| + | She also tells you that Davim's best friend, Mattrick, is also missing, so she tells you should talk to Davim's brother in law, Achmed. He probably will tell you something useful to find the two guys. | ||
| + | {{S2frame|[[Image:PresentForTheBride_Achmed_map.jpg|250px]][[Image:PresentForTheBride_Achmed_tabmap.jpg|250px]]|left]]}} | ||
| + | You walk to meet Achmed near the south west city entrance, next to the city wall. Achmed explains that Davim and Mattrick are old friends who are always plotting something... and not always have good ideas! | ||
| − | + | But Achmed tells you some important information: there's an old tradition in Artamark of giving a dragon claw to the bride, because it's the symbol of long live and fertility. And Mettrick said something about the grave of Caling, a famous dragon hunter who lived in Griffinborough long ago. The tale tells that Caling slew the last dragon of the region, before he was buried in a dragon cave many years ago. So you'd better start walking to the cave! | |
| − | + | {{S2frame|[[Image:PresentForTheBride_Achmed_camera.jpg|400px]]|left}} | |
| − | + | <br clear="both" /> | |
| − | {{S2frame|[[Image: | + | {{S2frame|[[Image:PresentForTheBride_Achmed_dialog.jpg|430px]]|left}} |
| + | <br clear="both" /> | ||
| + | North west from Griffinborough you find the cave where Caling grave is, and you walk inside. You are attacked by several goblins as soon as you enter the cave, but you fight them bravely and you are victorious! That was a good fight, but you hear someone shouting inside the cave... let's move in! | ||
| + | {{S2frame|[[Image:PresentForTheBride_Cave_map.jpg|250px]][[Image:PresentForTheBride_Cave_tabmap.jpg|250px]]|left]]}} | ||
| + | {{S2frame|[[Image:PresentForTheBride_Cave_camera.jpg|400px]]|left}} | ||
| + | <br clear="both" /> | ||
| + | Oh, Davim is so happy to see you... he tells the goblins infested the graveyard cave, thus they've been sucked in for days. He tells you to pick the dragon claw from Caling's grave and get away from the cave, so you walk back to the tomb to look for the claw. | ||
| + | {{S2frame|[[Image:PresentForTheBride_Davim_tabmap.jpg|400px]]|left}} | ||
| + | {{S2frame|[[Image:PresentForTheBride_Davim_camera.jpg|400px]]|left}} | ||
| + | <br clear="both" /> | ||
| + | {{S2frame|[[Image:PresentForTheBride_Davim_dialog.jpg|430px]]|left}} | ||
| + | <br clear="both" /> | ||
| + | You and Davim look for the claw inside the tomb and you finally find it! That will be a great present for Jocelyn!! | ||
| + | {{S2frame|[[Image:PresentForTheBride_Grave_tabmap.jpg|400px]]|left}} | ||
| + | <br clear="both" /> | ||
| + | {{S2frame|[[Image:PresentForTheBride_Grave_camera.jpg|400px]]|left}} | ||
| + | {{S2frame|[[Image:PresentForTheBride_DragonClaw_camera.jpg|400px]]|left}} | ||
<br clear="both" /> | <br clear="both" /> | ||
| − | + | After all the adventure, you escort Davim and Mettrick back to Griffinborough. As soon as you meet Jocelyn... well, of course she's very happy to see her fiancé in a single piece. She is pleased to receive the dragon claw, and you are given a generous amount of gold in exchange for your help. | |
| − | + | {{S2frame|[[Image:PresentForTheBride_Jocelyn_camera_end.jpg|400px]]|left}} | |
| − | {{S2frame|[[Image: | ||
<br clear="both" /> | <br clear="both" /> | ||
| − | + | {{S2frame|[[Image:PresentForTheBride_Jocelyn_dialog_end.jpg|430px]]|left}} | |
| − | |||
| − | {{S2frame|[[Image: | ||
<br clear="both" /> | <br clear="both" /> | ||
| + | It has been a great day! You rescued those guys, saved the marrying and filled your gold bag, all in a row! | ||
| + | == Quest Enemies == | ||
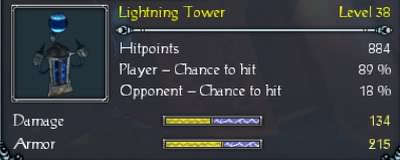
| − | + | === [[Sacred 2:Lightning Tower|Lightning Tower]] === | |
| − | + | {{:Sacred 2:Lightning Tower}} | |
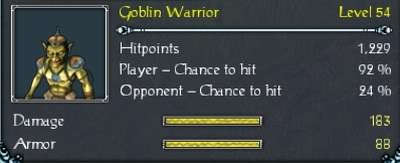
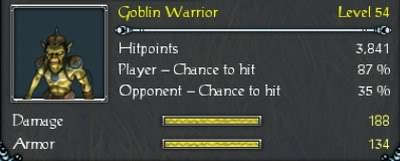
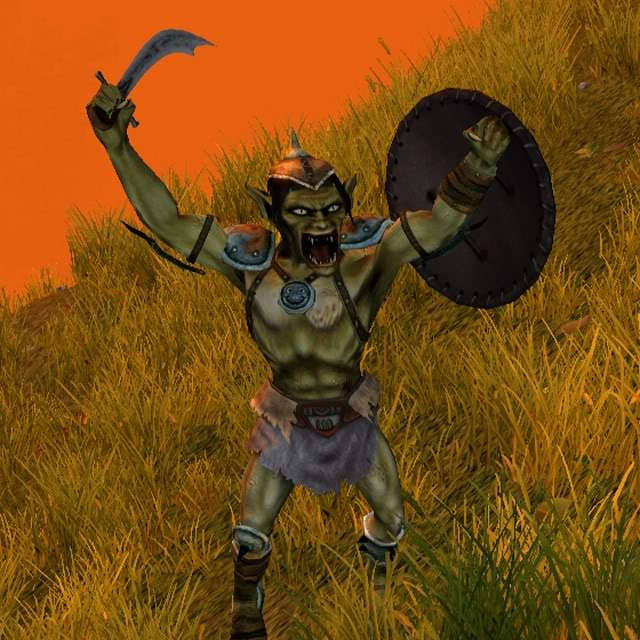
| − | [[ | + | === [[Sacred 2:Goblin Warrior|Goblin Warrior]] === |
| − | + | {{:Sacred 2:Goblin Warrior}} | |
| − | + | === [[Sacred 2:Goblin Shaman|Goblin Shaman]] === | |
| − | + | {{:Sacred 2:Goblin Shaman}} | |
| − | |||
| − | |||
| − | + | * Various kinds of rats may also be found inside the cave, such as [[Sacred 2:Rat|rats]], [[Sacred 2:Plague Rat|plague rats]] and [[Sacred 2:Dark Rodent|dark rodents]]. | |
| − | |||
| − | |||
| − | |||
== Hirelings and Escorts == | == Hirelings and Escorts == | ||
| − | + | * [[Sacred 2:Davim|Davim]] - Escort. Immortal. Tries to escape the fight. | |
| − | + | * [[Sacred 2:Mettrick|Mettrick]] - Escort. Immortal. Tries to escape the fight. | |
| − | * [[Sacred 2: | ||
| − | * [[Sacred 2: | ||
== Logbook Entry == | == Logbook Entry == | ||
| − | |||
{| | {| | ||
| − | |{{S2frame|[[Image: | + | |{{S2frame|[[Image:PresentForTheBride_logbook1.jpg|300px]]|left}} |
| − | |{{S2frame|[[Image: | + | |{{S2frame|[[Image:PresentForTheBride_logbook2.jpg|300px]]|left}} |
|} | |} | ||
== Notes == | == Notes == | ||
| − | |||
| − | |||
| + | Bug Alert: Sometimes after completing the quest, the display will still show Davim and Mettrick as escorts even though they are not with you. Saving and reloading may clear the display error. | ||
</div> | </div> | ||
| − | |||
[[Category:Sacred 2 Quest|{{PAGENAME}}]] | [[Category:Sacred 2 Quest|{{PAGENAME}}]] | ||
[[Category:Sacred 2 Side Quest|{{PAGENAME}}]] | [[Category:Sacred 2 Side Quest|{{PAGENAME}}]] | ||
| − | [[Category:Sacred 2 | + | [[Category:Sacred 2 Artamark Quest|{{PAGENAME}}]] |
| − | |||
| − | |||
| − | |||
| − | |||
| − | |||
| − | |||
Latest revision as of 20:39, 21 December 2011
|
| ||||||||||


Quick Walkthrough |
| |||||||||

Detailed Walkthrough
While taking a walk through Griffinborough streets, a young lady stops you and asks for your help. She looks very nervous, and explains that Davim, her fiancé, is missing for several days. They planned to marry next week, so she's very worried about him.
|
| ||
 |
||
She also tells you that Davim's best friend, Mattrick, is also missing, so she tells you should talk to Davim's brother in law, Achmed. He probably will tell you something useful to find the two guys.
|
| ||
  |
||
You walk to meet Achmed near the south west city entrance, next to the city wall. Achmed explains that Davim and Mattrick are old friends who are always plotting something... and not always have good ideas!
But Achmed tells you some important information: there's an old tradition in Artamark of giving a dragon claw to the bride, because it's the symbol of long live and fertility. And Mettrick said something about the grave of Caling, a famous dragon hunter who lived in Griffinborough long ago. The tale tells that Caling slew the last dragon of the region, before he was buried in a dragon cave many years ago. So you'd better start walking to the cave!
|
| ||
 |
||
|
| ||
 |
||
North west from Griffinborough you find the cave where Caling grave is, and you walk inside. You are attacked by several goblins as soon as you enter the cave, but you fight them bravely and you are victorious! That was a good fight, but you hear someone shouting inside the cave... let's move in!
|
| ||
  |
||
|
| ||
 |
||
Oh, Davim is so happy to see you... he tells the goblins infested the graveyard cave, thus they've been sucked in for days. He tells you to pick the dragon claw from Caling's grave and get away from the cave, so you walk back to the tomb to look for the claw.
|
| ||
 |
||
|
| ||
 |
||
|
| ||
 |
||
You and Davim look for the claw inside the tomb and you finally find it! That will be a great present for Jocelyn!!
|
| ||
 |
||
|
| ||
 |
||
|
| ||
 |
||
After all the adventure, you escort Davim and Mettrick back to Griffinborough. As soon as you meet Jocelyn... well, of course she's very happy to see her fiancé in a single piece. She is pleased to receive the dragon claw, and you are given a generous amount of gold in exchange for your help.
|
| ||
 |
||
|
| ||
 |
||
It has been a great day! You rescued those guys, saved the marrying and filled your gold bag, all in a row!
Quest Enemies
Lightning Tower
|
|
Damage Types: Weakest Against: Region: | ||||||||||||||||||


Goblin Warrior
|
|
Damage Types: Weakest Against: Region: Nor Plat | ||||||||||||||||||

|
|
Damage Types: Weakest Against: Region: Nor Plat | ||||||||||||||||||
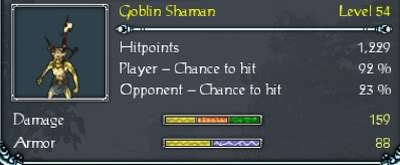
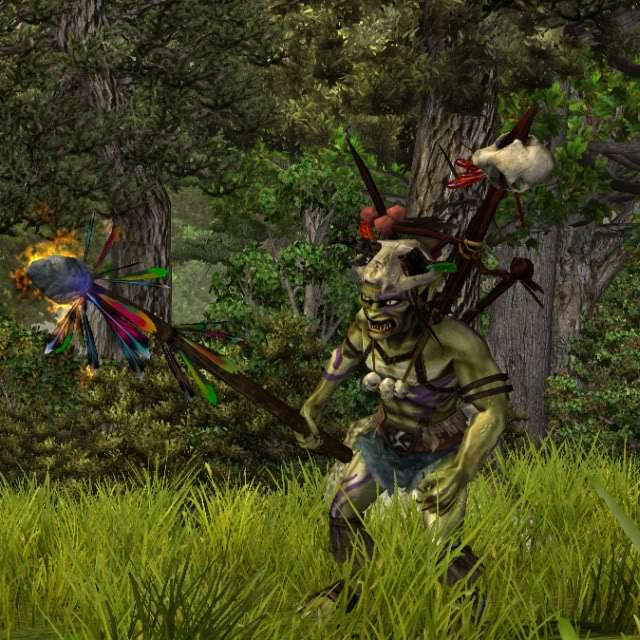
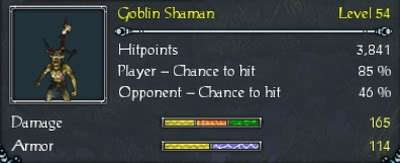
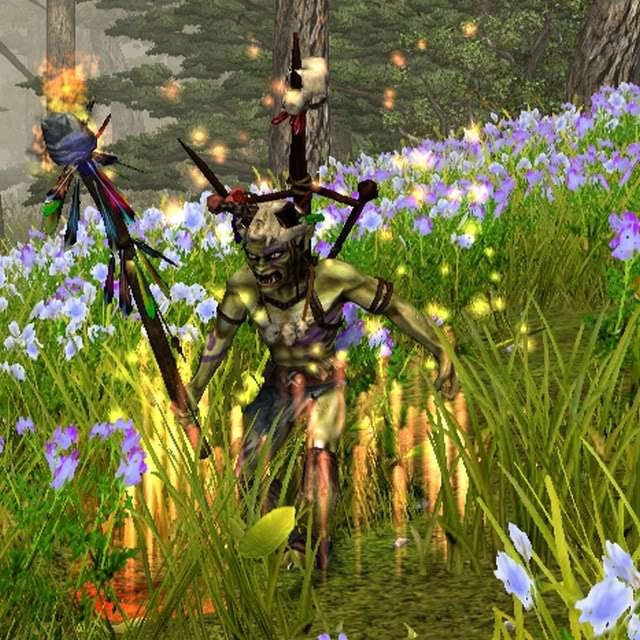
Goblin Shaman
|
|
Damage Types: Weakest Against: Region: Nor Plat | ||||||||||||||||||
|
|
Damage Types: Weakest Against: Region: Nor Plat | ||||||||||||||||||
- Various kinds of rats may also be found inside the cave, such as rats, plague rats and dark rodents.
Hirelings and Escorts
- Davim - Escort. Immortal. Tries to escape the fight.
- Mettrick - Escort. Immortal. Tries to escape the fight.
Logbook Entry
|
| ||||||||||||||||||


Notes
Bug Alert: Sometimes after completing the quest, the display will still show Davim and Mettrick as escorts even though they are not with you. Saving and reloading may clear the display error.