Difference between revisions of "Sacred 2:The End of Life"
(New page: {{subst:Quest}}) |
|||
| (3 intermediate revisions by one other user not shown) | |||
| Line 1: | Line 1: | ||
| − | |||
| − | |||
| − | |||
<div class="plainlinks"> | <div class="plainlinks"> | ||
{|WIDTH="100%" | {|WIDTH="100%" | ||
|WIDTH="15%" VALIGN="TOP"|__TOC__ | |WIDTH="15%" VALIGN="TOP"|__TOC__ | ||
|WIDTH="35%" VALIGN="TOP"| | |WIDTH="35%" VALIGN="TOP"| | ||
| − | * '''Quest Objective:''' | + | * '''Quest Objective:''' Destroy the artifact |
| − | * '''Quest Difficulty:''' | + | * '''Quest Difficulty:''' No difficulty given for this quest |
| − | * '''Quest Giver:''' | + | * '''Quest Giver:''' [[Sacred 2:Ancient Marla|Ancient Malra]] |
| − | * '''Location(s):''' | + | * '''Location(s):''' [[Sacred 2:Dyr Lain|Dyr Lain]] region, west of [[Sacred 2:Aerendyr|Aerendyr]] (near [[Sacred 2:Forest Guardian|Forest Guardian]]) |
| − | * '''Prerequisite Quest:''' | + | * '''Prerequisite Quest:''' [[Sacred 2:Waking the Dead|Waking the Dead]] |
| − | * '''Next Quest:''' | + | * '''Next Quest:''' None |
| − | * '''Reward:''' | + | * '''Reward:''' [[Sacred 2:Gold|Gold]] [[Sacred 2:Experience|Experience]] [[Sacred 2:Tyranny of the Condemned|Tyranny of the Condemned]] |
| − | |WIDTH="50%" VALIGN="TOP"| | + | * '''Main Quest Page:''' [[Sacred 2:Shadow Warrior Class Chain Quest - Light]] |
| + | |WIDTH="50%" VALIGN="TOP"| | ||
| − | {{S2frame|[[Image: | + | {{S2frame|[[Image:dyrlaincavemap.jpg|250px]][[Image:dyrlaincavetab.jpg|250px]]|right|'''[[Sacred 2:Map of Ancaria|View the Ancaria Interactive Map]]'''}} |
|} | |} | ||
{|WIDTH="100%" | {|WIDTH="100%" | ||
|WIDTH="60%" VALIGN="TOP"| | |WIDTH="60%" VALIGN="TOP"| | ||
== Quick Walkthrough == | == Quick Walkthrough == | ||
| − | + | * Speak to [[Sacred 2:Ancient Marla|Ancient Malra]] in cave | |
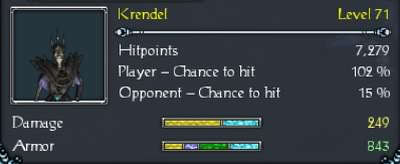
| − | * | + | * Go further into cave and defeat the undead [[Sacred 2:Krendel|Krendel]] |
| − | * | + | * Return to Marla and then head to [[Sacred 2:Wastelands|Wastelands]] |
| − | * | + | * Speak to the [[Sacred 2:Cleric|Cleric]] at the [[Sacred 2:Wastelands Coast|Wastelands Coast]] |
| − | |WIDTH="40%" VALIGN="TOP"|{{S2frame|[[Image: | + | * Defeat 5 Clerics and then head to [[Sacred 2:Great Machine|Great Machine]] |
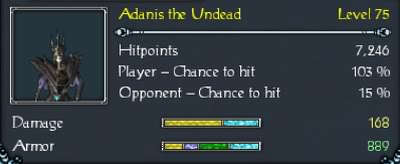
| + | * Speak to [[Sacred 2:Hudelia|Hudelia]] and then to [[Sacred 2:Adanis the Undead|Adanis the Undead]] | ||
| + | * Defeat Adanis to complete this loooooong quest and get your reward: [[Sacred 2:Tyranny of the Condemned|Tyranny of the Condemned]] | ||
| + | |||
| + | |WIDTH="40%" VALIGN="TOP"|{{S2frame|[[Image:marlaloc.jpg|500px]]}} | ||
|} | |} | ||
== Detailed Walkthrough == | == Detailed Walkthrough == | ||
| − | + | When you enter the cave you will meet [[Sacred 2:Ancient Marla|Ancient Malra]]. She has felt the rift in the boundary between life and death and when it was sealed by your cleansing of the sword. But before you could do that a strong lich managed to cross over. He is now trying to call all the undead on the island to rise up. She wants you to kill the lich and stop him from contaminating her home land. | |
| − | + | {{S2frame|[[Image:marlachat.jpg|430px]]|left}} | |
| + | <br clear="both" /> | ||
| + | {{S2frame|[[Image:marlacave.jpg|400px]]|left}} | ||
| + | <br clear="both" /> | ||
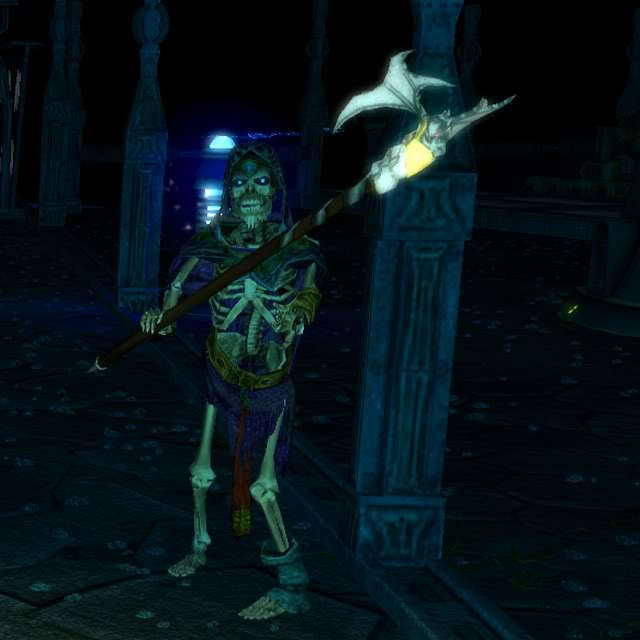
| − | + | You head further into the cave and find the lair of the lich. At the end of the cave you find [[Sacred 2:Krendel|Krendel]]. | |
| − | {{S2frame|[[Image: | + | {{S2frame|[[Image:Krendel.jpg|300px]]|left}} |
<br clear="both" /> | <br clear="both" /> | ||
| + | After all you've been through he shouldn't be much of a challenge. Defeat him and head back to Marla with the news. She thanks you but asks you to leave the island as soon as possible. Seems she doesn't want the sword anywhere near her either. You do as she asks following the tug of the medallion. | ||
| + | |||
| + | |||
| + | {{S2frame|[[Image:marlachat2.jpg|430px]]|left}} | ||
| + | <br clear="both" /> | ||
| + | |||
| + | |||
| + | It leads you to the [[Sacred 2:Wastelands Coast|Wastelands Coast]]. You run into some clerics at the small camp there. They didn't seem to mind you killing Orkus but they won't allow you to destroy the sword. It's too valuable to them. But you have had enough of resurrections and of the clerics. You refuse to give up the sword and they attack you. Unfortunately for them, they are no match for you and you send them to their maker. | ||
| + | |||
| + | {{S2frame|[[Image:clericmap.jpg|250px]][[Image:clerictab.jpg|250px]]|left]]}} | ||
| + | <br clear="both" /> | ||
| − | {{S2frame|[[Image: | + | {{S2frame|[[Image:clericloc.jpg|400px]]|left}} |
<br clear="both" /> | <br clear="both" /> | ||
| − | + | ||
| − | {{S2frame|[[Image: | + | {{S2frame|[[Image:clericchat.jpg|430px]]|left}} |
<br clear="both" /> | <br clear="both" /> | ||
| − | + | You continue heading north traversing bridges and caves until you get to the Great Machine. Continue through the Machine until you are in a huge circular room. Near the far end you see Hudelia....And Adanis the Undead. She reminds you about why they made the sword and explains that Adanis was one of the first to be brought back. She knows the sword must be destroyed but before that happens she wants to let Adanis use it. He has been a stalwart ally through the centuries. Seems he's discovered a way to be truly alive, but needs the sword in order to try. You got a bad feeling about this but reluctantly hand over the sword. | |
| − | |||
| − | + | {{S2frame|[[Image:adanismap.jpg|250px]][[Image:adanistab.jpg|250px]]|left]]}} | |
| + | <br clear="both" /> | ||
| − | {{S2frame|[[Image: | + | {{S2frame|[[Image:adanisloc.jpg|400px]]|left}} |
<br clear="both" /> | <br clear="both" /> | ||
| − | |||
| − | |||
| − | + | {{S2frame|[[Image:hudelia3chat.jpg|430px]]|left}} | |
| − | {{: | + | <br clear="both" /> |
| + | |||
| + | |||
| + | |||
| + | As soon as Adanis grabs the sword you know you've been had. He starts going on and on about how the power is coursing through him and how he's going to rule the world with an undead army. He should have been paying more attention as you immediately attack and cut him down. | ||
| + | |||
| + | |||
| + | {{S2frame|[[Image:adanischat.jpg|430px]]|left}} | ||
| + | <br clear="both" /> | ||
| + | |||
| + | He will rise once more after you kill him the first time, showing his true entity, a lich. Defeat him a second time to put an end to him forever. As Adanis is absorbed back into the netherworld, the sword is sucked in with him and the portal window closes. Good riddance to both. You turn and realize Hudelia has paid the highest price for trusting the wrong person. She lays on the floor dead. You, neither dead nor living...but full of life move on to other adventures. | ||
| − | == | + | == Quest Enemies == |
| − | |||
| − | + | == [[Sacred 2:Krendel|Krendel]] == | |
| − | + | {{:Sacred 2:Krendel}} | |
| + | == [[Sacred 2:Adanis the Undead|Adanis the Undead]] == | ||
| + | {{:Sacred 2:Adanis the Undead}} | ||
| − | == Logbook Entry == | + | == Logbook Entry == |
| − | |||
{| | {| | ||
| − | |{{S2frame|[[Image: | + | |{{S2frame|[[Image:endlifelog1.jpg|300px]]|left}} |
| − | |{{S2frame|[[Image: | + | |{{S2frame|[[Image:endlifelog2.jpg|300px]]|left}} |
|} | |} | ||
== Notes == | == Notes == | ||
| − | |||
| − | |||
</div> | </div> | ||
| − | |||
[[Category:Sacred 2 Quest|{{PAGENAME}}]] | [[Category:Sacred 2 Quest|{{PAGENAME}}]] | ||
| − | + | [[Category:Sacred 2 Chain Quest Part|{{PAGENAME}}]] | |
| − | [[Category:Sacred 2 Chain Quest | ||
[[Category:Sacred 2 Class Quest|{{PAGENAME}}]] | [[Category:Sacred 2 Class Quest|{{PAGENAME}}]] | ||
[[Category:Sacred 2 Light Path Quest|{{PAGENAME}}]] | [[Category:Sacred 2 Light Path Quest|{{PAGENAME}}]] | ||
| − | [[Category:Sacred 2 | + | [[Category:Sacred 2 Artamark Quest|{{PAGENAME}}]] |
| − | [[Category:Sacred 2 | + | [[Category:Sacred 2 Dyr Lain Quest|{{PAGENAME}}]] |
| − | |||
| − | |||
Latest revision as of 02:49, 26 September 2013
|
| ||||||||||


Quick Walkthrough
|
| |||||||||

Detailed Walkthrough
When you enter the cave you will meet Ancient Malra. She has felt the rift in the boundary between life and death and when it was sealed by your cleansing of the sword. But before you could do that a strong lich managed to cross over. He is now trying to call all the undead on the island to rise up. She wants you to kill the lich and stop him from contaminating her home land.
|
| ||
 |
||
|
| ||
 |
||
You head further into the cave and find the lair of the lich. At the end of the cave you find Krendel.
|
| ||
 |
||
After all you've been through he shouldn't be much of a challenge. Defeat him and head back to Marla with the news. She thanks you but asks you to leave the island as soon as possible. Seems she doesn't want the sword anywhere near her either. You do as she asks following the tug of the medallion.
|
| ||
 |
||
It leads you to the Wastelands Coast. You run into some clerics at the small camp there. They didn't seem to mind you killing Orkus but they won't allow you to destroy the sword. It's too valuable to them. But you have had enough of resurrections and of the clerics. You refuse to give up the sword and they attack you. Unfortunately for them, they are no match for you and you send them to their maker.
|
| ||
  |
||
|
| ||
 |
||
|
| ||
 |
||
You continue heading north traversing bridges and caves until you get to the Great Machine. Continue through the Machine until you are in a huge circular room. Near the far end you see Hudelia....And Adanis the Undead. She reminds you about why they made the sword and explains that Adanis was one of the first to be brought back. She knows the sword must be destroyed but before that happens she wants to let Adanis use it. He has been a stalwart ally through the centuries. Seems he's discovered a way to be truly alive, but needs the sword in order to try. You got a bad feeling about this but reluctantly hand over the sword.
|
| ||
  |
||
|
| ||
 |
||
|
| ||
 |
||
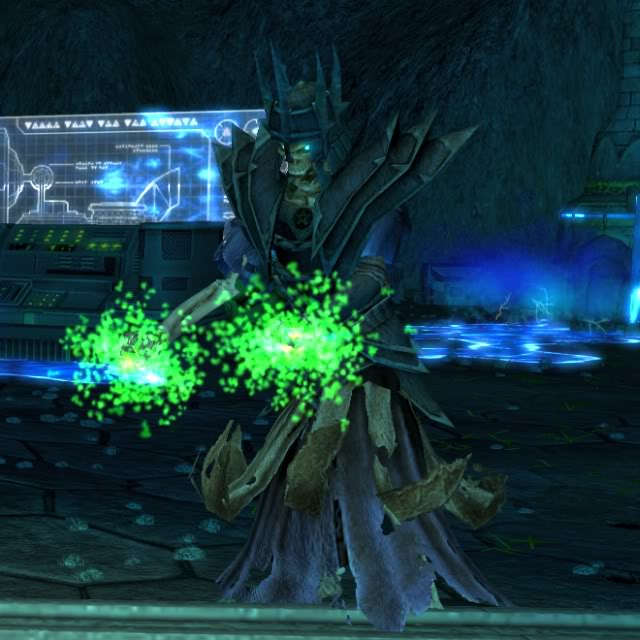
As soon as Adanis grabs the sword you know you've been had. He starts going on and on about how the power is coursing through him and how he's going to rule the world with an undead army. He should have been paying more attention as you immediately attack and cut him down.
|
| ||
 |
||
He will rise once more after you kill him the first time, showing his true entity, a lich. Defeat him a second time to put an end to him forever. As Adanis is absorbed back into the netherworld, the sword is sucked in with him and the portal window closes. Good riddance to both. You turn and realize Hudelia has paid the highest price for trusting the wrong person. She lays on the floor dead. You, neither dead nor living...but full of life move on to other adventures.
Quest Enemies
Krendel
|
|
Damage Types: Weakest Against: Quest:The End of Life | ||||||||||||||||||


Adanis the Undead
|
|
Damage Types: Weakest Against: Quest:The End of Life Quest Location: Great Machine in Wastelands | ||||||||||||||||||
|
|
Damage Types: Weakest Against: Quest:The End of Life Quest Location: Great Machine in Wastelands | ||||||||||||||||||
Logbook Entry
|
| ||||||||||||||||||

