Difference between revisions of "Sacred 2:Beyond the Wall - Shadow Campaign"
(New page: {{subst:Quest}}) |
Gogoblender (talk | contribs) |
||
| (20 intermediate revisions by 7 users not shown) | |||
| Line 1: | Line 1: | ||
{{Languages}} | {{Languages}} | ||
| + | {| | ||
| + | |valign="top"| | ||
| Line 8: | Line 10: | ||
|WIDTH="20%" VALIGN="TOP"|__TOC__ | |WIDTH="20%" VALIGN="TOP"|__TOC__ | ||
|WIDTH="50%" VALIGN="TOP"| | |WIDTH="50%" VALIGN="TOP"| | ||
| − | * '''Quest Objective:''' | + | * '''Quest Objective:''' You must find out where to find Enadris the Broker |
| − | * '''Quest Difficulty:''' | + | * '''Quest Difficulty:''' n/a |
| − | * '''Quest Giver:''' | + | * '''Quest Giver:''' [[Sacred 2:Syrilar, the Spy|Syrilar, the Spy]] |
| − | * '''Location(s):''' | + | * '''Location(s):''' Near [[Sacred 2:Griffinborough|Griffinborough]], Human lands |
| − | * '''Prerequisite Quest:''' | + | * '''Prerequisite Quest:''' [[Sacred 2:Through the Wall - Shadow Campaign|Through the Wall]] |
| − | * '''Next Quest:''' | + | * '''Next Quest:''' [[Sacred 2:Gar'Colossus - Shadow Campaign|Gar'Colossus]] |
| − | * '''Reward:''' | + | * '''Reward:''' n/a |
| − | |WIDTH="20%" VALIGN="TOP"| | + | |WIDTH="20%" VALIGN="TOP"|[http://s596.photobucket.com/albums/tt46/ZenoMaN/sacred_beyondthewall/start_map.jpg http://i596.photobucket.com/albums/tt46/ZenoMaN/sacred_beyondthewall/th_start_map.jpg] |
<br /> | <br /> | ||
| − | + | [http://s596.photobucket.com/albums/tt46/ZenoMaN/sacred_beyondthewall/syrilar_view.jpg http://i596.photobucket.com/albums/tt46/ZenoMaN/sacred_beyondthewall/th_syrilar_view.jpg] | |
|} | |} | ||
== Quick Walkthrough == | == Quick Walkthrough == | ||
| − | + | * Find Syrilar and save him from the wolf attack | |
| + | * Go to the Royal Honky-Tonk Tavern and find the owner | ||
| + | * Kill George and Richard, the owner's escort | ||
| + | * Interrogate the owner to get Enadris (the Broker) location | ||
| + | == Detailed Walkthrough == | ||
| + | When you exit Griffinborough through the East city door you find a path leading north-east. Follow that path, and just before arriving a village called Valeview you find Syrilar, the inquisition spy, who is being attacked by a group of wolves. After killing the wolves you ask Syrilar for the location of the Broker, Enadris. He explains that north of Valeview, you find a nearby tavern whose owner is the Broker's partner. | ||
| + | [http://s596.photobucket.com/albums/tt46/ZenoMaN/sacred_beyondthewall/syrilar_view.jpg http://i596.photobucket.com/albums/tt46/ZenoMaN/sacred_beyondthewall/th_syrilar_view.jpg] | ||
| + | [http://s596.photobucket.com/albums/tt46/ZenoMaN/sacred_beyondthewall/syrilar.jpg http://i596.photobucket.com/albums/tt46/ZenoMaN/sacred_beyondthewall/th_syrilar.jpg] | ||
| + | [http://s596.photobucket.com/albums/tt46/ZenoMaN/sacred_beyondthewall/syrilar_dialog.jpg http://i596.photobucket.com/albums/tt46/ZenoMaN/sacred_beyondthewall/th_syrilar_dialog.jpg] | ||
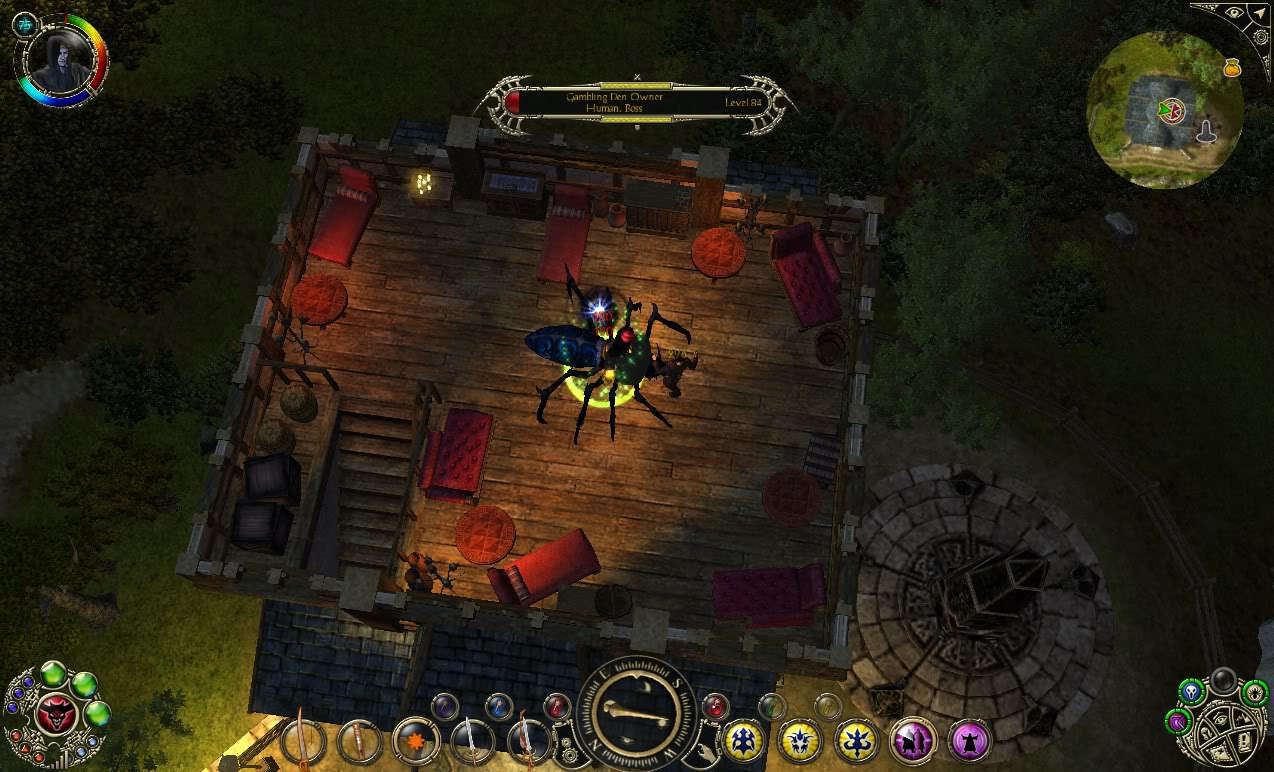
| − | + | Now you follow the path to the north, and after crossing Valeview you find the Royal Honky-Tonk Tavern. Enter and go directly to the upper floor, where you'll find the tavern's owner. You will have to use convincing methods before you can interrogate him (that means, killing his escort and letting him know how steel tastes). | |
| − | + | ||
| + | [http://s596.photobucket.com/albums/tt46/ZenoMaN/sacred_beyondthewall/bet_tabern_map.jpg http://i596.photobucket.com/albums/tt46/ZenoMaN/sacred_beyondthewall/th_bet_tabern_map.jpg] | ||
| + | [http://s596.photobucket.com/albums/tt46/ZenoMaN/sacred_beyondthewall/bet_tabern_view.jpg http://i596.photobucket.com/albums/tt46/ZenoMaN/sacred_beyondthewall/th_bet_tabern_view.jpg] | ||
| + | [http://s596.photobucket.com/albums/tt46/ZenoMaN/sacred_beyondthewall/bet_tabern_owner.jpg http://i596.photobucket.com/albums/tt46/ZenoMaN/sacred_beyondthewall/th_bet_tabern_owner.jpg] | ||
| + | [http://s596.photobucket.com/albums/tt46/ZenoMaN/sacred_beyondthewall/bet_tabern_owner_dialog.jpg http://i596.photobucket.com/albums/tt46/ZenoMaN/sacred_beyondthewall/th_bet_tabern_owner_dialog.jpg] | ||
| + | [http://www.sacredwiki.org/images/gamblingowner.jpg http://www.sacredwiki.org/images/thumbgamblingowner.jpg] | ||
| + | After that, he will gladly explain to you where to find Enadris: he tells you he lives at Skook's Corner. Despite his confession, you don't trust him (of course) and you decide he would better off dead. After killing him you find in his pocket a letter from Enadris, written from Orcish Byway. After feeling happy you killed that stupid liar, you have to go west on a long journey, until you arrive to Orcish Byway. | ||
| + | If you chose not to kill him, you end up on a detour to Skook's corner. However, as the [[Sacred 2:Gambling Den Owner|Gambling Den Owner]] is a boss he has a high chance to drop set or unique items and killing him is definitely worthwhile. | ||
| + | [http://s596.photobucket.com/albums/tt46/ZenoMaN/sacred_beyondthewall/bet_tabern_owner_dialog2.jpg http://i596.photobucket.com/albums/tt46/ZenoMaN/sacred_beyondthewall/th_bet_tabern_owner_dialog2.jpg] | ||
| + | [http://s596.photobucket.com/albums/tt46/ZenoMaN/sacred_beyondthewall/map_end.jpg http://i596.photobucket.com/albums/tt46/ZenoMaN/sacred_beyondthewall/th_map_end.jpg] | ||
== Logbook Entry == | == Logbook Entry == | ||
| − | |||
| + | I found the spy while he was fighting off a pack of wolves. I may have saved his life, but perhaps not. No matter. He told me a friend of the broker's runs a gambling den in the village north of here. | ||
| + | |||
| + | (vial sketch) Vial of Emptyness | ||
| + | |||
| + | ''If you chose not to trust the broker's friend you get this journal entry.'' | ||
| + | |||
| + | That son of a greenskin in the gambling den set his thugs on me! I killed them and whipped him within an inch of his life until he told me where to find the broker. I killed him anyway and guess what! There was a note in his pocket from the broker with a return address of Orcish Byway! Lying Swine!. Glad I killed him. Served him right. | ||
| + | |||
| + | ''If you chose to trust the broker's friend you get this journal entry.'' | ||
| + | |||
| + | The scoundrel in the gambling den set his thugs on me! I killed them and whipped him within an inch of his life until he told me where to find the broker. He's lucky I let him live. I wonder how far it is to Skook's Corner. | ||
| + | Damn! Damn! Damn! That lying son of a greenskin in the gambling den sent me to the wrong damn village. Scumbag! I should've killed him when I had that chance. The Broker really lives in Orcish Byway. Damn! | ||
== Notes == | == Notes == | ||
| − | + | Don't need to pick up the monolith next to the tavern, unless you want to do all nearby side quests. If that's your intention you can use it as a teleport destination despite Griffinborough's portal is relatively near (see maps above). | |
</div> | </div> | ||
| − | + | [[Category:Sacred 2 Shadow Campaign Quest|{{SUBPAGENAME}}]] | |
| − | + | [[Category:Sacred 2 Quest|{{SUBPAGENAME}}]] | |
| − | [[Category:Sacred 2 Shadow Campaign Quest]] | + | [[Category:Sacred 2 Artamark Quest|{{PAGENAME}}]] |
| − | [[Category:Sacred 2 | ||
| − | |||
| − | [[Category:Sacred 2 | ||
Latest revision as of 22:02, 17 August 2014
|
Quick Walkthrough
Detailed WalkthroughWhen you exit Griffinborough through the East city door you find a path leading north-east. Follow that path, and just before arriving a village called Valeview you find Syrilar, the inquisition spy, who is being attacked by a group of wolves. After killing the wolves you ask Syrilar for the location of the Broker, Enadris. He explains that north of Valeview, you find a nearby tavern whose owner is the Broker's partner.
Now you follow the path to the north, and after crossing Valeview you find the Royal Honky-Tonk Tavern. Enter and go directly to the upper floor, where you'll find the tavern's owner. You will have to use convincing methods before you can interrogate him (that means, killing his escort and letting him know how steel tastes).
After that, he will gladly explain to you where to find Enadris: he tells you he lives at Skook's Corner. Despite his confession, you don't trust him (of course) and you decide he would better off dead. After killing him you find in his pocket a letter from Enadris, written from Orcish Byway. After feeling happy you killed that stupid liar, you have to go west on a long journey, until you arrive to Orcish Byway. If you chose not to kill him, you end up on a detour to Skook's corner. However, as the Gambling Den Owner is a boss he has a high chance to drop set or unique items and killing him is definitely worthwhile.
Logbook EntryI found the spy while he was fighting off a pack of wolves. I may have saved his life, but perhaps not. No matter. He told me a friend of the broker's runs a gambling den in the village north of here. (vial sketch) Vial of Emptyness If you chose not to trust the broker's friend you get this journal entry. That son of a greenskin in the gambling den set his thugs on me! I killed them and whipped him within an inch of his life until he told me where to find the broker. I killed him anyway and guess what! There was a note in his pocket from the broker with a return address of Orcish Byway! Lying Swine!. Glad I killed him. Served him right. If you chose to trust the broker's friend you get this journal entry. The scoundrel in the gambling den set his thugs on me! I killed them and whipped him within an inch of his life until he told me where to find the broker. He's lucky I let him live. I wonder how far it is to Skook's Corner. Damn! Damn! Damn! That lying son of a greenskin in the gambling den sent me to the wrong damn village. Scumbag! I should've killed him when I had that chance. The Broker really lives in Orcish Byway. Damn! NotesDon't need to pick up the monolith next to the tavern, unless you want to do all nearby side quests. If that's your intention you can use it as a teleport destination despite Griffinborough's portal is relatively near (see maps above).
|