Difference between revisions of "Sacred 2:Leader of the Pack"
(replace photobucket pic(s) and frame/format) |
|||
| (5 intermediate revisions by 3 users not shown) | |||
| Line 1: | Line 1: | ||
| − | <div class="plainlinks"> | + | [[Category:Sacred 2 Tyr Lysia Quest|{{PAGENAME}}]]<div class="plainlinks"> |
{| | {| | ||
| Line 6: | Line 6: | ||
* '''Quest Objective:''' Slay the leader of the [[Sacred 2:Brigand|Brigands]], [[Sacred 2:Cold Charley|Cold Charley]] | * '''Quest Objective:''' Slay the leader of the [[Sacred 2:Brigand|Brigands]], [[Sacred 2:Cold Charley|Cold Charley]] | ||
* '''Quest Difficulty:''' 3 stars | * '''Quest Difficulty:''' 3 stars | ||
| − | * '''Quest Giver:''' [[Sacred 2:High Elf Soldier|High Elf Soldier]] | + | * '''Quest Giver:''' [[Sacred 2:High Elf Soldier - Sloeford|High Elf Soldier]] |
* '''Location(s):''' At the southwest entrance to [[Sacred 2:Sloeford|Sloeford]] | * '''Location(s):''' At the southwest entrance to [[Sacred 2:Sloeford|Sloeford]] | ||
* '''Prerequisite Quest:''' [[Sacred 2: Missing Patrol|Missing patrol]] | * '''Prerequisite Quest:''' [[Sacred 2: Missing Patrol|Missing patrol]] | ||
* '''Next Quest:''' None | * '''Next Quest:''' None | ||
* '''Reward:''' [[Sacred 2:Experience|Experience]], [[Sacred 2:Gold|Gold]] & Items | * '''Reward:''' [[Sacred 2:Experience|Experience]], [[Sacred 2:Gold|Gold]] & Items | ||
| − | |WIDTH="20%" VALIGN="TOP"|[ | + | |WIDTH="20%" VALIGN="TOP"|{{S2frame|[[Image:lotpLongwalkQ3-1.jpg|400px]]}} |
| − | + | <br clear="both" /> | |
|} | |} | ||
== Quick Walkthrough == | == Quick Walkthrough == | ||
| − | * Talk to the [[Sacred 2:High Elf Soldier|High Elf Soldier]]. | + | * Talk to the [[Sacred 2:High Elf Soldier - Sloeford|High Elf Soldier]]. |
* Walk north to the [[Sacred 2:Brigand Camp 2 (Tyr Lysia)|Brigand Camp 2]] and kill all 15 [[Sacred 2:Highwayman|Highwaymen]] along with [[Sacred 2:Cold Charley|Cold Charley]], their captain. | * Walk north to the [[Sacred 2:Brigand Camp 2 (Tyr Lysia)|Brigand Camp 2]] and kill all 15 [[Sacred 2:Highwayman|Highwaymen]] along with [[Sacred 2:Cold Charley|Cold Charley]], their captain. | ||
| − | * Return to the [[Sacred 2:High Elf Soldier|High Elf Soldier]] Talk to him to complete this quest. | + | * Return to the [[Sacred 2:High Elf Soldier - Sloeford|High Elf Soldier]] Talk to him to complete this quest. |
| Line 25: | Line 25: | ||
The Third part of this quest, is beyond any doubt the longest part. Mainly because it involves walking around Ancaria's equator ... Twice. No, but seriously. It's quite a walk, as you can see on the map above. | The Third part of this quest, is beyond any doubt the longest part. Mainly because it involves walking around Ancaria's equator ... Twice. No, but seriously. It's quite a walk, as you can see on the map above. | ||
| − | The quest starts by talking to the [[Sacred 2:High Elf Soldier|High Elf Soldier]] at [[Sacred 2:Sloeford|Sloeford]], and he will tell you to put a stop to the [[Sacred 2:Brigand|Brigands]] once and for all. Not really liking his idea, but tempted by Gold and treasure ... er, I mean noble causes, you decide to take it on anyway. | + | The quest starts by talking to the [[Sacred 2:High Elf Soldier - Sloeford|High Elf Soldier]] at [[Sacred 2:Sloeford|Sloeford]], and he will tell you to put a stop to the [[Sacred 2:Brigand|Brigands]] once and for all. Not really liking his idea, but tempted by Gold and treasure ... er, I mean noble causes, you decide to take it on anyway. |
Basically you have to reach the [[Sacred 2:Brigand Camp 2 (Tyr Lysia)|Brigand Camp 2]], and slay 15 [[Sacred 2:Highwayman|Highwaymen]], along with their captain, [[Sacred 2:Cold Charley|Cold Charley]]. | Basically you have to reach the [[Sacred 2:Brigand Camp 2 (Tyr Lysia)|Brigand Camp 2]], and slay 15 [[Sacred 2:Highwayman|Highwaymen]], along with their captain, [[Sacred 2:Cold Charley|Cold Charley]]. | ||
| Line 31: | Line 31: | ||
Well, first off: Getting there. This is not only a long, but also a tricky part. Well, the part north of [[Sacred 2:Twainbrook|Twainbrook]] is at least. The place is north of [[Sacred 2:Twainbrook|Twainbrook]]. Once you head north of [[Sacred 2:Twainbrook|Twainbrook]], you need to make sure you stay '''LEFT''' of the treelines when you're almost there, otherwise you'll end up taking a huge detour. | Well, first off: Getting there. This is not only a long, but also a tricky part. Well, the part north of [[Sacred 2:Twainbrook|Twainbrook]] is at least. The place is north of [[Sacred 2:Twainbrook|Twainbrook]]. Once you head north of [[Sacred 2:Twainbrook|Twainbrook]], you need to make sure you stay '''LEFT''' of the treelines when you're almost there, otherwise you'll end up taking a huge detour. | ||
| − | [ | + | {{S2frame|[[Image:lotpBanditCampQ3.jpg|400px]]|left}} |
| + | <br clear="both" /> | ||
| + | |||
| + | When you get to the [[Sacred 2:Brigand Camp 2 (Tyr Lysia)|Brigand Camp 2]], you'll see that conveniently enough, there are exactly 15 [[Sacred 2:Highwayman|Highwaymen]]. Pull out your weapon, and start causing rampage. When all 15 [[Sacred 2:Highwayman|Highwayman]], [[Sacred 2:Cold Charley|Cold Charley]] will appear. Once he is dead, you can portal or walk back to [[Sacred 2:Sloeford|Sloeford]]. Talk to the [[Sacred 2:High Elf Soldier - Sloeford|High Elf Soldier]] to complete this last quest in the chain. | ||
| + | |||
| + | == Logbook Entry== | ||
| + | {{S2frame|[[Image:lotpLog3.jpg|400px]]|left}} | ||
| + | <br clear="both" /> | ||
| − | + | The map I found shows the place where the band of highwaymen ar hiding. I am supposed to wipe them out and take the head of their leader to the village as proof of my deed. | |
| − | + | The band of highwaymen has been wiped out. All that's missing is their leader. | |
| − | + | Cold Charley is dead. I am in possession of his head. | |
| + | I have handed over the head as proof. Peace should be restored to the village. | ||
== Notes == | == Notes == | ||
* '''MAJOR TIME SAVER''' | * '''MAJOR TIME SAVER''' | ||
| − | # If you are playing single player => make sure you get the waypoint (the arch) and the monolith activated at Sloeford before you make your long journey north. After you finished , press F12 to jump to your activated monolith. You just saved yourself the walk down | + | # If you are playing single player => make sure you get the waypoint (the arch) and the monolith activated at Sloeford before you make your long journey north. After you finished , press F12 to jump to your activated monolith. You just saved yourself the walk down. |
| + | |||
# If you are playing Multiplayer, F12 will reset you to the starting isle. But still this saves time, since you can easily reach Sloeford from there, and save yourself a journey back from the brigand camp to sloeford. | # If you are playing Multiplayer, F12 will reset you to the starting isle. But still this saves time, since you can easily reach Sloeford from there, and save yourself a journey back from the brigand camp to sloeford. | ||
| − | * | + | * Cold Charley can be a tough nut to crack, with high defensive values. It's in your best interest to switch to a weapon with higher chance to hit (attack rating) and lower damage, since weapons with little or no attack bonus will hardly hit him at all. Other then that his damage is nothing major, and he isn't quite the sprinter, more of a slow fellow. |
* The quest [[Sacred 2:The Kobold Chieftain|The Kobold Chieftain]] is also in this area; you can save yourself some running if you do both quests at the same time. | * The quest [[Sacred 2:The Kobold Chieftain|The Kobold Chieftain]] is also in this area; you can save yourself some running if you do both quests at the same time. | ||
| − | *If you have the Ice | + | *If you have the [[Sacred 2:Ice and Blood|Ice and Blood]] add on, you might want to activate the monolith/soulstone in [[Sacred 2:Twainbrook|Twainbrook]]. You can teleport to any active portal directly from the map. |
*You can also do the [[Sacred 2:Burn Skeletons Burn!|Burn Skeletons Burn!]] "tutorial" quest. | *You can also do the [[Sacred 2:Burn Skeletons Burn!|Burn Skeletons Burn!]] "tutorial" quest. | ||
| + | |||
| + | *If you have the [[Sacred 2:Community Patch|Community Patch]], you can pick up the [[Sacred 2:The Farm Owner|The Farm Owner]] because the quest giver for that quest is not far from the guard you pick this quest up from. You need to kill 25 Kobolds and will find lots more than that on your way up to retrieve Cold Charley's head. | ||
*Many of the blue quest chains are located here as well. | *Many of the blue quest chains are located here as well. | ||
</div> | </div> | ||
| + | |||
| + | [[Category:Sacred 2 Quest|{{PAGENAME}}]] | ||
[[Category:Sacred 2 Chain Quest Part|{{SUBPAGENAME}}]] | [[Category:Sacred 2 Chain Quest Part|{{SUBPAGENAME}}]] | ||
Latest revision as of 02:06, 2 September 2013
|
| ||||||||||
Quick Walkthrough
- Talk to the High Elf Soldier.
- Walk north to the Brigand Camp 2 and kill all 15 Highwaymen along with Cold Charley, their captain.
- Return to the High Elf Soldier Talk to him to complete this quest.
Detailed Walkthrough
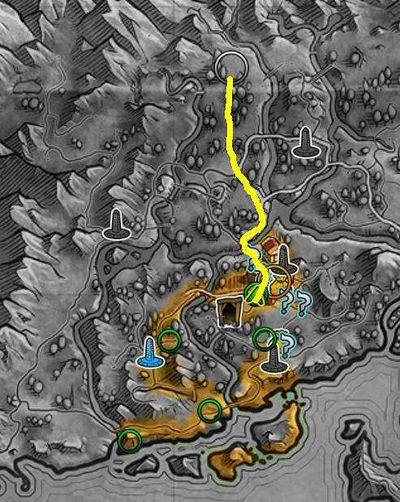
The Third part of this quest, is beyond any doubt the longest part. Mainly because it involves walking around Ancaria's equator ... Twice. No, but seriously. It's quite a walk, as you can see on the map above.
The quest starts by talking to the High Elf Soldier at Sloeford, and he will tell you to put a stop to the Brigands once and for all. Not really liking his idea, but tempted by Gold and treasure ... er, I mean noble causes, you decide to take it on anyway.
Basically you have to reach the Brigand Camp 2, and slay 15 Highwaymen, along with their captain, Cold Charley.
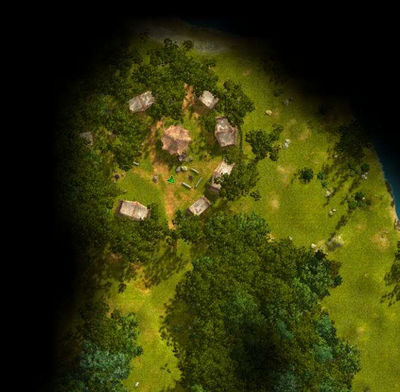
Well, first off: Getting there. This is not only a long, but also a tricky part. Well, the part north of Twainbrook is at least. The place is north of Twainbrook. Once you head north of Twainbrook, you need to make sure you stay LEFT of the treelines when you're almost there, otherwise you'll end up taking a huge detour.
|
| ||
When you get to the Brigand Camp 2, you'll see that conveniently enough, there are exactly 15 Highwaymen. Pull out your weapon, and start causing rampage. When all 15 Highwayman, Cold Charley will appear. Once he is dead, you can portal or walk back to Sloeford. Talk to the High Elf Soldier to complete this last quest in the chain.
Logbook Entry
|
| ||
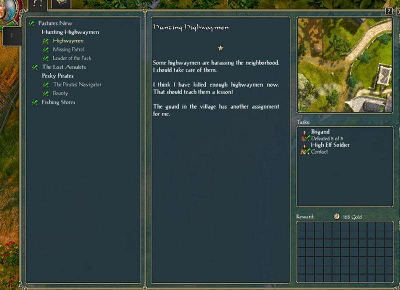
The map I found shows the place where the band of highwaymen ar hiding. I am supposed to wipe them out and take the head of their leader to the village as proof of my deed.
The band of highwaymen has been wiped out. All that's missing is their leader.
Cold Charley is dead. I am in possession of his head.
I have handed over the head as proof. Peace should be restored to the village.
Notes
- MAJOR TIME SAVER
- If you are playing single player => make sure you get the waypoint (the arch) and the monolith activated at Sloeford before you make your long journey north. After you finished , press F12 to jump to your activated monolith. You just saved yourself the walk down.
- If you are playing Multiplayer, F12 will reset you to the starting isle. But still this saves time, since you can easily reach Sloeford from there, and save yourself a journey back from the brigand camp to sloeford.
- Cold Charley can be a tough nut to crack, with high defensive values. It's in your best interest to switch to a weapon with higher chance to hit (attack rating) and lower damage, since weapons with little or no attack bonus will hardly hit him at all. Other then that his damage is nothing major, and he isn't quite the sprinter, more of a slow fellow.
- The quest The Kobold Chieftain is also in this area; you can save yourself some running if you do both quests at the same time.
- If you have the Ice and Blood add on, you might want to activate the monolith/soulstone in Twainbrook. You can teleport to any active portal directly from the map.
- You can also do the Burn Skeletons Burn! "tutorial" quest.
- If you have the Community Patch, you can pick up the The Farm Owner because the quest giver for that quest is not far from the guard you pick this quest up from. You need to kill 25 Kobolds and will find lots more than that on your way up to retrieve Cold Charley's head.
- Many of the blue quest chains are located here as well.


