Difference between revisions of "Sacred 2:Orcish Necromancers"
(New page: {{subst:Quest}}) |
|||
| Line 1: | Line 1: | ||
| − | |||
| − | |||
| − | |||
<div class="plainlinks"> | <div class="plainlinks"> | ||
{|WIDTH="100%" | {|WIDTH="100%" | ||
|WIDTH="15%" VALIGN="TOP"|__TOC__ | |WIDTH="15%" VALIGN="TOP"|__TOC__ | ||
|WIDTH="35%" VALIGN="TOP"| | |WIDTH="35%" VALIGN="TOP"| | ||
| − | * '''Quest Objective:''' | + | * '''Quest Objective:''' Get the last artifact from the orc chief and head to [[Sacred 2:Seraphim Tower|Seraphim Tower]] |
| − | * '''Quest Difficulty:''' | + | * '''Quest Difficulty:''' No difficulty is given for this quest |
| − | * '''Quest Giver:''' | + | * '''Quest Giver:''' [[Sacred 2:James Orkus - NPC|James Orkus]] |
| − | * '''Location(s):''' | + | * '''Location(s):''' [[Sacred 2:Artamark|Artamark]], in the [[Sacred 2:Orcish Byway Cemetery|Orcish Byway Cemetery]] |
| − | * '''Prerequisite Quest:''' | + | * '''Prerequisite Quest:''' [[Sacred 2:The Lives of Others|The Lives of Others]] |
| − | * '''Next Quest:''' | + | * '''Next Quest:''' [[Sacred 2:Past Mistakes|Past Mistakes]] |
| − | * '''Reward:''' | + | * '''Reward:''' [[Sacred 2:Gold|Gold]] [[Sacred 2:Experience|Experience]] |
| − | |WIDTH="50%" VALIGN="TOP"| | + | |WIDTH="50%" VALIGN="TOP"| |
| − | {{S2frame|[[Image: | + | {{S2frame|[[Image:bywaycemmap.jpg|250px]][[Image:bywaycemtab.jpg|250px]]|right|'''[[Sacred 2:Map of Ancaria|View the Ancaria Interactive Map]]'''}} |
|} | |} | ||
{|WIDTH="100%" | {|WIDTH="100%" | ||
|WIDTH="60%" VALIGN="TOP"| | |WIDTH="60%" VALIGN="TOP"| | ||
== Quick Walkthrough == | == Quick Walkthrough == | ||
| − | + | * Talk to [[Sacred 2:James Orkus - NPC|James Orkus]] at entrance to vault in [[Sacred 2:Orcish Byway Cemetery|Orcish Byway Cemetery]] | |
| − | * | + | * Travel south of the [[Sacred 2:Blade Fields|Blade Fields]] in the [[Sacred 2:Nor Plat|Nor Plat]] region |
| − | * | + | * Find and speak to [[Chieftain Gron'kar of the Blood Orcs - NPC|Chieftain Gron'kar of the Blood Orcs]] |
| − | * | + | * Defeat 9 [[Sacred 2:Undead - Undead|Undead]] |
| − | |WIDTH="40%" VALIGN="TOP"|{{S2frame|[[Image: | + | * Talk to Gron'kar again and then kill him |
| + | * Pick up the '''Pyramid of Control''' | ||
| + | * Travel to the [[Sacred 2:Dragon Sea Islands|Dragon Sea Islands]] | ||
| + | * Speak to [[Sacred 2:Commander Winderlich|Commander Winderlich]] at the entrance to the [[Sacred 2:Seraphim Tower|Seraphim Tower]] | ||
| + | |WIDTH="40%" VALIGN="TOP"|{{S2frame|[[Image:jamesorkusloc.jpg|500px]]}} | ||
|} | |} | ||
== Detailed Walkthrough == | == Detailed Walkthrough == | ||
| − | |||
| − | + | As you exit the vault in the [[Sacred 2:Orcish Byway Cemetery|Orcish Byway Cemetery]] you see an orc waiting for you. You immediately ready yourself for a fight when the orc, [[Sacred 2:James Orkus - NPC|James Orkus]] begins to speak to you. He claims to be from a Secret Alliance of orcs. And you thought they were just one step above wild animals. His leader is worried about the chief of the Blood Orcs. He is trying to gain power over the undead and create his own army. James has learned that this chief has gained an object shaped like a small pyramid. Sounds a lot like the 3rd item you need to recover. He wants you to recover this item and get it as far away from Nor Plat as you can. For the first time in your life you find yourself agreeing with an orc...strange times indeed! | |
| + | |||
| + | {{S2frame|[[Image:jamesorkuschat.jpg|430px]]|left}} | ||
| + | <br clear="both" /> | ||
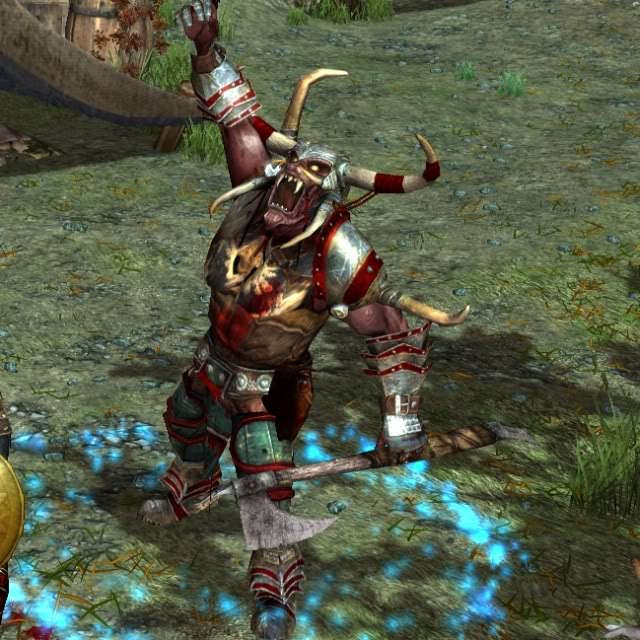
| − | + | You head off into Orc territory and head to the southern edge of the [[Sacred 2:Blade Fields|Blade Fields]]. Up along the mountains you find a path up into the foothills. You find [[Chieftain Gron'kar of the Blood Orcs - NPC|Chieftain Gron'kar of the Blood Orcs]]. He thinks he's a great necromancer now and wants to demonstrate his power. He'll conjure up 9 undead but they're next to useless and you eliminate them quickly. That enrages the chief and he promises to see you dead...err...re-undead...ummm...not living...never mind, he wants to hurt you ! He's actually a half decent warrior. He should have stayed in that profession. After beating the chief, grab the pyramid..finally you have all the artifacts. | |
| − | {{S2frame|[[Image: | + | {{S2frame|[[Image:gronkarmap.jpg|250px]][[Image:gronkartab.jpg|250px]]|left]]}} |
<br clear="both" /> | <br clear="both" /> | ||
| + | {{S2frame|[[Image:gronkarloc.jpg|400px]]|left}} | ||
| + | <br clear="both" /> | ||
| − | {{S2frame|[[Image: | + | {{S2frame|[[Image:gronkarchat.jpg|430px]]|left}} |
<br clear="both" /> | <br clear="both" /> | ||
| − | + | {{S2frame|[[Image:gronkarchat2.jpg|430px]]|left}} | |
| − | {{S2frame|[[Image: | ||
<br clear="both" /> | <br clear="both" /> | ||
| + | Time to travel up to the [[Sacred 2:Seraphim Tower|Seraphim Tower]]. You'll find [[Sacred 2:Commander Winderlich|Commander Winderlich]] waiting for you at the tower entrance. You hand over the objects to him, guess the seraphim will destroy them so resurrections can never happen again. He also asks you to visit their blacksmith. She apparently has something for you. | ||
| − | + | {{S2frame|[[Image:winderlichmap2.jpg|250px]][[Image:winderlichtab2.jpg|250px]]|left]]}} | |
| + | <br clear="both" /> | ||
| − | [[Image: | + | {{S2frame|[[Image:winderlich2loc2.jpg|400px]]|left}} |
| − | + | <br clear="both" /> | |
| − | |||
| − | {{S2frame|[[Image: | + | {{S2frame|[[Image:winderlich2chat.jpg|430px]]|left}} |
<br clear="both" /> | <br clear="both" /> | ||
== Quest Enemies == | == Quest Enemies == | ||
| − | |||
| − | |||
| − | |||
| − | |||
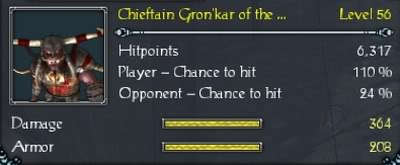
| − | == | + | == [[Sacred 2:Chieftain Gron'kar of the Blood Orcs|Chieftain Gron'kar of the Blood Orcs]] == |
| − | + | {{:Sacred 2:Chieftain Gron'kar of the Blood Orcs}} | |
| − | |||
| − | |||
== Logbook Entry == | == Logbook Entry == | ||
| − | + | ||
{| | {| | ||
| − | |{{S2frame|[[Image: | + | |{{S2frame|[[Image:necromancerlog1.jpg|300px]]|left}} |
| − | |{{S2frame|[[Image: | + | |{{S2frame|[[Image:necromancerlog2.jpg|300px]]|left}} |
|} | |} | ||
== Notes == | == Notes == | ||
| − | + | ||
</div> | </div> | ||
| − | + | ||
[[Category:Sacred 2 Quest|{{PAGENAME}}]] | [[Category:Sacred 2 Quest|{{PAGENAME}}]] | ||
| − | |||
[[Category:Sacred 2 Chain Quest]|{{PAGENAME}}]] | [[Category:Sacred 2 Chain Quest]|{{PAGENAME}}]] | ||
[[Category:Sacred 2 Class Quest|{{PAGENAME}}]] | [[Category:Sacred 2 Class Quest|{{PAGENAME}}]] | ||
[[Category:Sacred 2 Light Path Quest|{{PAGENAME}}]] | [[Category:Sacred 2 Light Path Quest|{{PAGENAME}}]] | ||
| − | [[Category:Sacred 2 | + | [[Category:Sacred 2 Artamark Quest|{{PAGENAME}}]] |
| − | |||
| − | |||
| − | |||
Revision as of 01:03, 27 December 2011
|
| ||||||||||


Quick Walkthrough
|
| |||||||||

Detailed Walkthrough
As you exit the vault in the Orcish Byway Cemetery you see an orc waiting for you. You immediately ready yourself for a fight when the orc, James Orkus begins to speak to you. He claims to be from a Secret Alliance of orcs. And you thought they were just one step above wild animals. His leader is worried about the chief of the Blood Orcs. He is trying to gain power over the undead and create his own army. James has learned that this chief has gained an object shaped like a small pyramid. Sounds a lot like the 3rd item you need to recover. He wants you to recover this item and get it as far away from Nor Plat as you can. For the first time in your life you find yourself agreeing with an orc...strange times indeed!
|
| ||
 |
||
You head off into Orc territory and head to the southern edge of the Blade Fields. Up along the mountains you find a path up into the foothills. You find Chieftain Gron'kar of the Blood Orcs. He thinks he's a great necromancer now and wants to demonstrate his power. He'll conjure up 9 undead but they're next to useless and you eliminate them quickly. That enrages the chief and he promises to see you dead...err...re-undead...ummm...not living...never mind, he wants to hurt you ! He's actually a half decent warrior. He should have stayed in that profession. After beating the chief, grab the pyramid..finally you have all the artifacts.
|
| ||
  |
||
|
| ||
 |
||
|
| ||
 |
||
|
| ||
 |
||
Time to travel up to the Seraphim Tower. You'll find Commander Winderlich waiting for you at the tower entrance. You hand over the objects to him, guess the seraphim will destroy them so resurrections can never happen again. He also asks you to visit their blacksmith. She apparently has something for you.
|
| ||
  |
||
|
| ||
 |
||
|
| ||
 |
||
Quest Enemies
Chieftain Gron'kar of the Blood Orcs
|
|
Damage Types: Weakest Against: Quest:Orcish Necromancers | ||||||||||||||||||


Logbook Entry
|
| ||||||||||||||||||


Notes
[[Category:Sacred 2 Chain Quest]|Orcish Necromancers]]