Difference between revisions of "Sacred 2:The Farm Owner"
Jump to navigation
Jump to search
| Line 1: | Line 1: | ||
| − | |||
{{CPcontent}} | {{CPcontent}} | ||
| Line 8: | Line 7: | ||
|WIDTH="10%" VALIGN="TOP"|__TOC__ | |WIDTH="10%" VALIGN="TOP"|__TOC__ | ||
|WIDTH="35%" VALIGN="TOP"| | |WIDTH="35%" VALIGN="TOP"| | ||
| − | * '''Quest Objective:''' Solve [[Sacred 2:Chuck Latbar|Chuck Latbar's]] problems with [[Sacred 2:Kobold| | + | * '''Quest Objective:''' Solve [[Sacred 2:Chuck Latbar|Chuck Latbar's]] problems with [[Sacred 2:Kobold|Kobold]] |
* '''Quest Difficulty:''' 1 star in the beginning, then changes to 2 stars | * '''Quest Difficulty:''' 1 star in the beginning, then changes to 2 stars | ||
* '''Quest Giver:''' [[Sacred 2:Chuck Latbar|Chuck Latbar]] | * '''Quest Giver:''' [[Sacred 2:Chuck Latbar|Chuck Latbar]] | ||
| Line 15: | Line 14: | ||
* '''Next Quest:''' None | * '''Next Quest:''' None | ||
* '''Reward:''' Gold, [[Sacred 2:Experience|Experience]] | * '''Reward:''' Gold, [[Sacred 2:Experience|Experience]] | ||
| − | |WIDTH="55%" VALIGN="TOP"| {{S2frame|[[Image:Chuck latbar worldmap.jpg| | + | |WIDTH="55%" VALIGN="TOP"| {{S2frame|[[Image:Chuck latbar worldmap.jpg|250px]][[Image:Chuck latbar map.jpg|250px]]}} |
|} | |} | ||
| − | {| | + | {|WIDTH="100%" |
|WIDTH="60%" VALIGN="TOP"| | |WIDTH="60%" VALIGN="TOP"| | ||
== Quick Walkthrough == | == Quick Walkthrough == | ||
* Talk to [[Sacred 2:Chuck Latbar|Chuck Latbar]] in [[Sacred 2:Sloeford|Sloeford]]. | * Talk to [[Sacred 2:Chuck Latbar|Chuck Latbar]] in [[Sacred 2:Sloeford|Sloeford]]. | ||
| − | * Kill 25 [[Sacred 2:Kobold| | + | * Kill 25 [[Sacred 2:Kobold|Kobold]] near [[Sacred 2:Sloeford|Sloeford]]. |
| − | * Collect the heads of the [[Sacred 2:Kobold| | + | * Collect the heads of the [[Sacred 2:Kobold|Kobold]] you killed. |
* Walk back to [[Sacred 2:Chuck Latbar|Chuck Latbar]] and receive some [[Sacred 2:Experience|Experience]]. | * Walk back to [[Sacred 2:Chuck Latbar|Chuck Latbar]] and receive some [[Sacred 2:Experience|Experience]]. | ||
| Line 34: | Line 33: | ||
* Kill [[Sacred 2:Chuck Latbar|Chuck Latbar]]. | * Kill [[Sacred 2:Chuck Latbar|Chuck Latbar]]. | ||
* Talk to [[Sacred 2:Maid Mathilda|Maid Mathilda]] and receive your reward. | * Talk to [[Sacred 2:Maid Mathilda|Maid Mathilda]] and receive your reward. | ||
| − | |WIDTH="40%" VALIGN="TOP"|{{S2frame|[[Image:Farm owner camera.jpg| | + | |WIDTH="40%" VALIGN="TOP"|{{S2frame|[[Image:Farm owner camera.jpg|500px]]}} |
|} | |} | ||
| Line 40: | Line 39: | ||
Though according to logbook, this story is considered one quest, actually [[Sacred 2:Chuck Latbar|Chuck Latbar]] would have two tasks for your character. | Though according to logbook, this story is considered one quest, actually [[Sacred 2:Chuck Latbar|Chuck Latbar]] would have two tasks for your character. | ||
| − | ''Part one: Slay Kobolds'' | + | ''Part one: Slay Kobolds'' |
| − | [[Image:Farm owner dialog start.png|430px]] | + | |
| − | [[Image:Farm owner dialog2.png|430px]] | + | [[Image:Farm owner dialog start.png|430px]] |
| − | ''Part two: Save Damsels'' | + | |
| − | [[Image:Farm owner dialog3.png|430px]] | + | [[Image:Farm owner dialog2.png|430px]] |
| − | + | ||
| − | + | ''Part two: Save Damsels'' | |
| − | + | ||
| − | + | [[Image:Farm owner dialog3.png|430px]] | |
| − | + | ||
| − | + | ||
| − | [[Image:Farm owner dialog4.png|430px]] | + | {{S2frame|[[Image:Farm owner walk world.jpg|250px]][[Image:Farm owner walk green.jpg|250px]]|left}} |
| − | [[Image:Farm owner dialog5.png|430px]] | + | <br clear="both" /> |
| − | [[Image:Farm owner dialog6.png|430px]] | + | |
| − | [[Image:Farm owner dialog7.png|430px]] | + | |
| − | [[Image:Farm owner dialog8.png|430px]] | + | {{S2frame|[[Image:Farm owner camera2.jpg|400px]]|left}} |
| + | <br clear="both" /> | ||
| + | |||
| + | |||
| + | [[Image:Farm owner dialog4.png|430px]] | ||
| + | |||
| + | [[Image:Farm owner dialog5.png|430px]] | ||
| + | |||
| + | [[Image:Farm owner dialog6.png|430px]] | ||
| + | |||
| + | [[Image:Farm owner dialog7.png|430px]] | ||
| + | |||
| + | [[Image:Farm owner dialog8.png|430px]] | ||
| + | |||
== Quest Enemies == | == Quest Enemies == | ||
| − | |||
| − | |||
| − | |||
| − | |||
| − | |||
| − | |||
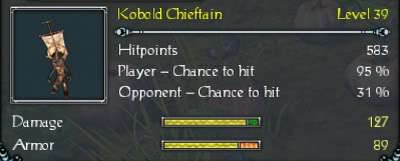
| + | {{:Sacred 2:Kobold Chieftain}} | ||
| − | { | + | {{:Sacred 2:Chuck Latbar }} |
| − | |||
| − | |||
| − | |||
| − | |||
| − | |||
| − | |||
| − | |||
| − | |||
| − | |||
| − | |||
== Hirelings and Escorts == | == Hirelings and Escorts == | ||
| Line 85: | Line 82: | ||
== Logbook Entry == | == Logbook Entry == | ||
| + | |||
{| | {| | ||
| − | |{{S2frame|[[Image:Farm owner log1.jpg|300px]]|left}} | + | |{{S2frame|[[Image:Farm owner log1.jpg|300px]]|left}} |
|{{S2frame|[[Image:Farm owner log2.jpg|300px]]|left}} | |{{S2frame|[[Image:Farm owner log2.jpg|300px]]|left}} | ||
|} | |} | ||
| Line 96: | Line 94: | ||
</div> | </div> | ||
| − | [[Category:Sacred 2 Quest|{{SUBPAGENAME}}]] | + | [[Category:Sacred 2 CM Patch Quest|{{SUBPAGENAME}}]] |
Revision as of 00:04, 25 January 2011

|
This page is about additional content added from the CM Patch.
The contents of this page are exclusive content found only by installing the Community Patch. |
|
| ||||||||||


Quick Walkthrough
|
| |||||||||

Detailed Walkthrough
Though according to logbook, this story is considered one quest, actually Chuck Latbar would have two tasks for your character.
Part one: Slay Kobolds
Part two: Save Damsels
|
| ||
  |
||
|
| ||
 |
||
Quest Enemies
|
|
Damage Types: Weakest Against: Quest:Kobolds are not Humans Quest Location: Kobold Camp in Tyr Lysia | ||||||||||||||||||


|
|
Damage Types: Weakest Against: Quest:The Farm Owner | ||||||||||||||||||


Hirelings and Escorts
- Maid Mathilda - Escort. Immortal. Tries to escape the fight.
- Maid Theresa - Escort. Immortal. Tries to escape the fight.
- Maid Lena - Escort. Immortal. Tries to escape the fight.
- Children - Escort. Immortal. Try to escape the fight.
Logbook Entry
|
| ||||||||||||||||||

