Difference between revisions of "Sacred 2:The Legendary Pirate Treasure"
| (9 intermediate revisions by 5 users not shown) | |||
| Line 1: | Line 1: | ||
| + | {{Languages}} | ||
<div class="plainlinks"> | <div class="plainlinks"> | ||
| − | {| | + | {|WIDTH="100%" |
| − | |WIDTH=" | + | |WIDTH="15%" VALIGN="TOP"|__TOC__ |
| − | |WIDTH=" | + | |WIDTH="35%" VALIGN="TOP"| |
| − | * '''Quest Objective:''' To | + | * '''Quest Objective:''' To find the Legendary Pirate Treasure |
| − | * '''Quest Difficulty:''' | + | * '''Quest Difficulty:''' 3 stars |
| − | * '''Quest Giver:''' | + | * '''Quest Giver:''' None - the quest starts when you turn over the rock |
| − | * '''Location(s):''' | + | * '''Location(s):''' [[Sacred 2:Golden Coast|Golden Coast]] and caves in [[Sacred 2:Copper Peaks|Copper Peaks]] |
| − | * '''Prerequisite Quest:''' | + | * '''Prerequisite Quest:''' None |
| − | * '''Next Quest:''' | + | * '''Next Quest:''' None |
| − | * '''Reward:''' The | + | * '''Reward:''' The Pirate Treasure, [[Sacred 2:Experience|Experience]] |
| − | |WIDTH=" | + | |WIDTH="50%" VALIGN="TOP"| {{S2frame|[[Image:Pirate treasure worldmap.jpg|250px]][[Image:Pirate treasure map.jpg|250px]]|right|'''[[Sacred 2:Map of Ancaria|View the Ancaria Interactive Map]]'''}} |
|} | |} | ||
| − | + | {|WIDTH="100%" | |
| + | |WIDTH="60%" VALIGN="TOP"| | ||
== Quick Walkthrough == | == Quick Walkthrough == | ||
| − | * Enter cave on the left on the path to the Seraphim | + | * Enter the cave on the left on the path to the [[Sacred 2:Seraphim Valley|Seraphim Valley]] and [[Sacred 2:Forgotten Gardens|Forgotten Gardens]] just northwest of the Resurrection Monolith in the [[Sacred 2:Golden Coast|Golden Coast]]. |
| − | * Make your way through to the cave with the green mist on the ground | + | * Make your way through to the part of the cave with the green mist on the ground. |
| − | * Go out through the cave entrance | + | * Go out through the cave entrance in that room. |
| − | * Find the fish hanging near the fire | + | * Find the fish hanging near the fire. |
| − | * Click on the rock under the fish | + | * Click on the rock under the fish. |
| − | * Enter cave entrance to the west of the fish | + | * Enter cave entrance to the west of the fish. |
| − | * Look for locked door | + | * Look for locked door. It is just past [[Sacred 2:Capt Bloodtongue|Captain Bloodtongue]] if you have the [[Sacred 2:Bloodmouth Must Die|Bloodmouth Must Die]] part of the [[Sacred 2:Captain Bloodtongue|Captain Bloodtongue]] chain quest active. |
| + | * Go through the small portal behind that door. | ||
* Follow the path to the right until you see the next door | * Follow the path to the right until you see the next door | ||
* Kill the pirates and enjoy the loot | * Kill the pirates and enjoy the loot | ||
| − | + | |WIDTH="40%" VALIGN="TOP"|{{S2frame|[[Image:Pirate treasure camera1.jpg|500px]]}} | |
| − | + | |} | |
| − | |||
== Detailed Walkthrough == | == Detailed Walkthrough == | ||
| − | Travel to the Golden Coast by following the road for the [[Sacred 2:Tutorial Hirelings|Tutorial Hirelings]] quest. In the southwestern most corner of Tyr | + | Travel to the [[Sacred 2:Golden Coast|Golden Coast]] by following the road for the [[Sacred 2:Tutorial Hirelings|Tutorial Hirelings]] quest. In the southwestern most corner of [[Sacred 2:Tyr Lysia|Tyr Lysia]], you'll find a resurrection monolith and a small camp with a merchant. There are two high elves there with other quests - but that's another story. Head north and slighty west of the Resurrection Monolith and you should see a high elf that has a quest for you. He wants you to kill the kobolds running around in the canyon behind him. Just beyond him, there's a soldier standing on the side of the path with yet another quest. He wants you to go in and find one of his soldiers who is hiding in the cave. Take this quest, go in, find the soldier who is keeping an eye on the pirates. Go back out, talk to the first soldier and take on the 3rd part of that quest - to kill [[Sacred 2:Captain Bloodtongue|Captain Bloodtongue]]. Might as well kill multiple birds with one shot. |
| − | [http://www.sacredwiki.org/images/Sacred_2/quests/Legendary%20Pirate%20Treasure/treasure_map.jpg http://www.sacredwiki.org/images/Sacred_2/quests/Legendary%20Pirate%20Treasure/th_treasure_map.jpg] | + | {| |
| + | |align="left" style="margin-top: 0px;"|{{S2frame|[http://www.sacredwiki.org/images/Sacred_2/quests/Legendary%20Pirate%20Treasure/treasure_map.jpg http://www.sacredwiki.org/images/Sacred_2/quests/Legendary%20Pirate%20Treasure/th_treasure_map.jpg]}} | ||
| + | |} | ||
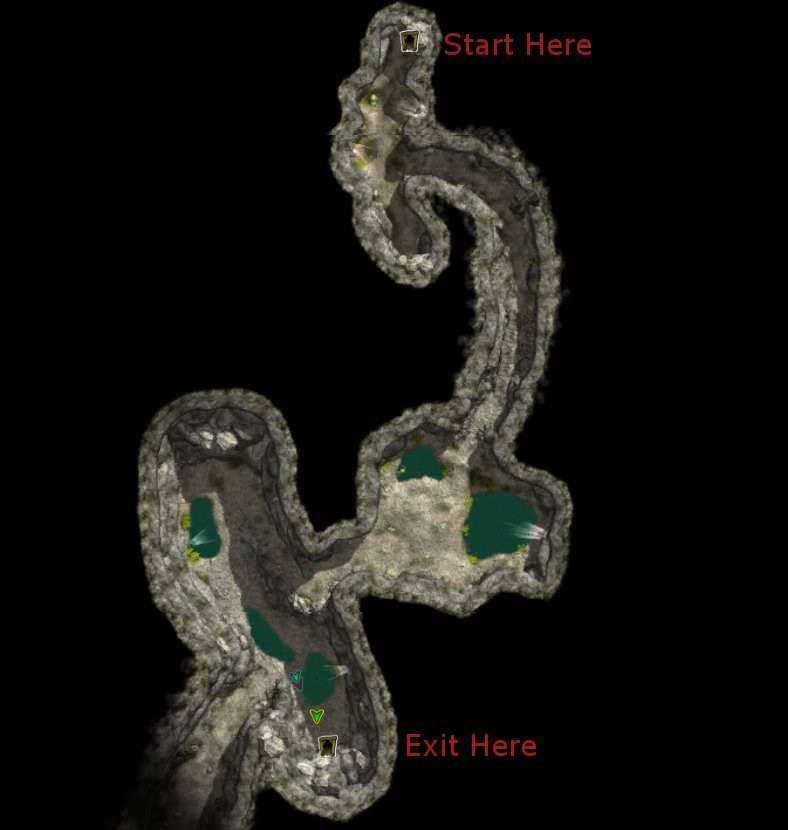
Go past the hiding soldier and you'll find yourself in a cave with a green mist hugging the floor and a bunch of small earth elementals. There is also an exit to the surface that's located at the bottom of the following picture. Go outside and down toward the beach. | Go past the hiding soldier and you'll find yourself in a cave with a green mist hugging the floor and a bunch of small earth elementals. There is also an exit to the surface that's located at the bottom of the following picture. Go outside and down toward the beach. | ||
| − | [http://www.sacredwiki.org/images/Sacred_2/quests/Legendary%20Pirate%20Treasure/treasure_1.jpg http://www.sacredwiki.org/images/Sacred_2/quests/Legendary%20Pirate%20Treasure/th_treasure_1.jpg] | + | {| |
| + | |align="left" style="margin-top: 0px;"|{{S2frame|[http://www.sacredwiki.org/images/Sacred_2/quests/Legendary%20Pirate%20Treasure/treasure_1.jpg http://www.sacredwiki.org/images/Sacred_2/quests/Legendary%20Pirate%20Treasure/th_treasure_1.jpg]}} | ||
| + | |} | ||
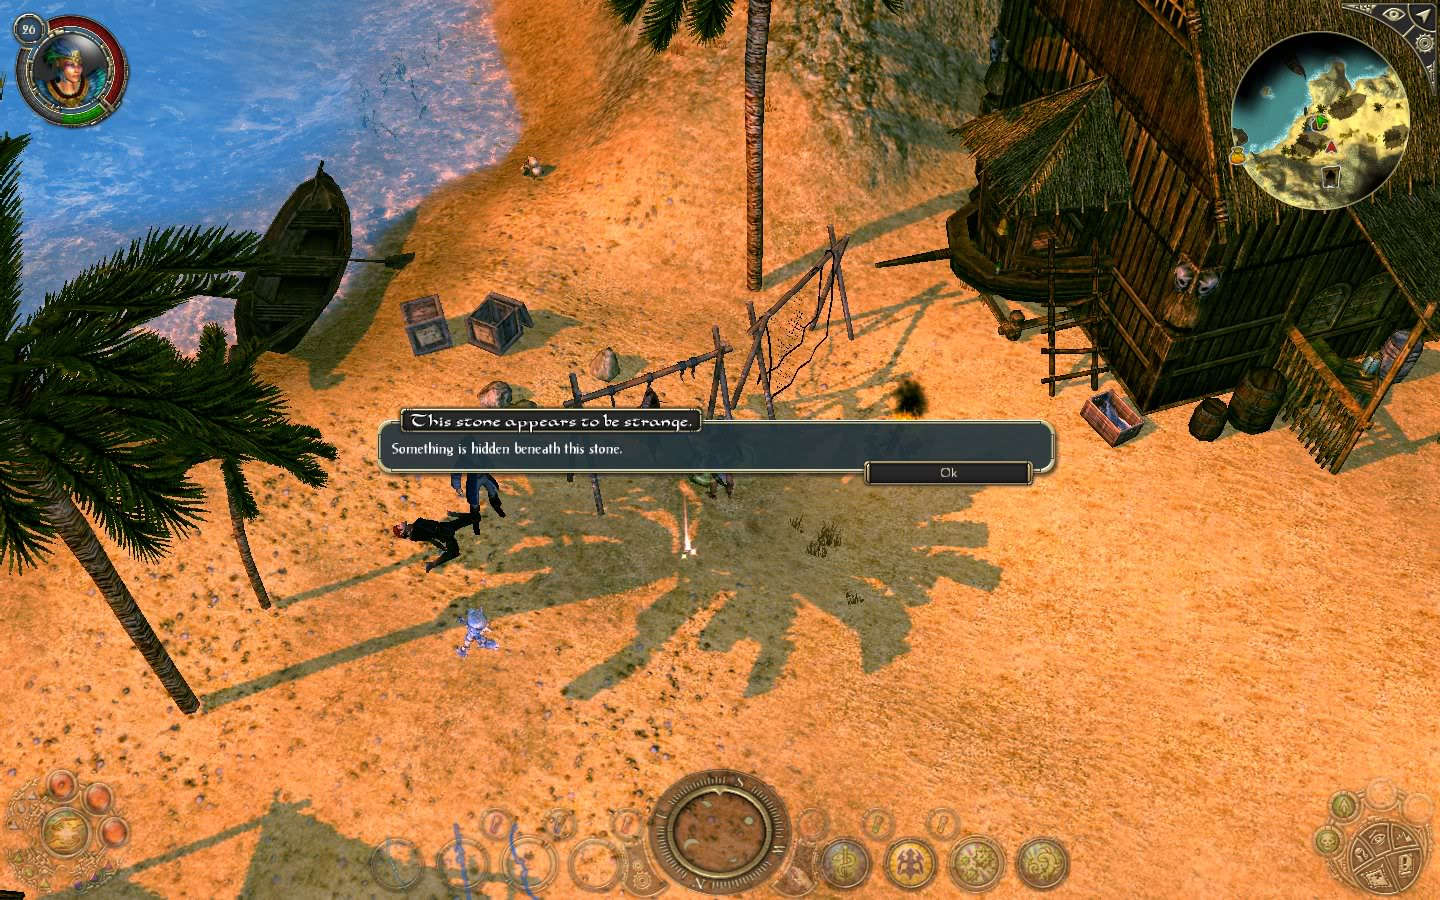
You will see a fish roasting on a fire. Underneath the fish, you'll see a small rock. Hover your mouse over the rock and you will see a message on the screen. Click on the rock and a key will appear. Collect the key. | You will see a fish roasting on a fire. Underneath the fish, you'll see a small rock. Hover your mouse over the rock and you will see a message on the screen. Click on the rock and a key will appear. Collect the key. | ||
| − | [http://www.sacredwiki.org/images/Sacred_2/quests/Legendary%20Pirate%20Treasure/treasure_start.jpg http://www.sacredwiki.org/images/Sacred_2/quests/Legendary%20Pirate%20Treasure/th_treasure_start.jpg] | + | {| |
| + | |align="left" style="margin-top: 0px;"|{{S2frame|[http://www.sacredwiki.org/images/Sacred_2/quests/Legendary%20Pirate%20Treasure/treasure_start.jpg http://www.sacredwiki.org/images/Sacred_2/quests/Legendary%20Pirate%20Treasure/th_treasure_start.jpg]}} {{S2frame|[http://www.sacredwiki.org/images/Sacred_2/quests/Legendary%20Pirate%20Treasure/treasure_start1.jpg http://www.sacredwiki.org/images/Sacred_2/quests/Legendary%20Pirate%20Treasure/th_treasure_start1.jpg]}} | ||
| + | |} | ||
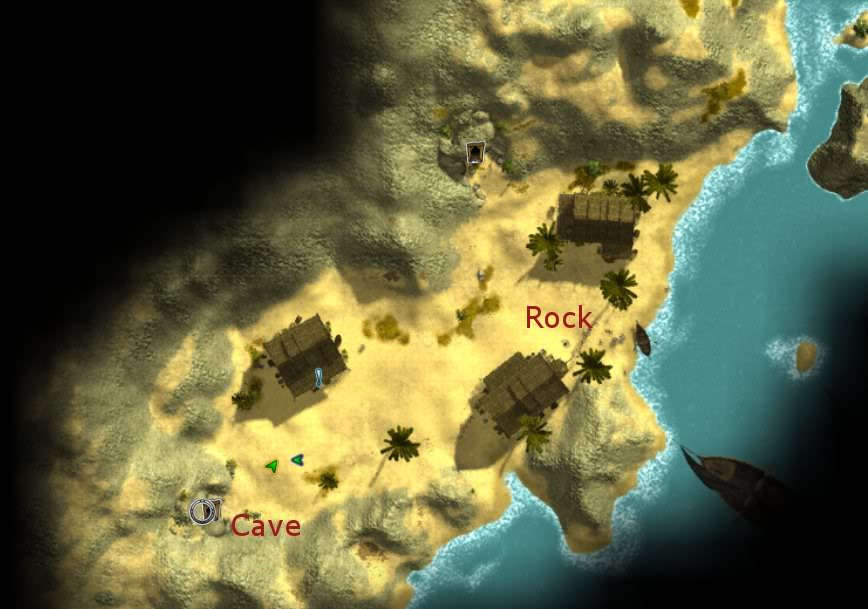
Now then... There's two ways to continue - only ONE way is the right way. Whatever you do, '''''DO NOT''''' go back through the cave entrance you just came out of. There is another entrance to the west - check your mini map. If you go back the way you came, you will not hit a quest marker and you will not have your quest completed. At least, not until you hit that marker first! | Now then... There's two ways to continue - only ONE way is the right way. Whatever you do, '''''DO NOT''''' go back through the cave entrance you just came out of. There is another entrance to the west - check your mini map. If you go back the way you came, you will not hit a quest marker and you will not have your quest completed. At least, not until you hit that marker first! | ||
| − | [http://www.sacredwiki.org/images/Sacred_2/quests/Legendary%20Pirate%20Treasure/treasure_map1.jpg http://www.sacredwiki.org/images/Sacred_2/quests/Legendary%20Pirate%20Treasure/th_treasure_map1.jpg] | + | {| |
| + | |align="left" style="margin-top: 0px;"|{{S2frame|[http://www.sacredwiki.org/images/Sacred_2/quests/Legendary%20Pirate%20Treasure/treasure_map1.jpg http://www.sacredwiki.org/images/Sacred_2/quests/Legendary%20Pirate%20Treasure/th_treasure_map1.jpg]}} | ||
| + | |} | ||
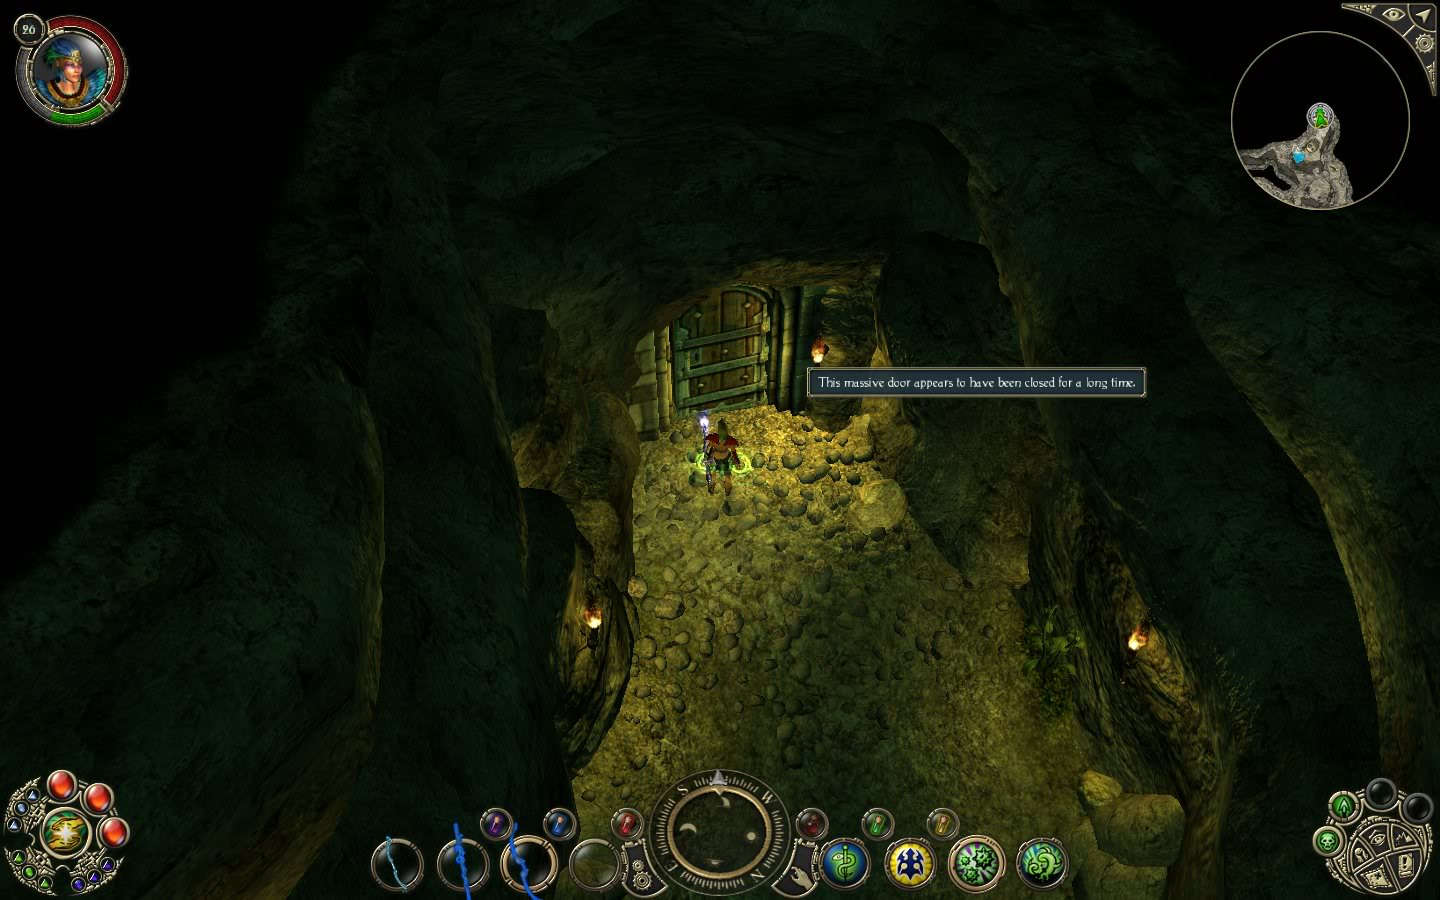
Follow the cave to the location marked on the map where Captain Bloodtongue is located, and talk to him. Kill him and collect whatever he dropped. Keep going in the cave and you will find a door that says that it looks like it hasn't been open in a very long time. Click on it and go in. This is your next quest marker. You will now find yourself in a very large cavern with a harbor in it. If you look down, you'll see a pirate ship. The treasure is not on board. | Follow the cave to the location marked on the map where Captain Bloodtongue is located, and talk to him. Kill him and collect whatever he dropped. Keep going in the cave and you will find a door that says that it looks like it hasn't been open in a very long time. Click on it and go in. This is your next quest marker. You will now find yourself in a very large cavern with a harbor in it. If you look down, you'll see a pirate ship. The treasure is not on board. | ||
| − | [http://www.sacredwiki.org/images/Sacred_2/quests/Legendary%20Pirate%20Treasure/treasure_map2.jpg http://www.sacredwiki.org/images/Sacred_2/quests/Legendary%20Pirate%20Treasure/th_treasure_map2.jpg] | + | {| |
| + | |align="left" style="margin-top: 0px;"|{{S2frame|[http://www.sacredwiki.org/images/Sacred_2/quests/Legendary%20Pirate%20Treasure/treasure_map2.jpg http://www.sacredwiki.org/images/Sacred_2/quests/Legendary%20Pirate%20Treasure/th_treasure_map2.jpg]}} {{S2frame|[http://www.sacredwiki.org/images/Sacred_2/quests/Legendary%20Pirate%20Treasure/door.jpg http://www.sacredwiki.org/images/Sacred_2/quests/Legendary%20Pirate%20Treasure/th_door.jpg]}} | ||
| + | |} | ||
| − | Make your way around the harbor by going north. Kill off any pirates and giant bats. You will see another door on the side of the cavern wall. Click on it and go inside. When you get there, you | + | Make your way around the harbor by going north. Kill off any pirates and giant bats. You will see another door on the side of the cavern wall. Click on it and go inside. When you get there, enter the middle of the room and head to the back until you get a Quest Complete message and the screen flash. You should also get a message pop up and say that "I'm in the pirate's treasure chamber!" You will find a pirate captain and four of his henchmen. Kill them and loot the chamber at will. Quest Complete! |
| − | [http://www.sacredwiki.org/images/Sacred_2/quests/Legendary%20Pirate%20Treasure/treasure_complete.jpg http://www.sacredwiki.org/images/Sacred_2/quests/Legendary%20Pirate%20Treasure/th_treasure_complete.jpg] | + | {| |
| + | |align="left" style="margin-top: 0px;"|{{S2frame|[http://www.sacredwiki.org/images/Sacred_2/quests/Legendary%20Pirate%20Treasure/treasure_complete.jpg http://www.sacredwiki.org/images/Sacred_2/quests/Legendary%20Pirate%20Treasure/th_treasure_complete.jpg]}} | ||
| + | |} | ||
| + | == Logbook Entry == | ||
| + | {{S2frame|[[Image:Treasure log.jpg|300px]]|left}} | ||
| + | <br clear="both" /> | ||
| − | + | I found four piles of skulls arranged in the form of a square on the beach. If the corners are connected it forms a cross. I found a stone at the point of intersection. An old key was located beneath the stone which as adorned with a skull and engraved with tiny runes. The runes were difficult to decipher, but I figured it out and they specify the location of a cave. How convenient! | |
| − | |||
| + | I found a large cave with a small landing for boats. It would appear that no one has entered this cave in years. I wonder if there is still pirate treasure here! | ||
| + | I found the treasure chamber. | ||
== Notes == | == Notes == | ||
* Dryads can skip the initial first cave by walking up to the mountain and activating Forest Flight | * Dryads can skip the initial first cave by walking up to the mountain and activating Forest Flight | ||
| − | * It's generally easiest to do this quest while doing the Captain Bloodtongue | + | * It's generally easiest to do this quest while doing the [[Sacred 2:Captain Bloodtongue|Captain Bloodtongue]] chain quest. |
| − | |||
| − | |||
</div> | </div> | ||
[[Category:Sacred 2 Side Quest|{{SUBPAGENAME}}]] | [[Category:Sacred 2 Side Quest|{{SUBPAGENAME}}]] | ||
[[Category:Sacred 2 Quest|{{SUBPAGENAME}}]] | [[Category:Sacred 2 Quest|{{SUBPAGENAME}}]] | ||
| + | [[Category: Sacred 2 Easter Eggs|L]] | ||
| + | [[Category:Sacred 2 Tyr Lysia Quest|{{PAGENAME}}]] | ||
Latest revision as of 21:49, 21 December 2011
|
| ||||||||||


Quick Walkthrough
|
| |||||||||

Detailed Walkthrough
Travel to the Golden Coast by following the road for the Tutorial Hirelings quest. In the southwestern most corner of Tyr Lysia, you'll find a resurrection monolith and a small camp with a merchant. There are two high elves there with other quests - but that's another story. Head north and slighty west of the Resurrection Monolith and you should see a high elf that has a quest for you. He wants you to kill the kobolds running around in the canyon behind him. Just beyond him, there's a soldier standing on the side of the path with yet another quest. He wants you to go in and find one of his soldiers who is hiding in the cave. Take this quest, go in, find the soldier who is keeping an eye on the pirates. Go back out, talk to the first soldier and take on the 3rd part of that quest - to kill Captain Bloodtongue. Might as well kill multiple birds with one shot.
| |||||||||
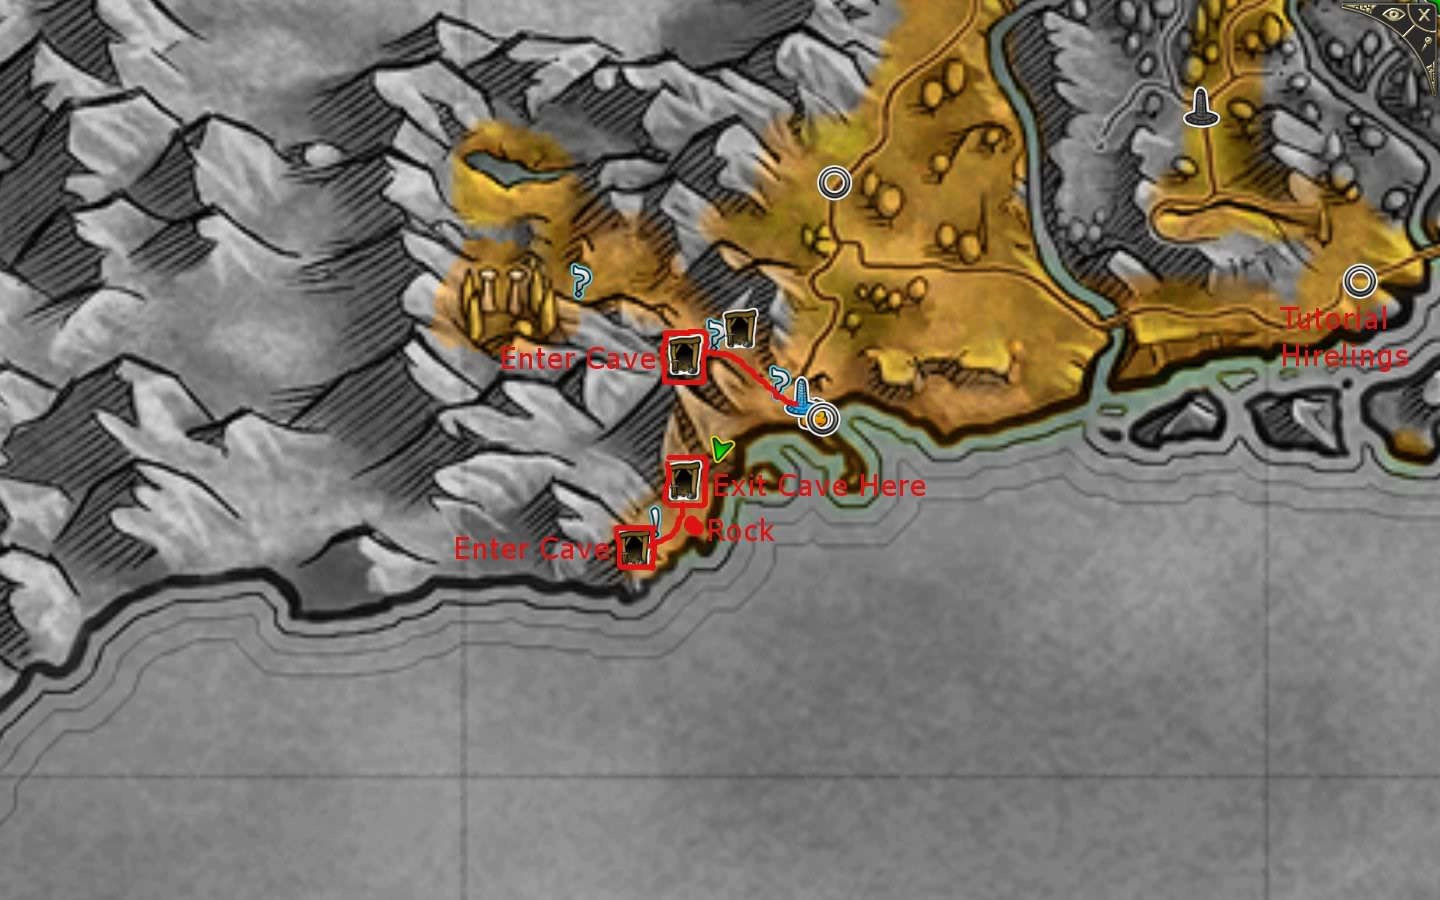
Go past the hiding soldier and you'll find yourself in a cave with a green mist hugging the floor and a bunch of small earth elementals. There is also an exit to the surface that's located at the bottom of the following picture. Go outside and down toward the beach.
| |||||||||
You will see a fish roasting on a fire. Underneath the fish, you'll see a small rock. Hover your mouse over the rock and you will see a message on the screen. Click on the rock and a key will appear. Collect the key.
| ||||||||||||||||||

Now then... There's two ways to continue - only ONE way is the right way. Whatever you do, DO NOT go back through the cave entrance you just came out of. There is another entrance to the west - check your mini map. If you go back the way you came, you will not hit a quest marker and you will not have your quest completed. At least, not until you hit that marker first!
| |||||||||
Follow the cave to the location marked on the map where Captain Bloodtongue is located, and talk to him. Kill him and collect whatever he dropped. Keep going in the cave and you will find a door that says that it looks like it hasn't been open in a very long time. Click on it and go in. This is your next quest marker. You will now find yourself in a very large cavern with a harbor in it. If you look down, you'll see a pirate ship. The treasure is not on board.
| ||||||||||||||||||

Make your way around the harbor by going north. Kill off any pirates and giant bats. You will see another door on the side of the cavern wall. Click on it and go inside. When you get there, enter the middle of the room and head to the back until you get a Quest Complete message and the screen flash. You should also get a message pop up and say that "I'm in the pirate's treasure chamber!" You will find a pirate captain and four of his henchmen. Kill them and loot the chamber at will. Quest Complete!
| |||||||||

Logbook Entry
|
| ||
 |
||
I found four piles of skulls arranged in the form of a square on the beach. If the corners are connected it forms a cross. I found a stone at the point of intersection. An old key was located beneath the stone which as adorned with a skull and engraved with tiny runes. The runes were difficult to decipher, but I figured it out and they specify the location of a cave. How convenient!
I found a large cave with a small landing for boats. It would appear that no one has entered this cave in years. I wonder if there is still pirate treasure here!
I found the treasure chamber.
Notes
- Dryads can skip the initial first cave by walking up to the mountain and activating Forest Flight
- It's generally easiest to do this quest while doing the Captain Bloodtongue chain quest.